Articles by Chuck Price — Page 11

Class B RV Floor Plans in 2026: Best Layouts, Rear Bath, Wet Bath vs Dry Bath

Class B RV Floor Plans in 2026: Best Layouts, Rear Bath, Wet Bath vs Dry Bath


A practical guide to rear bath, twin-bed, rear-lounge, front-lounge, and gear-garage layouts using current 2026 model examples.

Last updated: May 23, 2026 | Read time: 11 minutes

TL;DR

  • Must-know: The best Class B floor plan is usually a bed-and-bath screening decision first, not a brand decision.
  • Trip killers: Based on owner feedback and field testing, the top frustration sources are tiny wet baths, nightly bed conversion, and weak storage access.
  • Best for: Twin beds suit couples with different sleep schedules. Rear lounges suit travelers who prioritize daytime seating. Raised rear beds suit gear-heavy trips. Front lounges suit remote work and longer stays.
  • Confirm before you go: Model-year specs, MSRP, bed dimensions, and exact bath layout can change during the year. Verify the current floorplan page before you buy.

Class B Floor Plan Decision Matrix

Use this matrix to match your travel style to a layout pattern that reduces daily friction. This matrix covers layout fit only. It does not evaluate budget, payload capacity, off-grid systems, tank sizes, drivetrain, or accessibility needs. Those factors matter and should be evaluated separately.

Class B floor plan recommendations by traveler type
Traveler Type Recommended Layout Best Use Case Watch-Outs
Solo traveler Rear lounge or twin-bed layout Flexible daily living and easier storage Can feel tight if carrying bikes or large gear
Couple Twin beds or convertible rear lounge Better sleeping flexibility and usable daytime space Convertible beds require setup every night
Couple plus occasional guest Front lounge plus convertible rear bed Works for rare guests without upsizing Do not buy based on guest use alone
Full-timers Fixed bed or easy-convert twin layout Less daily setup and better routine Storage and tank capacity matter more than looks
Weekenders Open lounge or flexible convertible layout Short trips and casual use May lack long-trip storage

Best Class B layout for solo travelers

Solo travelers usually get the most flexibility from a rear lounge or a twin-bed layout where one bed doubles as a work surface during the day. The key advantage is not needing to coordinate space with a second person. A convertible rear lounge creates zero friction because the only person affected by nightly conversion is you. If you carry bulky gear, a raised rear bed with a garage underneath is also worth testing.

Best Class B layout for couples

For couples, the twin-bed layout with a rear wet bath remains the most practical starting point. It lets both people get up, use the bathroom, and start mornings without climbing over each other. A convertible rear lounge works too if daytime seating matters more than sleep convenience, but expect a short reset routine every night. Either way, test the morning routine in person before you sign anything.

The best Class B RV floor plan in 2026 depends less on brand and more on where you want the bed, bath, and storage. Current lineups from Winnebago, Airstream, Jayco, Pleasure-Way, and Roadtrek still cluster around four practical layouts, and each solves a different travel problem.

Purpose: This guide compares the most common Class B RV floor plans, shows real 2026 examples, and explains which layouts make the most sense for couples, solo travelers, remote workers, and boondockers.

Model-year note: Manufacturer pages can change during the year. Where pricing or layouts are mentioned below, check the linked factory page again before you sign anything.

Chuck Price has spent 35+ years camping and traveling by RV, including full-time travel in a Class B motorhome. He writes Boondock or Bust from a practical buyer’s point of view, with a strong bias toward real-world livability over showroom hype.

Start with the three things you use every day

The smartest way to compare Class B floor plans is to rank your daily friction points first. In 2026, official model pages from Winnebago, Airstream, Jayco, Pleasure-Way, and Roadtrek still show the same core trade-off: the more room you give to the bed, bath, or garage, the less flexible the rest of the van becomes. That matters most for couples, longer trips, and off-grid travel where bad layout choices show up fast.

Before you compare brands, answer these three questions:

  1. Do you want to make the bed every night, or leave it ready?
  2. Do you want the bathroom to be as small as possible, or more usable?
  3. Do you need interior cargo access for bikes, boards, tools, dog crates, or bulky camp gear?

Decision path for choosing the right Class B RV floor plan

If you want more broad Class B context before choosing a layout, start with the Boondock or Bust Class B RV hub and then compare this page against the site’s 2026 Class B model analysis.

Four layout patterns that dominate 2026 Class B vans

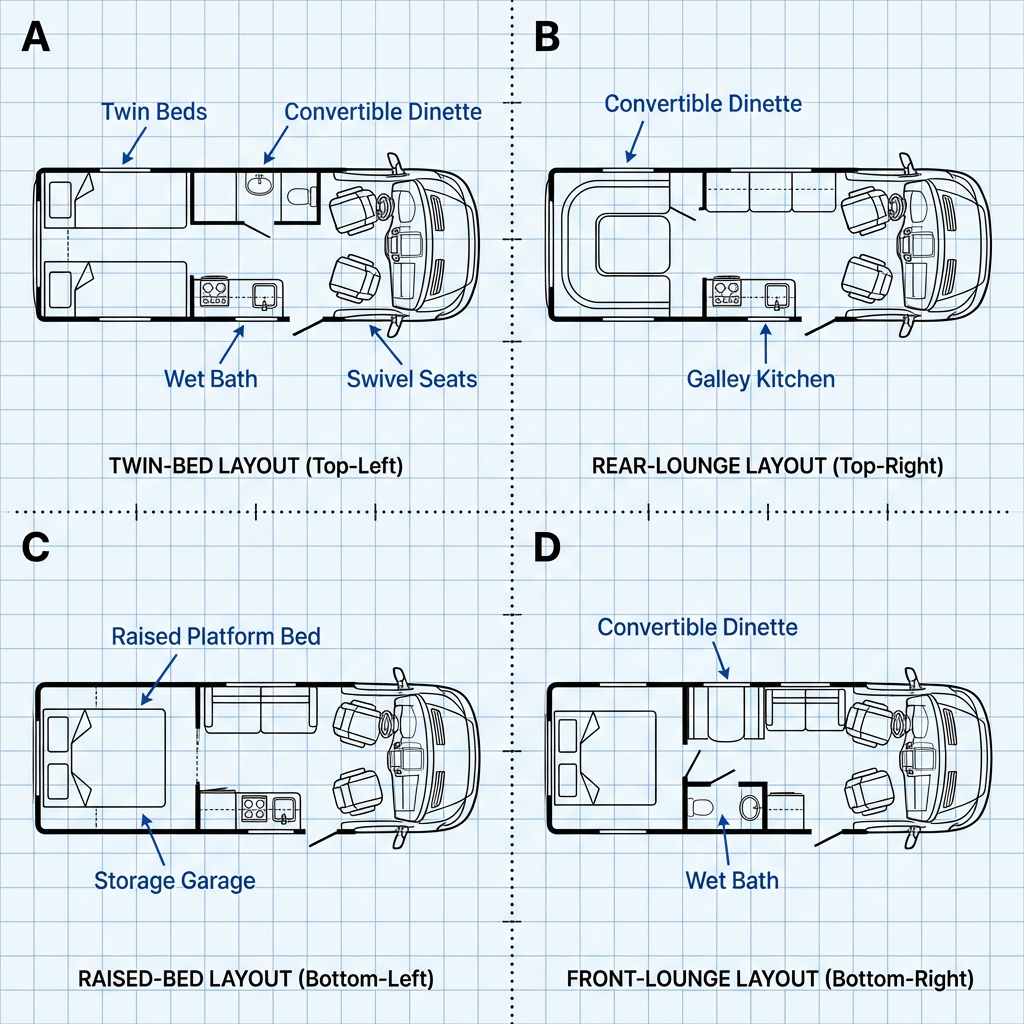
Based on a review of current model-year product pages from Winnebago, Airstream, Jayco, Pleasure-Way, and Roadtrek (all accessed May 2026), most true Class B vans still group into four practical patterns: twin beds with a rear wet bath, rear lounge that converts into a bed, fixed or raised rear bed with storage below, and front lounge plus rear sleeping arrangement. Search terms like “front bed” or “front lounge” usually map into these same four categories rather than adding a fifth pattern. The exact cabinetry changes by brand, but the daily use case usually stays the same.

Comparison table: the main 2026 Class B floor plan patterns
Layout pattern How it usually works Best use case 2026 model examples Main trade-off
Twin beds + rear wet bath Two singles often convert to one larger bed. Bathroom stays at the rear. Couples who want aisle access and less nightly conflict. Winnebago Travato 59K, Jayco Swift 20T, Roadtrek Play Less open daytime seating than a rear lounge.
Rear lounge converts to bed The back of the van is your social zone by day and sleeping zone by night. Travelers who value hanging out inside more than keeping a bed made. Airstream Interstate 19GT, Pleasure-Way Plateau FL You reset the rear of the van every night unless you leave it in bed mode.
Fixed or raised rear bed A permanent rear sleep zone sits over storage or a gear area. Boondockers, gear-haulers, and buyers who hate bed conversion. Pleasure-Way Plateau XLRB, Winnebago Revel 44E Less flexible seating space inside the van.
Front lounge + rear sleep zone The front of the van becomes a second work or dining area while the bed stays toward the rear. Remote workers and longer-stay travelers who want two usable zones. Pleasure-Way Plateau FL, Pleasure-Way Plateau RB Usually costs more and often pushes you into a longer chassis.

Annotated 2026 Class B floor plan grid comparing twin-bed, rear-lounge, raised-bed, and front-lounge layouts

2026 model examples worth studying before you tour a van

Model examples matter because floor plan labels are not standardized. One brand’s “rear bath” coach can feel open and usable, while another feels cramped even at a similar length. The 2026 pages below are useful because each shows a clear version of a common Class B layout. Use them as layout references first. Then decide which brand details you care about.

Layout descriptions below are based on manufacturer product pages accessed May 2026. Floorplans, bed sizes, and configurations can change during the model year. Verify on the linked factory page before you buy.

2026 model examples and manufacturer-listed layout cue
Model Length Manufacturer-listed layout cue Best fit
Winnebago Travato 59K 21′ Twin beds convert to a queen with a rear wet bath. Couples who want simple sleeping access in a shorter van.
Jayco Swift 20T 20′ 11″ Kitchen up front, twin beds that convert to a king midship, rear wet bath. Buyers who want a familiar, efficient couple’s layout.
Airstream Interstate 19GT 19′ Compact rear lounge and sleeping space inside a 19-foot footprint. Travelers who care about compact size and polished road-trip comfort.
Pleasure-Way Plateau FL 22′ 9″ Front lounge and workstation plus rear power sofa that becomes twins or a queen. Remote workers and travelers who want two separate hangout zones.
Pleasure-Way Ontour 2.2 AWD 21′ 10″ Dedicated bathroom compartment and queen-sized bed in a longer AWD package. Buyers who want more bathroom comfort without going to a bigger coach class.
Roadtrek Play 20′ 9″ Open-concept center aisle, wet bath with marine toilet, and twin beds that convert to a king. Travelers who want more open walk-through space and accessible storage.
Winnebago Revel 44E 19′ 7″ Power lift bed over a gear garage with a wet bath and flexible galley. Boondockers and buyers hauling bikes, boards, or outdoor gear.

If off-grid use is high on your list, compare this page with Boondock or Bust’s best Class B RVs for boondocking in 2026 guide. Floor plan only solves part of the problem. Battery, water, heating, and storage matter just as much once you stop plugging in every night.

Bed placement and bath position change your daily routine

The biggest buying mistake is thinking a floor plan is just a sleep decision. It is really a movement decision. In a camper van, bed position affects how you dress, cook, work, use the bathroom, load gear, and move around each other. In 2026 examples, rear baths and fixed rear beds usually make the van feel more segmented, while rear lounges and center-aisle designs keep the interior more open but add more nightly setup friction.

Rear bath Class B RV layouts

A rear bath layout puts the bathroom at the very back of the van, which creates a natural separation between living space and bathroom. This usually means more privacy and a more finished feel when you close the bathroom door. The trade-off is that a larger rear bathroom steals square footage from the lounge, cargo area, or sleeping setup. In shorter vans under 21 feet, a rear bath can force tight compromises in the galley or bed zone. This section does not cover cassette-toilet or portable-toilet alternatives, which fall outside standard factory floor plans.

Twin bed Class B RV layouts

Choose twin beds when:

  • Two people wake up at different times.
  • You want aisle access without climbing over each other.
  • You care more about sleep convenience than daytime entertaining space.

Rear lounge Class B RV layouts

Choose a rear lounge when:

  • You spend a lot of time hanging out inside the van during the day.
  • You want the back of the van to feel more social than bedroom-like.
  • You can live with converting the lounge into a bed most nights.

Choose a raised rear bed when:

  • You carry bulky gear inside the van.
  • You want little or no nightly bed conversion.
  • You can accept less open living space in exchange for cargo utility.

Choose a front lounge layout when:

  • You work from the road or want a second seating zone.
  • You expect to leave the rear bed made during parts of the trip.
  • You are comfortable paying more for a longer, more specialized layout.
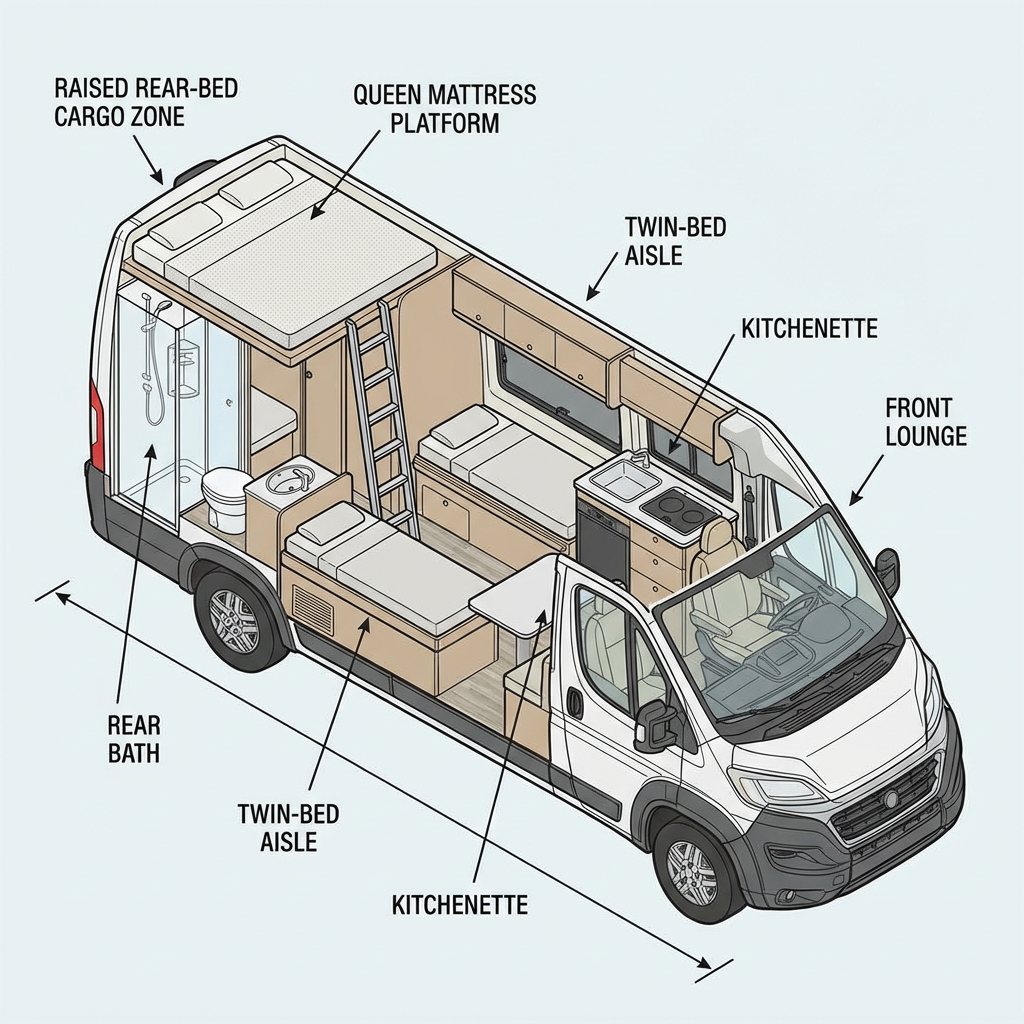
labeled interior diagram showing rear bath, front lounge, twin-bed aisle, and raised rear-bed cargo zone for class B camper Van

Wet bath vs dry bath in a Class B van

Wet bath vs dry bath in a Class B RV

Bathroom language gets confusing fast, so keep it simple. Winnebago’s bathroom guide defines a wet bath as one space used for both the shower and toilet, which means the whole compartment gets wet after showering. Pleasure-Way’s floorplan guide frames the same trade-off another way: wet baths save space, while dry baths keep the toilet area separate but take more room. In compact Class B vans, wet baths remain the most common factory configuration because every square foot has to do more than one job.

Wet bath vs dry bath for camper-van buyers
Bathroom type What you gain What you give up Who it usually suits
Wet bath Smaller footprint. More room for lounge, galley, or storage elsewhere. You wipe down more surfaces after showering. Less residential feel. Most Class B buyers, especially in 19- to 21-foot vans.
Dry bath Separate shower area. Easier to keep toilet and vanity dry. Takes more space, which often pushes you into a larger or more expensive coach. Buyers who shower inside often and care more about comfort than compactness.

Winnebago’s RV bathroom guide uses the rear wet bath in the Travato as a clear example of the compact camper-van approach, while Airstream’s Atlas bathroom guide (published 2021, referencing the now-discontinued Atlas) explains what a true dry bath looks like in a larger touring coach. Those two examples are useful because they show the basic truth: the more separated your bathroom becomes, the more floor plan budget it consumes. This comparison does not cover composting toilet conversions or external shower-only setups.

If a roomy, separate shower is non-negotiable, stop pretending you will “get used to” a tiny wet bath. That is usually the sign to compare larger touring coaches or even Class C options instead of forcing the wrong van to fit the wrong job.

What “front bed” usually means in Class B search results

A lot of buyers search for a front bed floor plan, but in true Class B vans that phrase usually points to one of two things: a front lounge or workstation combined with a rear sleeping setup, or a lounge configuration that converts into part of the bed at night. Current 2026 product pages from Pleasure-Way show the cleaner version of this idea. The Plateau FL uses the swivel captain’s chairs to create a front lounge and workstation while keeping the main sleep surface toward the rear.

That is why it is smarter to shop by bed behavior instead of by the search phrase. Ask:

  • Is the bed fixed, raised, power-deployed, or fully converted from seating?
  • Can one person stay in bed while the other uses the galley or bathroom?
  • Can you leave one zone in daytime mode and another in sleep mode?

If you are also weighing age, resale, or used inventory, cross-check this page with the site’s used Class B buying guide before narrowing your shortlist.

FAQ

Is a rear bath better in a Class B RV?

A rear bath is usually better if privacy and a clearer bedroom-to-bathroom split matter to you. It can make the back of the van feel more finished. The trade-off is that a bigger rear bathroom usually steals space from the lounge, cargo area, or sleeping setup somewhere else.

What do buyers mean by a front bed or front lounge layout?

In true Class B vans, buyers often say front bed when they really mean a front lounge or front workstation paired with a rear bed arrangement. A fixed front bed is uncommon. Most 2026 camper vans still keep the primary sleep surface in the middle or rear of the coach.

Is a wet bath or dry bath better in a camper van?

A wet bath is better if you want to preserve living space in a compact van. A dry bath is better if you shower inside often and hate wiping down the toilet area afterward. In the Class B segment, wet baths are still much more common because space is so tight.

Are twin beds better than a rear lounge that converts into a bed?

Twin beds are better for couples who sleep differently, want aisle access, or do not want a nightly conversion routine. A rear lounge is better if you want more comfortable daytime seating and only need the bed at night. Neither is better in the abstract. It depends on your routine.

What is the most practical Class B RV floor plan for two people?

For many couples, the most practical layout is still twin beds or a rear power sofa that can stay in bed mode once camp is set. That usually creates less daily friction than a social rear lounge layout while still fitting inside a normal camper-van footprint.

Which 2026 Class B floor plans work best for boondocking?

For boondocking, layouts with better storage access and less furniture conversion usually age better. Raised rear beds, center aisles, and gear-garage designs tend to make more sense once you add leveling blocks, hoses, camp chairs, tools, and cold-weather gear to the daily routine.

The simplest way to choose the right Class B floor plan

Ignore brand first. Test the floor plan first. On your next dealer visit or RV show stop, do four quick checks in this order:

  1. Bed test: Lie down the way you actually sleep. Check nighttime access to the bathroom.
  2. Bath test: Close the door, turn around, and mimic drying off after a shower.
  3. Morning test: Picture one person making coffee while the other stays seated or in bed.
  4. Storage test: Decide where hoses, cords, chairs, shoes, bedding, and dirty gear will really go.

That process will eliminate more bad options than any brochure. After that, compare reliability, boondocking systems, and price. If you want a broader cost-and-feature lens, the site’s RV comfort upgrades guide is also worth reading before you pay for a layout fix you could have solved at purchase.

Pick the floor plan that makes ordinary mornings easier, not the one that looks best in a 30-second walkthrough.
Sources

  1. Airstream. “Class B RV Bathroom Guide: The Atlas Bathroom.” March 5, 2021. Accessed May 23, 2026. https://www.airstream.com/blog/class-b-rv-bathroom-guide-the-atlas-bathroom/
  2. Airstream. “Interstate 19GT.” Accessed May 23, 2026. https://www.airstream.com/touring-coaches/interstate-19gt/
  3. Jayco. “2026 Swift.” Accessed May 23, 2026. https://www.jayco.com/rvs/class-b-motorhomes/2026-swift/
  4. Jayco. “2026 Swift 20T Floorplan.” Accessed May 23, 2026. https://www.jayco.com/rvs/class-b-motorhomes/2026-swift/20t/
  5. Pleasure-Way. “2026 Ontour 2.2 AWD.” Accessed May 23, 2026. https://pleasureway.com/models/ontour22_2026/
  6. Pleasure-Way. “2026 Plateau FL.” Accessed May 23, 2026. https://pleasureway.com/models/plateau-fl-2026/
  7. Pleasure-Way. “2026 Plateau RB.” Accessed May 23, 2026. https://pleasureway.com/models/2026-plateau-rb/
  8. Pleasure-Way. “2026 Plateau XLRB.” Accessed May 23, 2026. https://pleasureway.com/models/2026-plateau-xlrb/
  9. Pleasure-Way. “Choosing a Floorplan.” Accessed May 23, 2026. https://pleasureway.com/choosing-a-floor-plan/
  10. Roadtrek. “2026 Play.” Accessed May 23, 2026. https://roadtrek.com/models/2026-play/
  11. Winnebago. “Travato 59K Floorplan.” Accessed May 23, 2026. https://www.winnebago.com/models/product/motorhomes/camper-van/travato/2026-59k
  12. Winnebago. “Understanding RV Bathroom Types: 7 Winnebago Examples.” Accessed May 23, 2026. https://www.winnebago.com/lifestyle/winnebagolife/showroom/understanding-rv-bathroom-types-tour-7-options-from-winnebago
  13. Winnebago. “Winnebago Revel 44E.” Accessed May 23, 2026. https://www.winnebago.com/models/revel-series/revel/44e

Product specs, floor plans, pricing, and availability can change during the model year. Confirm current details with the manufacturer or dealer before you buy.

Boondock or Bust is an informational publisher. This page is intended to help you compare camper-van layouts before you tour or buy.

Boondockers Welcome Review: How It Works, Real Downsides, and Who Should Join

Boondockers Welcome Review: How It Works, Real Downsides, and Who Should Join


Updated for 2026

September 30, 2026 acquisition update: Choice Hotels agreed to acquire Harvest Hosts. Read our Choice Hotels and Harvest Hosts acquisition analysis for confirmed transaction details, member reactions, and unanswered questions about pricing and host terms.

Boondockers Welcome Review: How It Works, Real Downsides, and Who Should Join

If you want longer private-property RV stays instead of one-night winery stops, Boondockers Welcome can still be one of the better values in the RV membership world. It is not free camping in the traditional public-land sense, though, and it may not be suitable for every rig or travel style.

Review updated: April 14, 2026 | Harvest Hosts bundle offer verified: September 29, 2026
Best for: Self-contained RVers who want private-property overnight stays, flexible routing, and a stronger community feel than a standard campground stop.

TL;DR

  • Boondockers Welcome is a paid RV membership that provides access to over 3,500 private-property host locations across the U.S. and Canada.[1]
  • As of April 14, 2026, the standalone guest membership is $79 per year, and hosts cannot charge for parking itself, though some may charge small fees for hookups, including electricity or water, or for extra nights.[4][8][9]
  • It works best for self-contained RVers who plan, read host rules carefully, and want one-to-five-night stays, with a general system cap of up to five nights per host within a 90-day window.[14]
  • The biggest regrets usually come from joining with the wrong expectations, especially if you want public-land boondocking, instant booking, or you travel in a rig that does not meet the self-contained rules.

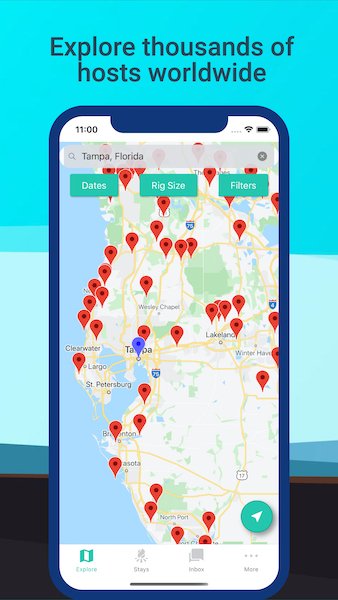
Boondockers Welcome mobile app screen showing host search and stay planning tools

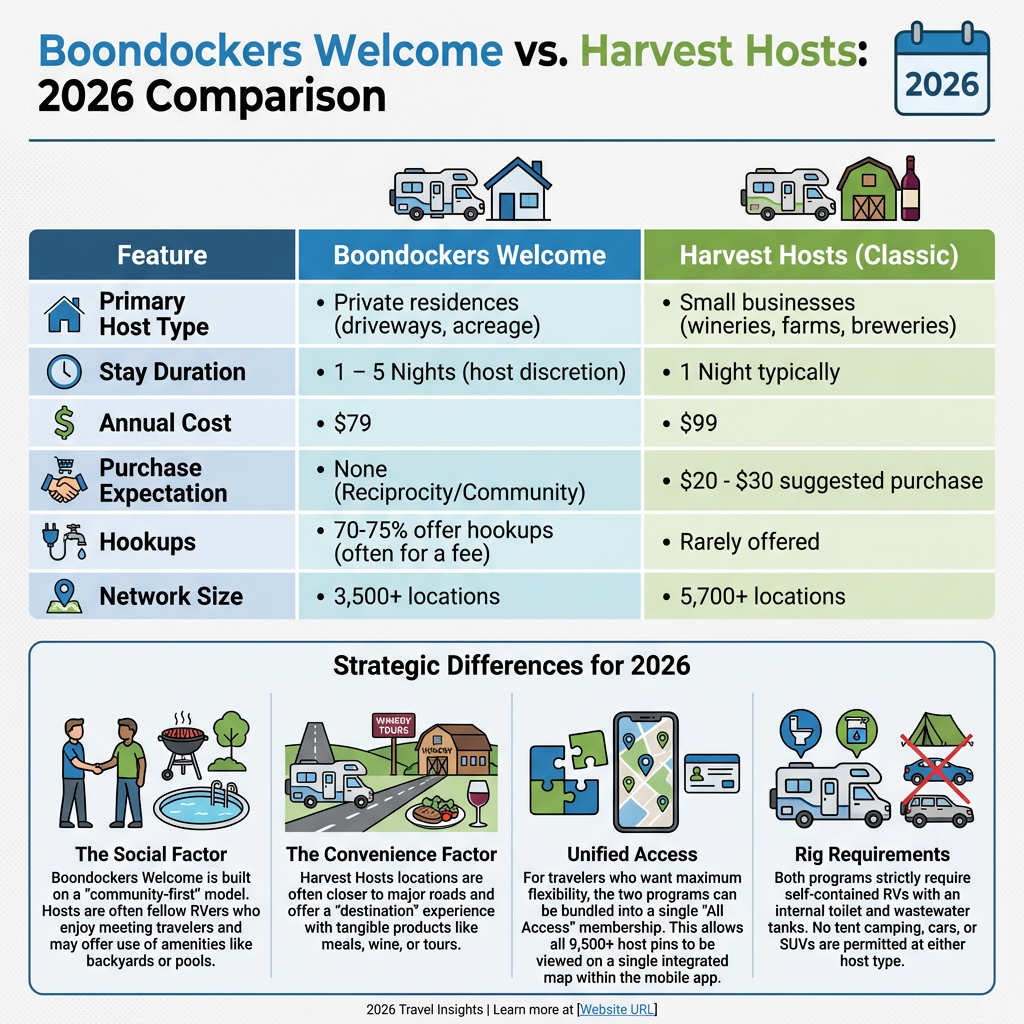
Quick reality check: Boondockers Welcome is now part of the broader Harvest Hosts ecosystem, but it still serves a different use case. Harvest Hosts leans toward one-night stays at businesses. Boondockers Welcome leans toward private residences, more flexible stays, and a community-first model.[1][15]

What Boondockers Welcome is in 2026

Boondockers Welcome is a membership program for self-contained RVers who want overnight stays on private property. As of April 2026, the official support materials describe it as a separate membership plan from Harvest Hosts with more than 3,500 locations, and they say over 75% of hosts offer some form of hookups.[1] That matters because this is not dispersed camping, and it is not a campground chain. You are requesting permission to stay with a host who sets their own property rules, arrival preferences, rig limits, and stay length.

That distinction is why some RVers love it and others bounce off it. If you like the idea of staying in driveways, side yards, acreage, or rural properties with real people, this can be a strong fit. If you want a predictable campground experience with bathhouses, pull-through pads, and no social component, this is probably not your lane.

How Boondockers Welcome works

The basic process is simple. You buy a membership, create your guest profile, search the map or route planner, check a host’s rules and availability, then send a stay request. Harvest Hosts support says same-day requests are possible at hosts who allow them, but the company generally recommends allowing 24 to 48 hours for a host response.[2][3]

Step by step

  1. Join. As of April 14, 2026, the current standalone Boondockers Welcome guest membership is $79 per year.[4]
  2. Build a useful profile. Include rig type, total length, pets, towing setup, and anything else a host will want to know before approving a stay.
  3. Search smart. Filter for dates, hookups, extra nights, and sometimes same-day availability.[5][6]
  4. Read the listing. Check rig limits, parking surface, generator rules, arrival windows, pet rules, and whether hookups cost extra.
  5. Request the stay. This is not instant booking. The host approves or declines.
  6. Show up like a decent human. Communicate clearly, follow property rules, and cancel with at least 24 hours’ notice if your plans change.[7]

What it costs and what is actually free

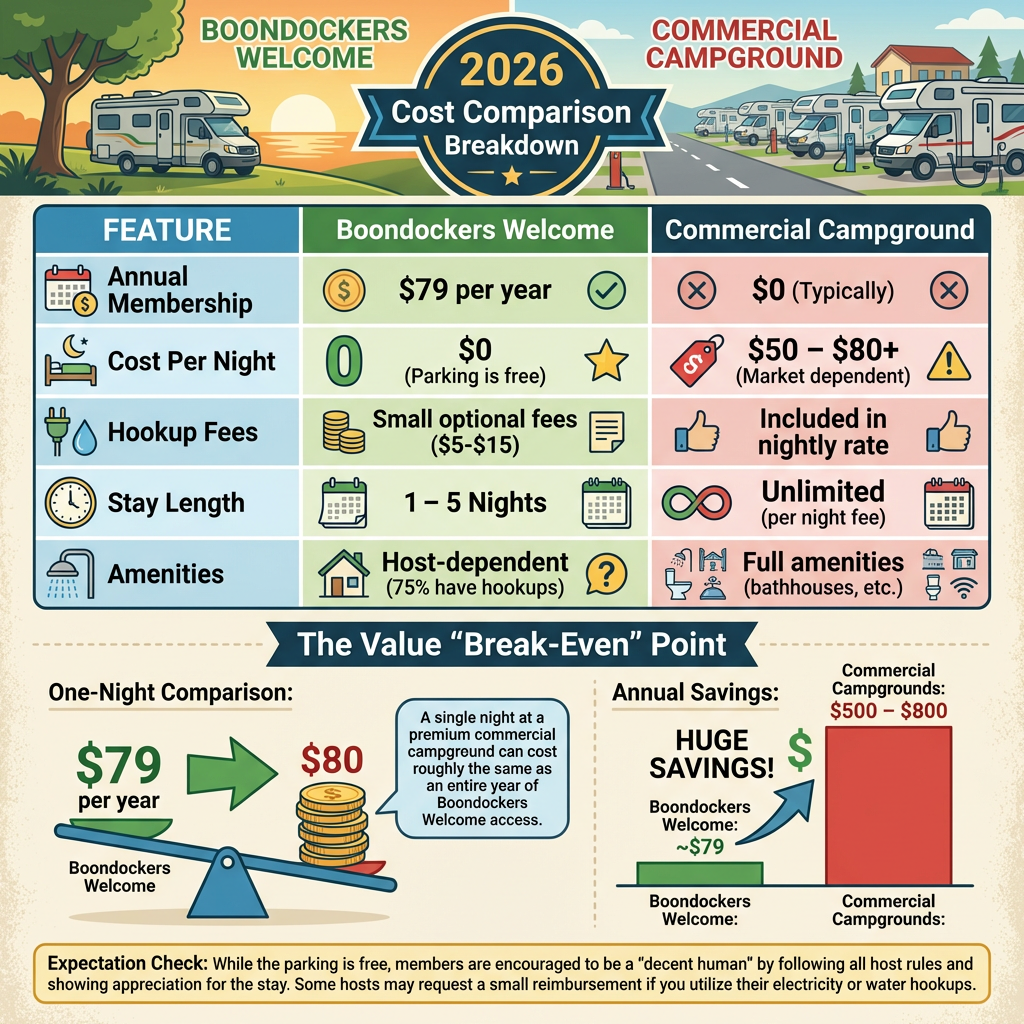
The membership is paid. The parking is typically free. That difference trips people up. As of April 14, 2026, the current standalone guest membership is $79 per year.[4] As a rough illustration, if campground overnight rates on your routes run about $40 to $60 per night, one or two successful stays could recover the annual fee. Actual savings depend on where you travel, whether you would otherwise pay for a campground, and whether you choose hookups or extra nights.

Harvest Hosts support also says Boondockers Welcome hosts are not permitted to charge a parking fee. They can, however, charge small fees for things like electricity, water, or extra nights if those options are offered on the profile.[8][9] Verify current pricing and host terms before you purchase, because plan details and host options can change.[4]

There is also a refund policy angle worth knowing before you join. Harvest Hosts advertises a 3-month Happy Camper Guarantee, but support and terms pages add restrictions, including that refunds are not available if you have completed two or more overnight stays during that initial 90-day period.[10][11]

Table based on current official Boondockers Welcome and Harvest Hosts support pages, accessed April 14, 2026.
Attribute Boondockers Welcome Why it matters
Membership price $79 per year Low entry cost if you will use it more than once or twice.
Host network 3,500+ private-property hosts Good spread, but not the same density as public campgrounds.
Typical stay length One to five nights, host dependent Better than single-night-only models if you want to stop and breathe.
Hookups Offered by more than 75% of hosts A major reason many RVers choose it over rougher overnight options.
Parking fee Hosts cannot charge for parking Helpful for budgeting, but hookups or extra nights may still cost more.

Boondockers Welcome cost comparison graphic showing membership versus campground night pricing

Boondockers Welcome options: 20% off a Harvest Hosts bundle

Want both private-property stays and Harvest Hosts business locations? BOONDOCK20 gives new members 20% off any Harvest Hosts plan for the first year only, including Harvest Hosts + Boondockers Welcome ($135.20 instead of $169) and All Access ($143.20 instead of $179), as displayed September 29, 2026. The offer link applies the code automatically. Compare those bundles with the standalone Boondockers Welcome option before buying; the extra benefits only have value if you will use them. The bundle discount does not cover host charges or future renewals.

Compare Harvest Hosts + Boondockers Welcome bundles and save 20%

Affiliate disclosure: Boondock or Bust may earn a commission at no extra cost to you. Confirm the final price and renewal terms at checkout.

Who can use it and who cannot

Boondockers Welcome is for self-contained RVs. That is stricter than some people realize. Harvest Hosts support says the RV must have an interior toilet and built-in holding tanks or bladders for wastewater. Outdoor cooking is prohibited at host locations. Tents, cars, SUVs, and pickup trucks are not allowed as guest rigs, even if you have built them out to camp in.[12][13]

That means this membership is a better fit for motorhomes, travel trailers, truck campers, skoolies, teardrops that meet the rules, and other rigs that clearly qualify. If you are traveling in a lightly converted SUV or pickup and hoping this will function like casual stealth camping, save your money.

Best fit

  • You travel in a true self-contained RV.
  • You like private-property overnights and a community vibe.
  • You value extra nights more than tourist-business stays.
  • You are willing to request, communicate, and follow host-specific rules.

Poor fit

  • You want public-land boondocking, not hosted stays.
  • You expect instant booking every time.
  • You travel in a tent, car, SUV, or pickup setup that does not qualify.
  • You dislike the social or etiquette side of staying on someone else’s property.

The real pros

The biggest advantage is flexibility. Boondockers Welcome can give you a safer, quieter overnight than a random parking lot and often a more personal stay than a commercial campground. The multi-night angle is the real differentiator. Official support says Boondockers Welcome members can get stays of up to five days with a host, depending on host preferences, while the system also supports filters for extra nights and hookup availability.[14][6]

  • It can pay for itself fast if you use it a few times per year.
  • Many hosts offer hookups, which matters if you are not set up for hard-core off-grid living.
  • The community element is real. Many hosts are RVers themselves and can offer local knowledge you will never get from a check-in kiosk.
  • It can be easier on nerves than improvised overnight options when you are traveling through unfamiliar areas.

For a lot of RVers, the sweet spot is using Boondockers Welcome as a routing tool. It works especially well on long repositioning days when you want a quiet legal stop without paying campground rates. These advantages apply only when your rig qualifies, a host near your route accepts your request, and you are traveling in a corridor with adequate host density.

The real regrets and complaints to think through before you join

The real friction points come from mismatched expectations about how hosted RV stays actually work.

1. You still have to be accepted by a host

This is not a campground reservation engine. It is a request system. You can have a full membership and still not get the exact stop you wanted on the exact date you wanted if the host declines or does not respond fast enough.

2. Private-property stays are not the same as scenic boondocking

Some RVers join because they picture quiet acreage with a view every time. Sometimes you get that. Sometimes you are parked beside a driveway, behind a house, or in a functional stopover spot. The product is about legal hosted stays, not guaranteed scenery.

3. Costs can creep in around hookups and longer stays

Parking is not supposed to cost money, but your total stop may not be zero if you use electric, water, or an extra-night option. That does not make it a bad deal. It just means the word free needs an asterisk.

4. It excludes some travel styles completely

If your rig does not meet the self-contained standard, this membership is done before it starts. That can be a hard no for people in minimalist van, SUV, or pickup setups.

5. Coverage is good, not universal

The network is large, but you still need a workable host near your route, with the right rig limit, pet policy, and arrival window. In some corridors, you will have choices. In others, you may not.

Boondockers Welcome vs. Harvest Hosts

The basic difference is simple. Harvest Hosts usually fit one-night stays at businesses. Boondockers Welcome usually fits private-property stays with more flexibility. Harvest Hosts support says Boondockers Welcome is the better choice if you want a homier atmosphere and stays that can extend up to five nights.[15]

Use this as a practical travel-style comparison, not a winner-loser chart.
Choose this when Boondockers Welcome Harvest Hosts
You want more than one night Stronger fit Usually weaker fit
You want business-based destination stays Weaker fit Stronger fit
You want more hookups Usually better odds Less consistent
You want community and local host interaction Usually stronger Varies by host business

If you want the deeper comparison, read our full Boondockers Welcome vs. Harvest Hosts breakdown. If you are leaning toward the business-host model instead, start with this Harvest Hosts review. You may also want to compare how this stacks up against broader membership options in our camping memberships guide.

Boondockers Welcome versus Harvest Hosts comparison chart for RV travelers

My take on whether Boondockers Welcome is worth it

For the right RVer, yes. The value case is pretty straightforward. As a rough example, if you would otherwise pay $40 to $60 for a private campground stop, one or two successful stays can cover most or all of the annual fee. The bigger question is not price. It is fit.

I think Boondockers Welcome is worth it when you want private-property stopovers, are comfortable with member-to-member etiquette, and travel in a fully self-contained RV. I think it is a bad fit when you want public-land solitude, instant booking certainty, or a campground-style amenity stack every night.

That is why this membership tends to perform best as one tool in a larger overnight strategy. Mix it with campgrounds, public-land options, and other route-planning tools, and it becomes much more useful than trying to force it to do every job.

Smarter ways to use it

  • Use it on transition days between bigger destination stops.
  • Prioritize hosts with clear reviews, realistic parking details, and response signals.
  • Filter for hookups first if you are not fully set up for dry camping.
  • Have a backup stop in mind if your first-choice host declines.
  • Read our guide to finding free legal camping if you are really after public-land style boondocking, because that is a different game.

Boondockers Welcome FAQ

How much is Boondockers Welcome in 2026?

The current standalone guest membership is $79 per year, according to Boondockers Welcome and Harvest Hosts support pages accessed on April 14, 2026.[4] Prices can change, so check the current plan page before joining.

Are Boondockers Welcome stays really free?

The parking itself is supposed to be free. Hosts are not allowed to charge a parking fee, but some may charge for hookups or extra nights if those options are listed on the profile.[8][9]

How long can you stay at a Boondockers Welcome host?

It depends on the host, but the general system cap is up to five nights within a 90-day window with the same host.[14] Some hosts offer only one night. Others allow more.

Do you need a self-contained RV for Boondockers Welcome?

Yes. The rig must be self-contained, including an interior toilet and wastewater storage. Tents, cars, SUVs, and pickup trucks are not allowed as guest rigs.[12][13]

Is Boondockers Welcome better than Harvest Hosts?

Neither is automatically better. Boondockers Welcome is usually better for longer private-property stays. Harvest Hosts is usually better for one-night business-host experiences. The right answer depends on how you travel.[15]

Can you get a refund on Boondockers Welcome?

There is a 3-month Happy Camper Guarantee, but it has restrictions. For example, the refund policy says you are not eligible if you complete two or more overnight stays during the initial 90-day period.[10][11]

Bottom line

Boondockers Welcome is not a magic pass to free camping everywhere. It is a specific kind of RV membership with a specific kind of value. When you use it for what it is good at, private-property overnights, occasional hookups, and more flexible stays than Harvest Hosts, it can be a smart buy. When you expect it to behave like public-land boondocking or instant campground booking, frustration usually follows.

Before you join, check that your rig qualifies, look at current host density on your actual routes, and read the current refund terms. Then decide whether you want hosted community stays or whether your money belongs in a different camping tool instead.

Next step: If you are deciding between hosted stays and traditional boondocking, read our beginner’s boondocking guide next. If you are already comparing memberships, go straight to the Boondockers Welcome vs. Harvest Hosts comparison.

References

  1. Harvest Hosts Support. (2025, updated 2026). What is Boondockers Welcome? Retrieved April 14, 2026, from https://support.harvesthosts.com/en/articles/6110864-what-is-boondockers-welcome
  2. Harvest Hosts Support. (n.d.). Manage – How long should I wait for a Host to respond to my Request to Stay? Retrieved April 14, 2026, from https://support.harvesthosts.com/en/articles/9128115-manage-how-long-should-i-wait-for-a-host-to-respond-to-my-request-to-stay
  3. Harvest Hosts Support. (n.d.). Request – How do I request a Same-Day Stay? Retrieved April 14, 2026, from https://support.harvesthosts.com/en/articles/9128046-request-how-do-i-request-a-same-day-stay
  4. Boondockers Welcome. (n.d.). Become a guest. Retrieved April 14, 2026, from https://www.boondockerswelcome.com/become-a-guest/
  5. Harvest Hosts Support. (n.d.). How do I search for Hosts by available dates? Retrieved April 14, 2026, from https://support.harvesthosts.com/en/articles/9119460-how-do-i-search-for-hosts-by-available-dates
  6. Harvest Hosts Support. (n.d.). Can I search for Hosts that offer Extra Nights? Retrieved April 14, 2026, from https://support.harvesthosts.com/en/articles/9483104-can-i-search-for-hosts-that-offer-extra-nights
  7. Harvest Hosts Support. (n.d.). How to manage stay reservations, cancellations, and communication on Harvest Hosts? Retrieved April 14, 2026, from https://support.harvesthosts.com/en/articles/12732964-how-to-manage-stay-reservations-cancellations-and-communication-on-harvest-hosts
  8. Harvest Hosts Support. (n.d.). Do Boondockers Welcome Hosts charge a fee? Retrieved April 14, 2026, from https://support.harvesthosts.com/en/articles/6110917-do-boondockers-welcome-hosts-charge-a-fee
  9. Harvest Hosts Support. (2025). Hosts: What are the best practices for Collecting Payments for Hookups and Extra Nights? Retrieved April 14, 2026, from https://support.harvesthosts.com/en/articles/12986956-hosts-what-are-best-practices-for-collecting-payments-for-hookups-and-extra-nights
  10. Harvest Hosts. (n.d.). Happiness guaranteed. Retrieved April 14, 2026, from https://www.harvesthosts.com/pages/satisfaction-guarantee
  11. Harvest Hosts Support. (n.d.). What is your refund policy? Retrieved April 14, 2026, from https://support.harvesthosts.com/en/articles/6110858-what-is-your-refund-policy
  12. Harvest Hosts Support. (n.d.). What type of RVs are allowed? Retrieved April 14, 2026, from https://support.harvesthosts.com/en/articles/6110387-what-type-of-rvs-are-allowed
  13. Harvest Hosts Support. (n.d.). Is Boondockers Welcome only for RVers? Retrieved April 14, 2026, from https://support.harvesthosts.com/en/articles/6110895-is-boondockers-welcome-only-for-rvers
  14. Harvest Hosts Support. (n.d.). How long can I stay at a Boondockers Welcome host location? Retrieved April 14, 2026, from https://support.harvesthosts.com/en/articles/6110964-how-long-can-i-stay-at-a-boondockers-welcome-host-location
  15. Harvest Hosts Support. (n.d.). What are the differences among Harvest Hosts memberships, including Classic, Golf, Boondockers Welcome, and All Access? Retrieved April 14, 2026, from https://support.harvesthosts.com/en/articles/12733247-what-are-the-differences-among-harvest-hosts-memberships-including-classic-golf-boondockers-welcome-and-all-access

Disclosure: Membership details, host counts, refund terms, and rules can change. Verify current pricing, host availability, and eligibility directly with Boondockers Welcome or Harvest Hosts before you join or travel.

Boondock or Bust covers RV memberships, route planning, and practical boondocking strategy for travelers who want fewer surprises on the road.

Zion Itinerary: 1–3 Day Complete Guide (April 2026 Update)

Zion Itinerary: 1–3 Day Complete Guide (April 2026 Update)

Zion Itinerary: 1, 2, or 3 Days in 2026

By Chuck Price | Last updated: April 1, 2026 | Read time: 14 minutes

Zion in 2026 rewards timing, not improvisation. Shuttle schedules, tunnel rules, dispersed camping access, and spring-to-fall crowd pressure all shape what you can realistically do in one, two, or three days. This guide gives you a workable plan, where RV travelers need to adjust, and what to verify before you leave home.

TL;DR
  • Must-know: During shuttle season, you cannot drive a personal vehicle on Zion Canyon Scenic Drive, including before the first shuttle and after the last one. NPS shuttle system
  • Trip killers: Missing the last shuttle, building an RV route around outdated tunnel rules, or assuming old SR9 boondocking pull-offs are still open can wreck the day.
  • Best for: First-timers who want a realistic plan, not a fantasy schedule built around every headline hike.
  • Confirm before you go: Shuttle hours, tunnel rules, BLM camping status, flash-flood potential, and current road conditions. Rules and access change. NPS Zion home

What a Zion itinerary actually does

A good Zion itinerary is a timing tool, not a bucket list. It works because shuttle boarding, trail start times, heat, parking, and permit windows all stack on top of each other in a narrow canyon. This guide covers a standard first visit to Zion Canyon and nearby park roads. It does not try to turn one day into every major hike in the park.

The practical payoff is simple. You stop losing time to guesswork. NPS says shuttles take about 45 minutes between the Zion Canyon Visitor Center and the Temple of Sinawava, so a full round trip is approximately 90 minutes before you add stops, lines, or trail time. Official shuttle details

If you are new to free camping and public-land trip planning, start with our Boondocking Guide hub. It will make the logistics around Zion easier to understand.

Why 2026 is different

2026 is not a year to “just see what happens.” Zion’s shuttle system resumed for the main season on March 7, 2026, and the park’s current rules still say personal vehicles cannot use Zion Canyon Scenic Drive during shuttle operations. That rule applies even before the first shuttle and after the last one. NPS shuttle resumption notice | NPS shuttle rules

Camping access outside the park is shifting too. The Bureau of Land Management project page for the SR9 Campground Management Project says the final environmental assessment, Decision Record, and Finding of No Significant Impact were published on March 23, 2026, with a 30-day appeal period ending April 22, 2026. That matters because old advice about simply pulling off near SR9 is now riskier and often outdated. Verify current status before your trip. BLM project home

Travel warning: Land access, permits, road conditions, and site availability change. Verify all information with the relevant land management agency before your trip. Remote desert travel can be hazardous. Match the route to your rig, your skill level, and the current conditions.

Where to sleep near Zion in 2026

The old “find a random pull-off near the park” approach is weaker in 2026. The BLM says camping in the Hurricane Cliffs Recreation Area is limited to 56 designated sites, each marked with a numbered placard and metal fire ring, and camping outside official sites is prohibited. This section covers public-land overnights near Zion. It does not cover every private campground in Springdale, Hurricane, or St. George. BLM Hurricane Cliffs page

Quick planning table. Source checks: BLM, NPS, and current site pages as of April 1, 2026.
Attribute Details Considerations Source Last verified
Hurricane Cliffs 56 designated dispersed sites Outside-site camping prohibited. Not every site works for RVs or trailers. BLM April 1, 2026
Road type and clearance Depends on site and season Medium clearance often helps. Verify accessibility before committing a trailer or longer rig. BLM April 1, 2026
Permit required No permit listed for standard site use Rules can change with project implementation. Check before departure. BLM project page April 1, 2026
Facilities Primitive Do not assume water, dump, or trash service. BLM April 1, 2026
Emergency contact Zion information line: 435-772-3256 Use it for recorded road and park information. NPS April 1, 2026
Season Year-round planning, conditions vary Snow, mud, enforcement, and summer heat all change usability. NPS conditions April 1, 2026

For backup research, use our guide to finding dispersed camping with BLM and USFS map tools and our roundup of the best apps for finding free campsites. Apps help, but they do not overrule current agency rules.

The Narrows trail in Zion with hikers in river

Photo credit: National Parks Gallery

The 1-day express itinerary

One day in Zion works best when you commit to a narrow plan. The goal is early canyon access, one moderate hike block, one scenic stop, and a controlled finish. This itinerary fits visitors staying in Springdale, nearby lodging, or legal overnight spots within practical driving distance. It is not the right plan for anyone trying to combine a late RV arrival, tunnel uncertainty, and every marquee trail in one shot.

7:00 a.m. to 10:00 a.m. — Start with the first park shuttle

Ride to Temple of Sinawava and walk the Riverside Walk. This gets you into the canyon before the heaviest mid-morning buildup. If you only want a Narrows taste without a full river day, this is the cleanest start.

10:30 a.m. to 1:00 p.m. — Shift to Emerald Pools from the Grotto side

Use the shuttle to reach the Grotto area and connect toward Emerald Pools. Trail conditions can change, so check the current park information guide first. Emerald Pools trail page

1:00 p.m. to 2:30 p.m. — Reset at Zion Lodge

Use the break to refill water, eat, and decide whether your energy still supports an afternoon scenic stop. A practical planning floor is about 1 gallon (3.8 liters) per person per day in desert conditions. Treat that as a rule of thumb, not a universal prescription, and adjust for heat, exertion, and personal needs. NPS hiking in hot weather

Late afternoon — Choose one scenic finish

If your vehicle plan is simple and current conditions cooperate, use the Zion-Mt. Carmel Highway side for Canyon Overlook planning. If your RV or trailer creates tunnel complications, skip the gamble and finish with the Pa’rus Trail or another lower-friction stop inside the shuttle system. Canyon Overlook trail | Pa’rus Trail

The 2-day explorer itinerary

Two days is where Zion gets easier. Day one handles orientation, shuttle rhythm, and one moderate hike. Day two becomes your decision day. This format fits most first-time visitors because it splits the iconic canyon experience from the high-effort trail choice. It is not ideal for anyone who dislikes early starts, heat exposure, or permit uncertainty.

Day 1 — Follow the 1-day express plan

Use the first day to learn the canyon, not to chase every headline trail. That makes day two cleaner and safer.

Day 2 option A — Angels Landing day

Angels Landing is a strenuous 5.4-mile round trip with 1,488 feet of gain. Build a backup. If you do not get the permit, you still have a strong day available through Scout Lookout or a Narrows pivot. Angels Landing permits | Trail details

Day 2 option B — The Narrows day

The bottom-up Narrows route usually means an early shuttle, gear decisions, and a hard stop if flash-flood risk rises. Do not use old forum chatter as your last check. Use the park’s current flood and flow guidance before you commit. The Narrows | Flash-flood guidance

Best backup if permits or conditions go bad

If Angels Landing is unavailable or the Narrows is a bad idea, use our booking and backup playbook mindset inside the park too: do not force the original plan. Pivot early, before the entire day is wasted.

The 3-day complete itinerary

Three days is enough to spread the park out. Day three lets you break away from the main-canyon bottleneck and add Kolob Canyons or Kolob Terrace logic to the trip. This plan works best for visitors who already handled the canyon core and still have energy for driving and a second terrain profile. It is a weaker fit in poor weather, snow-season shoulder periods, or when your rig makes route changes expensive.

Morning — Kolob Canyons

Kolob Canyons gives you a different pace and usually less compression than the main canyon. Taylor Creek is a common choice for visitors who want a quieter trail day. Kolob Canyons | Taylor Creek Trail

Afternoon — Kolob Terrace or a lower-risk scenic finish

Kolob Terrace Road usually closes for several months from fall to spring because of snow. Check current road status first. If the road is closed or conditions are weak, do not force it. Use a safer lower-elevation finish instead. NPS weather and climate conditions

Zion shuttle bus stopped along scenic canyon road

Photo credit: National Park Service

Shuttle strategy that saves time

The shuttle is the spine of a Zion day. NPS says you do not need a ticket, permit, or reservation to ride it, park shuttles usually arrive every 5 to 10 minutes, Springdale shuttles usually arrive every 10 to 15 minutes, and the ride from the visitor center to Temple of Sinawava takes about 45 minutes. This section covers shuttle season, not the winter periods when service is limited or paused. Official shuttle system

  • Best play for most visitors: Park in Springdale or arrive early enough to stay ahead of the line problem.
  • Do not wait for the last shuttle: NPS warns that if the last shuttle is full or you miss it, you may have to walk back to the visitor center. The park page currently states that walk can be about nine miles. NPS warning
  • Bike option: A bike can remove some shuttle dependence, but it does not erase heat, time, or trail effort.

RV and tunnel warning for 2026

RVers cannot treat the tunnel as background information in 2026. NPS currently says vehicles 7 feet 10 inches wide or 11 feet 4 inches tall or larger need the oversized-vehicle permit system under the current rule set. NPS also says large vehicles will be rerouted from the Zion-Mt. Carmel Highway beginning June 7, 2026. That means your route depends on your rig and your travel date. Zion tunnel rules | Directions and transportation

How this changes the 1-day express for RV users:
  • If you are coming from the east and your rig falls under the June 7 reroute rule, do not build the day around a late-afternoon tunnel crossing.
  • Use a shuttle-centered day based from Springdale, or move the scenic highway component to a date and route that fit your vehicle.
  • For many RV travelers, the smarter call is one Zion Canyon day and one separate highway or east-side day, not both at once.

FAQ

What is the best month to visit Zion?

For many visitors, April, May, September, and October offer the best mix of temperature and usable daylight. These patterns hold generally, but current conditions, closures, and heat waves still matter. Check the latest park weather and road page before you lock the trip dates. NPS conditions

Do I really need an Angels Landing permit?

Yes. Angels Landing uses a permit system, and the park’s permit page is the source that matters. Do not rely on old screenshots, old Reddit comments, or secondhand advice. NPS permit page

Can I drive into Zion Canyon?

During shuttle season, personal vehicles cannot use Zion Canyon Scenic Drive, including before the first shuttle and after the last one. You can still drive other park roads that remain open to private vehicles. NPS shuttle rules

How much water should I plan for?

A general planning rule of thumb is about 1 gallon, or 3.8 liters, per person per day in desert conditions, then more if heat and exertion go up. That is not a one-size-fits-all medical rule. It is a conservative trip-planning baseline. NPS heat guidance

Where should I verify camping and access changes?

Use the actual land manager first. For Zion, that usually means NPS for park operations and BLM for nearby dispersed camping areas. Forums and apps can point you in the right direction, but they should not be your final source. NPS | BLM SR9 project

Official downloads and next steps

The next move is not more scrolling. It is verification. Check current Zion conditions, lock your shuttle logic, confirm your RV route, and then save the official guides to your phone before signal gets spotty. If you still need camping or backup-planning help, our free and cheap campsite guide is the best follow-up read.

Sources

  • Bureau of Land Management. Hurricane Cliffs Designated Dispersed Camping Area. blm.gov
  • Bureau of Land Management. Hurricane Cliffs Trail System. blm.gov
  • Bureau of Land Management. SR9 Campground Management Project home. eplanning.blm.gov
  • National Park Service. Directions & Transportation. nps.gov
  • National Park Service. Hiking in Hot Weather. nps.gov
  • National Park Service. Zion Canyon Shuttle System. nps.gov
  • National Park Service. Zion National Park shuttle bus service resumes March 7, 2026. nps.gov
  • National Park Service. Zion weather and road conditions. nps.gov
  • National Park Service. Zion-Mt. Carmel Tunnel. nps.gov
Non-Lethal Protection for RV Campers and Boondockers

Non-Lethal Protection for RV Campers and Boondockers


Last updated: March 28, 2026  |  12 min read  |  By Chuck Price

Non-Lethal Protection for RV Campers and Boondockers

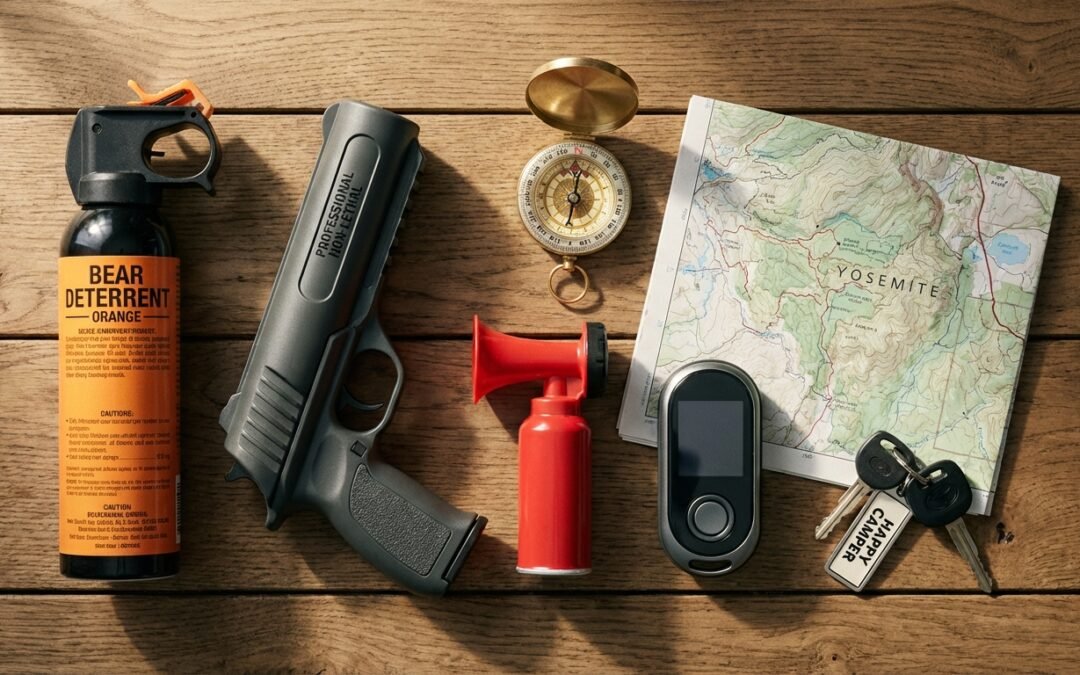
Bear spray stops an aggressive bear 92% of the time based on peer-reviewed research. A Byrna launcher requires no permit in any state, according to the manufacturer — though you should verify current law before travel. An air horn is broadly legal across the U.S. and costs under $25. Many boondockers carry none of these. This guide covers what each option actually does, what it doesn’t, and which scenarios each is built for — without the product hype.

Quick Answer

  • Wildlife threats: Bear spray is the most evidence-backed deterrent. Effective range 20–40 feet. 92% success rate against brown bears in documented encounters.
  • Human threats: Byrna launcher (no permit required per manufacturer; verify state law) or pepper spray. Air horn for deterrence and signaling.
  • Wasp spray: Prohibited under federal pesticide law for use against people. Do not use it as a substitute for pepper spray.
  • First rule: Carry what you will actually deploy. The best protection is the tool you reach for without thinking about it.

Chuck Price has traveled the U.S. in an RV for 35+ years and has been boondocking on BLM land, National Forest dispersed sites, and LTVAs. He and his wife, Cindy, have been featured on CBC Radio’s Cost of Living podcast, discussing full-time RV expenses, and operate out of a 2018 Hymer Aktiv Class B.

Why Boondockers Consider Non-Lethal Options

Remote camping removes the safety nets that developed campgrounds provide — host staff, neighboring rigs within earshot, security lighting. That exposure is precisely why people boondock, and it’s also why the question of personal protection arises more frequently in dispersed camping forums than anywhere else.

Non-lethal tools fill a specific gap. Firearms are effective but introduce complexity: interstate transport laws, storage requirements in a tight rig, and — if you haven’t trained for stress shooting — a false sense of preparedness. Non-lethal options are not a compromise. For the threat scenarios most boondockers actually face — curious black bears, wildlife startled near camp, or an escalating situation with a stranger — a non-lethal tool is often the appropriate and legally cleaner response.

This is not an either/or discussion. Many full-timers carry both. What follows is a clear-eyed look at each non-lethal option: what the evidence says, what the law says, and what the practical limitations are in a boondocking context. For a broader view of remote self-sufficiency — including site selection, water security, and emergency planning — see our boondocking with wildlife safety guide.

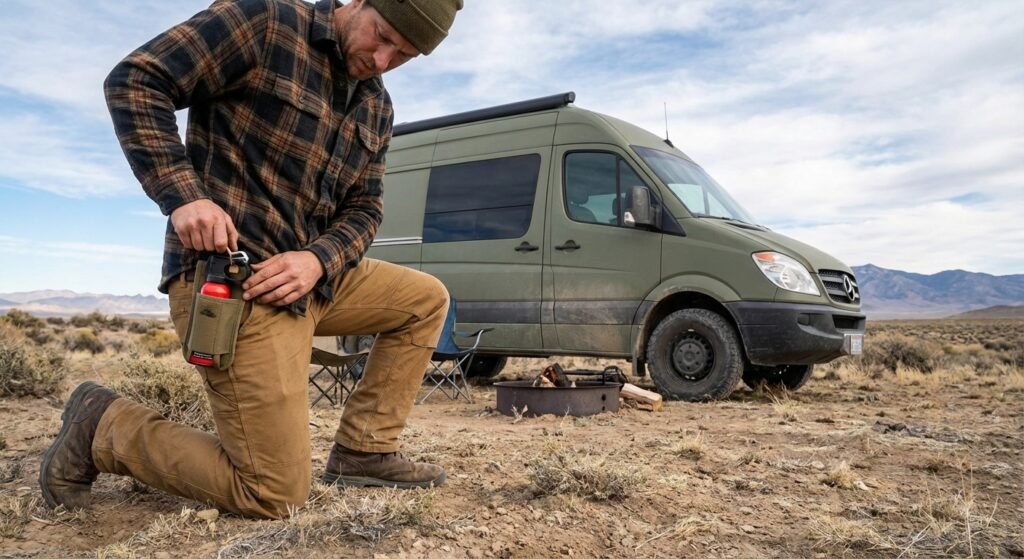
RV camper checking bear spray holster while parked on BLM land

Options at a Glance

Prices and permit requirements vary by state, park, and retailer. Verify legality for the specific areas you plan to visit before travel. Prices checked as of March 2026.

Option Best For Effective Range Permit Required Approx. Cost
Bear Spray Wildlife encounters 20–40 ft No $35–$60
Pepper Spray (human) Human threats 8–16 ft Some states $15–$35
Byrna Launcher Human threats; visual deterrent 30+ ft None required per mfr; verify state law $300–$400
Air Horn Wildlife deterrence; emergency signal Audible to 1 mi No (verify site rules) $10–$25
Personal Alarm Seniors; signaling; deterrence Passive only No $15–$50

Sources: BearWise, Byrna Technologies, NPS, BLM. Prices checked as of March 2026 — confirm current pricing before purchase. Permit requirements vary by state and site; verify before travel.

Bear Spray: The Evidence-Backed Wildlife Deterrent

Bear spray stopped aggressive brown bear behavior in 92% of documented Alaskan encounters, based on a peer-reviewed 20-year study published in the Journal of Wildlife Management (Smith et al., 2008).

That number matters because it comes from real-world encounters, not controlled conditions. The same study found that 98% of people who deployed bear spray in close-range encounters escaped without injury. No other non-lethal wildlife deterrent has a comparable evidence base.

Bear spray is specifically formulated for wildlife — it is not interchangeable with personal defense pepper spray. The NPS recommends deploying when an aggressive charging bear is within 60 feet, directing spray at a downward angle to create a barrier cloud the bear must pass through at approximately 30 feet. This is a practiced technique, not an instinctive one. Run at least one dry-run deployment before your first backcountry trip.

What Bear Spray Does NOT Do

  • Bear spray is not approved for use on humans in any U.S. jurisdiction. Using it against a person is a federal violation.
  • It is not permitted on commercial aircraft. Ship it to your destination or rent at some popular trailheads.
  • It does not work as a tent or gear repellent. Applying bear spray to equipment can actually attract bears.
  • Performance degrades in extreme cold. Keep it inside your sleeping bag overnight in sub-freezing temperatures.
  • Canisters expire — typically 3 to 4 years from manufacture. Check the date before every season.

What to buy: Look for the EPA registration number on the label. The EPA requires a minimum 7.9 oz canister and 1–2% capsaicinoids for a product to be marketed as bear spray. Brands meeting this standard include Counter Assault, UDAP, Frontiersman, and Guard Alaska. A chest or hip holster is not optional — the spray is useless stored in a day pack during a charge.

Relevant links: NPS bear spray and firearms guidance  |  BearWise bear spray use guide

Byrna Launcher Review: What RV Campers Actually Report

Byrna launchers are CO2-powered devices not classified as firearms under federal law. According to Byrna’s documentation, no permit, background check, or registration is required in any U.S. state as of early 2026. Verify current law in each state you travel through before departure.


Byrna LE less-lethal launcher used for RV and boondocking self-defense

The Byrna addresses a problem bear spray cannot: human threats where you’re not in bear country, or where deploying a chemical agent intended for wildlife creates legal exposure. It fires kinetic or pepper-compound projectiles from 30+ feet. The visual resemblance to a sidearm provides a deterrent effect before any round is fired, which is the outcome most boondockers are actually after.

The Byrna SD and Byrna LE are the two models with the most RV-community use. Tracy Michelle, who keeps one in her RV on the Oregon Coast, describes it this way: “It fits. Not just in a drawer, but into the way I live.” That’s the appeal in a rig context — compact enough to store within reach, no gunpowder, no interstate transport legal complexity.

As of March 2026, a full kit with pepper rounds typically runs $300–$400, and projectile packs are around $20–$30. Confirm current pricing at Byrna.com before purchase.

Does it work? The accidental proof.

Ryan Vader, a verified Byrna owner, accidentally broke open a pepper round while reloading, touched his face, and spent the next 30 seconds coughing violently and vomiting outside his shop. His words: “I am 100% a fan of the Byrna Launcher. I know for a fact that it works, even if by an unfortunate accident.” That’s an unintentional but hard-to-argue field test of the pepper rounds.

Shelf Life Warning — Read Before You Load

Larry Lankenau, who purchased a Byrna SE in January 2024, discovered his pepper projectiles had started leaking powder before the 18-month shelf life was up. Cause: vibration from driving over time caused the two-halve seam to separate. He found out the hard way — a dusting of pepper powder in a hotel room. His loading recommendation, confirmed by a Byrna retail outlet: load pepper rounds seam-side up, alternate with kinetic rounds, and plan to replace pepper projectiles every 8 months if stored in a vehicle.

The shelf life issue is real and specific to vehicle storage. Factor replacement costs into your total cost of ownership — this is not a buy-once setup.

Pros

  • No permit required per manufacturer (verify state law)
  • 30+ foot effective range
  • Fires kinetic or pepper rounds
  • Strong visual deterrent before firing
  • Compact; fits in a glove box or bedside drawer
  • No interstate transport restrictions of a firearm

Cons

  • $300–$400 entry cost plus ongoing consumables
  • Pepper rounds degrade faster in vehicles — replace every ~8 months
  • CO2 cartridges need replacing
  • Requires deliberate practice to deploy under stress
  • Not designed for large wildlife (bears, mountain lions)
  • Displaying it can create legal exposure in strict states — see below

Dale Brown, a Byrna dealer, frames the practice requirement plainly: “You need to know how to use the launcher, how to carry it, and how to deploy it. Practice, practice, practice.” That applies at least as much in a boondocking context as anywhere else — you may be retrieving it from a storage drawer at 2 a.m. with limited light and elevated stress.

Byrna documentation: Byrna’s official RV and camping use guide

The core decision for most boondockers: bear spray for wildlife, a Byrna or pepper spray for humans, an air horn for both at low cost. No single tool covers every scenario. The goal is a lightweight, legally clean setup you will actually deploy when stress degrades fine motor control. None of these tools are useful sitting in a storage bay when you need them at 2 a.m.

Air Horns and Fog Horns: The Underrated Option

Air horns are broadly legal across the U.S. with no permit requirement — but specific parks, campgrounds, and recreation areas may restrict their use, so check site rules before you deploy one. Marine-grade compressed-air horns meet U.S. Coast Guard sound requirements and produce 115 to 120 dB — enough to startle most wildlife and alert other campers from a significant distance.

For wildlife deterrence, the noise plus the sudden movement of a human reacting to it is often enough to redirect a bear, mountain lion, or coyote that hasn’t committed to aggression. Bear spray and an air horn together cover most wildlife-encounter scenarios on BLM or National Forest land.

What air horns don’t do: They provide no meaningful protection against a determined human threat and have a limited effect on an already-committed wildlife charge. An air horn is a deterrence and signaling tool, not a response tool.

What to buy: The Falcon Safety brand and Primus Powerhorm are widely used by backcountry campers. Get a marine-grade canister, not a sports horn — the compressed air output and sound level are meaningfully different. As of March 2026, quality marine-grade canisters run $10–$25 at most outdoor retailers — confirm current pricing before purchase.

Personal Alarms: Best for Seniors and Mobility-Limited Campers

Electronic personal alarms are generally lawful throughout the U.S., carry a low risk of self-injury, and are simple to deploy without significant practice. At 120–130 dB, a quality alarm is audible for several hundred feet in open terrain. Specific park or campground rules may restrict noise devices in some areas — verify before relying on one as your primary option.

For seniors or RVers with mobility limitations, a wearable personal alarm is a practical primary option. Some models include GPS tracking and fall detection with a connected monitoring service — relevant for solo travelers boondocking in areas with no cell coverage.

Limitations: Personal alarms are passive deterrents only. They signal distress and may startle an attacker or wildlife, but they do not stop a threat. Treat them as a complement to bear spray or pepper spray, not a replacement.

Key specs to look for: 120+ dB output, wrist or belt attachment, backup battery or rechargeable, pin-pull or button activation. Avoid models that require two hands to activate.

Wasp Spray for Self-Defense: A Bad Idea on Multiple Fronts

Correction: A Common but Risky Piece of Advice

What circulates online: “Keep wasp spray near your door — it shoots farther than pepper spray and is legal everywhere.”

Why it persists: Wasp spray does shoot 15–20 feet and is inexpensive and widely available. The legal risk is invisible until after an incident occurs.

The EPA label issue: Wasp spray is a registered pesticide. The product label expressly prohibits any use other than killing insects as directed — using it against a person violates federal pesticide law. EPA pesticide regulation guidance.

The state law issue: Separately from the EPA label violation, spraying any chemical on a person can constitute assault or aggravated assault under state criminal law, depending on jurisdiction. These are distinct legal risks — the federal label violation and whatever state law applies where the incident occurs.

Bottom line: Human-formulated pepper spray is inexpensive, more effective against human threats, and does not carry the EPA label-use problem. Use products specifically designed and labeled for personal defense.

Prevention Is the First Line of Defense

The tools above matter most when prevention fails. Prevention rarely fails if you apply a few consistent habits in the field.

The Nose-Out Parking Rule

Always park nose-out at boondocking sites. This single habit eliminates the most common reason people can’t leave quickly: backing out in the dark while stressed. If a situation deteriorates, nose-out means 30 seconds to driving away, not a 10-point turn with a flashlight.

Wildlife encounters: Do not maintain eye contact. Move slowly away. Keep food and scented items secured at all times — not in a cooler by the door.

Human encounters: Trust your instincts early — before a situation escalates. De-escalation and exit are always preferable to confrontation. Most experienced boondockers report never needing to deploy anything. Choosing a site with good sight lines and a clear exit route is more effective than any specific piece of gear. For emergency preparedness beyond personal protection, see our RV safety and emergency preparedness guide.

The three-rule field test from backcountry experience: Animals — do not look them in the eye; move quietly away. Intoxicated individuals — there is no productive conversation; move away. Belligerents — do not give them a scene; move away. Most situations resolve without escalation if you refuse to escalate.

How to Choose the Right Option for Your Situation

There is no universal answer. The right tool is the one that matches your specific camping profile, physical capability, and threat context.

If you camp in bear country

Bear spray is non-negotiable. Add an air horn as a secondary deterrent. Keep both in a belt holster and reachable from your driver’s seat.

If your primary concern is human threats

A Byrna launcher with pepper rounds gives you meaningful range without firearms complexity across state lines. Verify current state law before travel. Pair with a personal alarm for nighttime signaling.

If you are a solo senior or have mobility limits

A wearable personal alarm plus bear spray covers most scenarios at low cost and minimal self-injury risk. GPS-enabled models add a safety net for off-grid medical emergencies.

If you want broad coverage at a low cost

Bear spray ($35–$60) plus a marine-grade air horn ($10–$25) covers the two most common boondocking threat types for $50 to $85 total (March 2026 pricing). Both are broadly legal with no permit requirement — verify site-specific rules before travel.

Broader preparedness

If non-lethal protection is one piece of a larger self-sufficiency mindset, Ammo.com’s off-grid living guide covers the full picture — from remote location selection and water sourcing to food independence and personal security. Read: Off-Grid Living Guide

Before Your Trip

Practice with whatever you carry — at a minimum, practice the draw and safety removal. Stress degrades fine motor skills. If you haven’t removed the safety on your bear spray canister 20 times in a driveway, you will fumble it in the dark. Inert training canisters are available from most bear spray manufacturers for this purpose.

Frequently Asked Questions

Is bear spray legal on BLM land and in national parks?

Bear spray is legal in all U.S. national parks and on BLM land for deterring wildlife. Using it against a human being may be illegal in some jurisdictions. Specific park rules can add restrictions — check the NPS or relevant agency site before entering. The NPS recommends bear spray as the primary wildlife deterrent over firearms.

Is the Byrna launcher legal in all 50 states?

Byrna’s documentation states their launchers are CO2-powered devices not classified as firearms, with no permit or background check required in any state as of early 2026. State weapons laws change — verify current law in each state you plan to travel through before departure, particularly in states with restrictive weapons statutes.

Can you use wasp spray for self-defense while camping?

No. Wasp spray is an EPA-regulated pesticide, and its label prohibits use against people — violating that restriction is a federal pesticide law issue. Separately, spraying any chemical on a person can constitute assault under state law, depending on jurisdiction. It is also less effective than pepper spray against human threats. Use products specifically labeled for personal defense.

What is the effective range of bear spray?

Most EPA-registered bear sprays have an effective range of 20 to 40 feet, depending on brand and conditions. The NPS recommends deploying when an aggressive bear is within 60 feet, creating a barrier cloud at approximately 30 feet. Cold weather and high winds reduce the effective range. Confirm the range on your specific canister’s label.

What non-lethal protection is best for solo women boondocking?

A layered approach works best: bear spray for wildlife (range 20–40 feet), a personal alarm for emergency signaling, and pepper spray or a Byrna for human encounters. The most effective tool is the one you carry consistently and can deploy under stress without hesitation.

Should I tell other campers or rangers if I carry non-lethal protection?

No affirmative disclosure is typically required for legal non-lethal tools. If asked by a ranger, answer honestly. Some campgrounds and specific park areas may prohibit projectile-launching devices even if non-lethal — check site-specific rules before setting up camp.

Sources

  1. BearWise. “Bear Spray Safety Tips.” BearWise.org. Updated 2025. bearwise.org/bear-safety-tips/bear-spray/
  2. Byrna Technologies. “RV Security and Defense Gear.” Byrna.com. 2025. byrna.com/blogs/byrna-nation/secure-rv-defense-gear
  3. Legal Information Institute, Cornell Law School. “Self-Defense.” Law.Cornell.edu. Accessed March 2026. law.cornell.edu/wex/self-defense
  4. National Park Service. “Staying Safe in Bear Country: Bear Spray and Firearms.” NPS.gov. Updated 2024. nps.gov/articles/bearsprayfirearms.htm
  5. National Park Service. “Firearm and Weapon Laws.” NPS.gov. Accessed March 2026. nps.gov/subjects/lawenforcement/weapon-laws.htm
  6. Smith, T.S., Herrero, S., DeBruyn, T.D., Wilder, J.M. “Efficacy of Bear Deterrent Spray in Alaska.” Journal of Wildlife Management, 72(3), 640–645. 2008. Available via BearWise.
  7. U.S. Environmental Protection Agency. “Pesticide Registration and Regulation.” EPA.gov. Accessed March 2026. epa.gov/pesticides

Note: Two references present in the original version of this article — Brewer (2023) Journal of Wilderness Safety and Richardson & Martinez (2024) Outdoor Recreation Law Review — could not be independently verified and were removed in the first rewrite. No replacement sources were invented.

About the Author

Chuck Price is a full-time RVer with 35 years of experience traveling the United States. He and his wife Cindy, operate BoondockOrBust.com from their 2018 Hymer Aktiv Class B and have boondocked on BLM land, National Forest dispersed sites, LTVAs, and Harvest Hosts locations across the country. Chuck has been featured on CBC Radio’s Cost of Living podcast discussing full-time RV expenses.

How to Find Free Dispersed Camping Using BLM and USFS Map Layers

How to Find Free Dispersed Camping Using BLM and USFS Map Layers

Quick Answer

Four free tools provide the public land boundary overlays, MVUM road layers, and offline capability needed to research dispersed camping on BLM and National Forest land: Gaia GPS (free tier), Caltopo (free tier), OsmAnd (free, open-source), and Avenza Maps (free with USFS MVUM downloads). These tools help you verify land ownership and road access — they do not replace confirmation from the local field office that a specific site is currently open and legal. App features and pricing tiers change; verify current terms at each provider’s website before your trip.

Last updated: March 2026. BLM rules, app features, and pricing change — verify current details with the relevant field office and each tool’s official site before your trip.

Most campers searching for free dispersed sites end up in the same trap: Google Maps shows roads but not land ownership. The BLM and Forest Service websites have the right data but poor usability. And every app that promises “free camping” eventually reveals that the features you actually need — public land overlays, offline maps, road classifications — cost money.

This guide covers the tools that legitimately solve the problem at no cost, what each tool does well, and — critically — what each one cannot do so you don’t find out the hard way at the end of a dirt road.

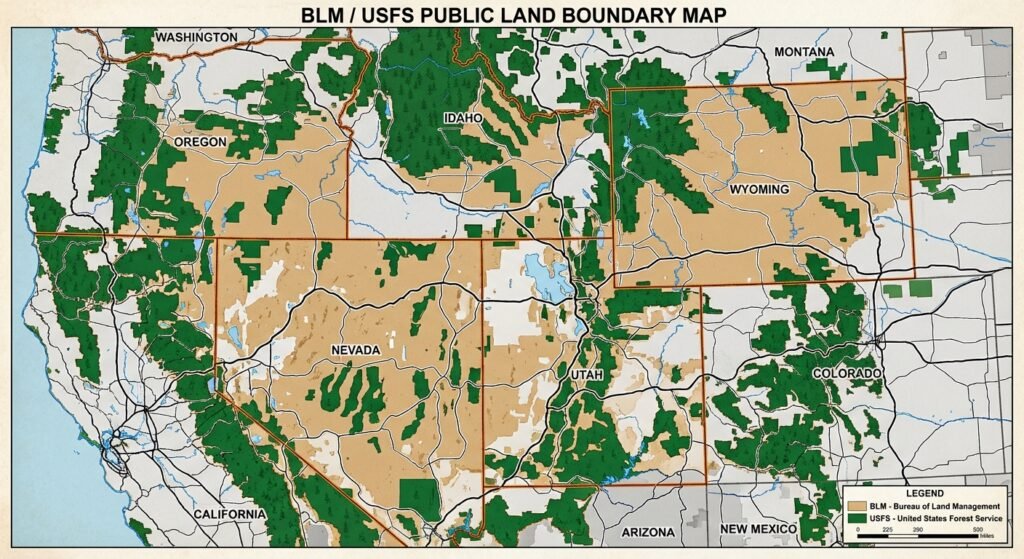
BLM/USFS public land boundary map

Why map layers — not campground listings — are the right tool for dispersed camping

Dispersed camping apps that show user-submitted pins tell you where other people have camped. Map layer tools tell you whether you are on public land where camping may be allowed. For boondocking, that land-ownership confirmation is more useful than any crowd-sourced pin — and it’s the first check that has to pass before anything else matters.

Dispersed camping is camping outside developed sites, typically on BLM or National Forest land. BLM policy allows dispersed camping on most public land unless an area is posted “Closed to Camping.” USFS lands follow similar rules, with individual ranger districts setting local restrictions. Confirming land ownership is a necessary step — it is not sufficient on its own. Closures, seasonal restrictions, and local permit requirements can override the general permission even on verified public land.

The problem is that BLM and USFS land is interspersed with private, state, tribal, and other land categories. Without a public land boundary layer active on your map, every promising pull-off is a guessing game. Map layer tools eliminate most of that guesswork.

Common misconception

Many guides recommend Google Maps as a starting point for dispersed camping research. Google Maps shows satellite imagery and some road names, but it does not display BLM or USFS boundary layers. It has no data on land ownership. Using Google Maps to verify that a site is on public land is not reliable — the land visible in satellite view may be private.

Verified correction: The authoritative public land boundary sources are the BLM Maps portal and the USGS National Map. Gaia GPS, Caltopo, OsmAnd, and Avenza Maps can incorporate these official datasets. Google Maps cannot.

The 14-day dispersed camping limit: what the BLM rules actually say

BLM dispersed camping is generally limited to 14 days within any 28-day period. (BLM.gov, Camping on Public Lands) After reaching the stay limit, you must relocate. The required move-out distance varies by field office — verify the specific distance with the local BLM office before your trip, as it is not uniform nationally.

Three constraints apply that many guides omit:

  • The 14-day limit accumulates across multiple short visits, not only continuous stays.
  • Individual BLM field offices and USFS ranger districts can — and do — set shorter limits, seasonal closures, or different move-out distances. The national default does not override local rules.
  • Some field offices apply stricter annual limits rather than the rolling 28-day window. Check directly with the field office governing your target area before planning any extended stay.

The 14-day rule does not apply to designated Long-Term Visitor Areas (LTVAs), which operate under separate fee and permit structures.

Practical implication for map tool use: You need to know not just that an area is BLM land but which field office governs it. Gaia GPS and Caltopo display BLM boundaries but do not show field office jurisdictions inline. For jurisdiction-specific rules, cross-reference with BLM’s recreation pages or call the field office directly before arrival.

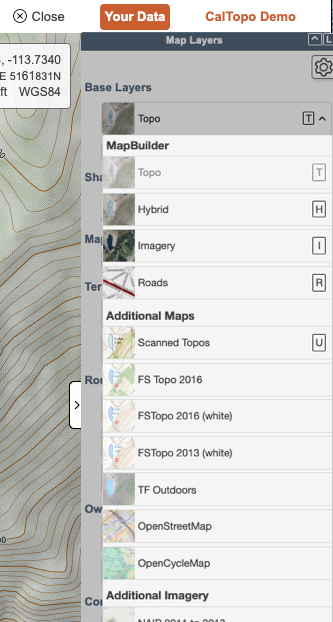
The core workflow: This guide covers four free tools — Gaia GPS, Caltopo, OsmAnd, and Avenza Maps — each capable of incorporating official BLM and USFS geographic data. The right choice depends on three criteria: whether you need offline capability, how comfortable you are building custom layer stacks, and whether your primary goal is land boundary verification or road-level navigation to a site. App features and free-tier access change over time; confirm current capabilities at each provider’s website.

Gaia GPS (free tier): integrated layer stack for pre-trip planning

Gaia GPS’s free tier includes BLM boundary overlays, USFS road layers, and public land classification. These are the core layers for verifying land ownership and road access on a candidate dispersed camping area. Confirm current free-tier feature availability at gaiagps.com, as tier content changes.

The layer stack that works for dispersed site hunting:

  • Gaia Topo: Topographic basemap. Contour lines help identify flat areas suitable for an RV or large tent footprint.
  • Public Land: Color-coded ownership (BLM, USFS, NPS, private, tribal). This layer answers “can I camp here?” — subject to local rules.
  • USFS Roads and Trails (MVUM): Motor Vehicle Use Maps showing which roads are open to which vehicle types. Open roads generally permit dispersed camping along their corridors, subject to district-specific restrictions.
  • USFS 2016: Older but still useful for showing developed recreation sites and designated areas within national forests.

Gaia GPS public land layer screenshot]

What the free tier does not include: Offline map downloads require a Gaia GPS premium subscription. In areas without cell service — which covers most worth-finding dispersed sites — the free tier shows a blank map. Use the free tier for desktop planning; pair it with OsmAnd or Avenza Maps for in-field offline navigation.

Caltopo (free tier): strongest desktop tool for layering multiple data sources

Caltopo’s free tier combines USGS topographic maps, satellite imagery, and public land boundaries in a single view. It is the preferred desktop planning choice when you need to overlay two or more data sources simultaneously to assess land ownership and physical site conditions together. Confirm current free-tier layer availability at caltopo.com.

Key layer combinations for dispersed camping:

  • MapBuilder Topo + Public Lands: Confirms land ownership against a detailed topographic base. The most common starting stack.
  • Satellite + Public Lands: Lets you visually assess terrain, tree cover, access road conditions, and potential camping spots on confirmed public land.
  • MVUM + Topo: Shows Forest Service road accessibility layered over contour data. Identifies which roads are open and whether the terrain alongside them is campable.
  • Cell Coverage: Caltopo’s cell coverage layer allows you to select by individual carrier (AT&T, T-Mobile, Verizon). This is a useful planning advantage for remote work and emergency communication planning.

Caltopo layer stack screenshot

What the free tier does not include: Offline capability is limited for free accounts. Caltopo is primarily a web-based planning tool. For in-field navigation without cell service, pair it with OsmAnd or Avenza Maps. It does not provide turn-by-turn routing.

OsmAnd: fully offline, fully free, higher learning curve

OsmAnd is an open-source mapping application that stores entire map regions on your device — no cell service, no subscription, no data connection required after setup. It is built on OpenStreetMap data and supports custom layer imports, including public land boundary files.

The setup process takes more time than Gaia GPS or Caltopo, but the result is a mapping tool that works identically with or without cell coverage:

  • Download regional map files for any U.S. state directly within the app — no internet required after download.
  • Add custom USFS and BLM boundary layers via the plugin system. The app supports custom map file formats and raster overlay imports; see OsmAnd’s raster map documentation for current import instructions.
  • GPX track recording lets you mark and save candidate sites for future reference.
  • Offline routing works for navigation to a site without active cell service.

OSMAnd Info

What OsmAnd does not include natively: USFS or BLM layer integration requires manual import — the app does not display public land ownership in the default configuration. OpenStreetMap data quality on remote forest roads varies; some roads are missing or mislabeled. Do not rely on OsmAnd road data alone for technical off-road routes without cross-referencing an official MVUM.

Available at osmand.net for Android and iOS.

Avenza Maps: the official MVUM viewer for in-field use

Avenza Maps is the most direct path to official USFS Motor Vehicle Use Maps (MVUMs) on a mobile device. MVUMs are the authoritative USFS documents showing which Forest Service roads are open to motorized vehicles and to which vehicle types. Road-access permission and dispersed camping permission are related but separate: an open road on an MVUM generally allows dispersed camping along its corridor, but district-specific restrictions may still apply. Verify current rules with the ranger district before travel.

The USFS publishes MVUMs as geospatial PDF files. Avenza imports these files and uses your device’s GPS to show your real-time location on the official map — no internet required after download.

Avenza

How to use it:

  1. Identify the National Forest or BLM district you plan to visit.
  2. Download the MVUM for that unit from fs.usda.gov/visit/maps (USFS) or the appropriate BLM field office page. Most MVUMs are free.
  3. Import the PDF into Avenza Maps. The app geo-references it automatically.
  4. Enable GPS tracking in the app. Your position appears on the official map in real time.

What Avenza does not include: It is a map viewer, not a navigation app. It will not route you to a waypoint or provide turn-by-turn directions. It also does not show public land ownership beyond what is printed on the source MVUM. Use it alongside Gaia GPS or Caltopo during pre-trip planning for ownership verification.

Available at avenzamaps.com for Android and iOS.

Side-by-side comparison: which tool handles which job

Feature / Use case Gaia GPS
(free tier)
Caltopo
(free tier)
OsmAnd
(free, open-source)
Avenza Maps
(free)
Public land boundary overlays Yes Yes Add-on required Via MVUM only
USFS MVUM road layers Yes Yes Add-on required Yes (native)
Offline map capability (free) No (paid only) Limited Yes (full regions) Yes (per-map file)
Turn-by-turn navigation No No Yes No
Carrier-specific cell coverage layer No Yes No No
Multiple layers simultaneously Yes Yes (strongest) Yes (with setup) No (single map)
Setup complexity Low Low Medium-High Low-Medium

Feature availability as of March 2026. Free-tier access changes — verify at each provider’s website before your trip.

No single free tool covers the full workflow from desktop planning to in-field navigation. These two combinations work reliably for most RV boondockers:

Option 1 — Caltopo + Avenza Maps: Use Caltopo at home to identify candidate areas using stacked public land, MVUM, and satellite layers. Then download the MVUM for your target National Forest or BLM district and load it into Avenza Maps before you leave cell range. Once on-site, Avenza shows your GPS position on the official MVUM in real time.

Option 2 — Gaia GPS + OsmAnd: Use Gaia GPS (web or app) to plan using its integrated layer system. Download the OsmAnd map for the target region before the trip. OsmAnd handles offline turn-by-turn navigation to a waypoint you’ve marked in Gaia GPS.

What neither combination handles: Both options give you land ownership data and road access information. Neither gives you confirmed site-level conditions — whether the spot is occupied, what road quality looks like after recent weather, or whether a specific pullout can fit your rig. For that, layer in user-submitted databases like FreeCampsites.net or Campendium after you’ve verified the land status independently.

For RV-specific routing to a site you’ve identified, a separate RV GPS tool is required. See our field-tested comparison: best free RV GPS apps for boondockers.

Official government map resources: free and authoritative

The third-party tools above can incorporate data from these primary sources. Using them directly costs nothing and removes the intermediary:

  • BLM Maps portal: Downloadable surface management maps showing BLM, USFS, NPS, and private land for each state. Available as PDF and GIS shapefiles. The authoritative source for land ownership verification.
  • USFS Maps & Apps: Official source for Motor Vehicle Use Maps by ranger district. Free downloads for every National Forest in the contiguous U.S.
  • USGS National Map: High-resolution topographic data and land ownership boundaries. Downloadable for offline use.
  • BLM National Data Viewer (GeoBOB): Interactive web-based viewer for BLM land status, roads, and designated areas. Not mobile-optimized, but reliable for desktop pre-trip research.

Constraint: Government portal maps are authoritative but not designed for field navigation. Download PDFs for offline reference, but use Avenza Maps or OsmAnd for in-field GPS tracking against those files.

For a broader look at legal free camping options — including membership programs, dispersed sites, and app-based spot-finding — see our guide to free campsite apps. For a rundown of where overnight parking remains viable in 2026, see our free RV parking guide.

What map layers cannot tell you — and what fills the gap

Map layer tools answer the ownership question. They do not answer the conditions question. Five things that require a different source — and a phone call or site check before you commit:

  • Current road closures and fire restrictions: MVUMs show roads as they were when the map was published. Seasonal closures, fire restrictions, and washouts are not reflected. Check with the relevant BLM field office or ranger district website before the trip, or call ahead. Fire restrictions change rapidly in dry seasons.
  • Whether a specific site can physically fit your rig: A road marked open on an MVUM may be passable by a pickup but not a Class A. User-submitted databases like Campendium often include rig-size notes from people who’ve been there.
  • Current occupancy: No free map tool shows real-time occupancy at dispersed sites. You will occasionally drive to a confirmed-legal spot and find it taken. Build a short list of two or three candidate sites per trip.
  • Water source status: Springs and streams shown on topo maps may be seasonal or dry. Verify independently before counting on on-site water.
  • Local permit requirements: Certain areas require fire permits or group permits even for dispersed camping. California BLM land requires a free California Campfire Permit for any open fire or gas stove use. Requirements vary by state and district — verify with the local office before your trip.

Frequently asked questions

Is all BLM land open to dispersed camping?

Most BLM land is open to dispersed camping unless an area is posted “Closed to Camping” or subject to specific land use restrictions. (BLM.gov) Some areas are closed for conservation, active restoration, or resource protection. Always check for posted signs and verify current closures with the local field office before committing to a site.

What is an MVUM and why does it matter for boondocking?

A Motor Vehicle Use Map (MVUM) is an official USFS document showing which roads within a National Forest are open to motorized vehicles and for which vehicle types. Dispersed camping is generally permitted along open Forest Service roads, though district-specific restrictions may still apply — road access and camping permission are separate determinations. MVUMs are published per ranger district and available free at fs.usda.gov/visit/maps.

Can I use Google Maps to find dispersed camping?

Google Maps does not display BLM or USFS land ownership boundaries. It shows satellite imagery and some road names, but it cannot confirm whether a specific location is on public land open to camping. It is not a reliable tool for verifying dispersed camping legality. Use Gaia GPS, Caltopo, or the BLM Maps portal for ownership verification.

Do any of these tools work without cell service?

OsmAnd (after downloading regional map files) and Avenza Maps (after downloading MVUM files) both function fully without cell service. Gaia GPS free tier and Caltopo free tier require an internet connection for map tile loading. Pre-download everything before leaving cell range.

What is the BLM 14-day limit and how is it calculated?

BLM dispersed camping is generally limited to 14 days within any 28-day period. The limit applies cumulatively — multiple short visits count toward it. After reaching 14 days, you must relocate; the required move-out distance varies by field office and is not uniform nationally. Individual field offices may impose shorter limits. Verify the specific rules with the local BLM office before your trip. (BLM.gov)

35+ years of field-tested boondocking knowledge, delivered free.

Get our weekly dispatch — real trips, real rigs, real conditions. No RV park ads, no fluff.

Get field-tested tips