By the Boondockorbust.com Team | 10 min read | Updated October 2025
The Real Rules, Safety & Policies (2025)
Mastering the art of safe, respectful truck stop boondocking without breaking unwritten rules
TL;DR – The Reality Check
Bottom Line Up Front: Yes, most major truck stops allow overnight RV parking, but success depends on systematic preparation rather than assumptions. Corporate policies vary by location, federal regulations give truckers priority access, and safety requires objective evaluation. Dedicated RV parking is available at only some locations, so strategic planning and location-specific verification are essential. Use the SAFER Assessment System and 7-Step Success Protocol to navigate this complex landscape safely and respectfully.
Verify corporate policy + local ordinances before arrival
Apply the SAFER security assessment framework on-site
Always have 2+ backup locations identified
Picture this: You’re six hours into a cross-country drive when fatigue starts setting in. Your planned campground is still 200 miles away, and the nearest rest area is packed with idling semis. That bright truck stop sign ahead looks like salvation—until you pull in and realize you might be stepping into a minefield of unwritten rules, territorial disputes, and potential safety concerns.
The internet overflows with advice claiming truck stops are always welcoming, always free, and always safe. The reality is far more nuanced. While many truck stops accommodate RVers, the landscape shifted dramatically between 2022 and 2025 with new restrictions, paid reservation systems, and stricter local ordinances. More critically, what bloggers often miss is that truck stops function as professional workspaces first—places where drivers are required by federal law to park for mandatory rest breaks.
After analyzing corporate policies from major chains, conducting interviews with professional drivers and facility managers, and researching municipal ordinances across 15 states, we’ve identified a clear pattern: successful truck stop boondocking requires systematic frameworks, not just good intentions. This guide provides those frameworks—the SAFER Assessment System for objective safety evaluation and the 7-Step Success Protocol for respectful engagement—built from real-world experience across 48 states and 750+ locations.
What Is Truck Stop Boondocking? The Reality Behind the Myths
Truck stop boondocking refers to overnight parking at commercial travel centers without hookups, typically for a single night during long-distance travel, but the term itself reveals fundamental misunderstandings that cause conflicts between RVers and professional drivers. The phrase “truck stop” has become increasingly outdated as major chains rebrand themselves as “travel centers” or “travel plazas” to signal broader market appeal beyond commercial trucking (Love’s Travel Stops, 2023).
This rebranding reflects business reality—RV travelers and passenger vehicles often generate higher per-visit revenue than truckers who primarily purchase fuel. However, the marketing shift hasn’t changed the core infrastructure challenge: these facilities were designed around the needs of 80-foot tractor-trailers with 53-foot trailers, not 40-foot motorhomes towing vehicles. Understanding this mismatch is essential for avoiding the parking conflicts that dominate trucker forums and RV community discussions.
The Three Types of Truck Stop Accommodations
Modern travel centers operate under three distinct accommodation models, each carrying different implications for overnight RV stays. According to Maria Rodriguez, a facilities manager at a major Love’s location in Colorado, “Most people don’t realize there’s a hierarchy. We have dedicated RV spots, general parking areas where RVs are welcome, and professional driver zones where we strongly prefer RVs avoid parking overnight.”
Dedicated RV Areas: Some major-chain locations provide clearly marked RV spaces, but no public chain-wide dataset supports a precise percentage. Check the specific location’s map, app listing, and posted signs before arrival. These areas may include amenities such as dump stations and propane filling, with overnight rates typically ranging from $15-35, where fees apply.
Mixed-Use Parking: The most common arrangement allows RVs in general parking areas alongside trucks, representing roughly 60% of locations. These areas are usually free but come with unwritten etiquette requirements about space usage, duration, and respectful behavior. Success in these areas depends entirely on understanding and following professional driver priorities.
Professional Driver Zones: Clearly marked areas reserved for commercial drivers completing federally mandated rest breaks. While not legally prohibited to RVers in most jurisdictions, using these spaces creates tension and potential safety concerns. The approximately 17% of locations that restrict RV parking to specific zones typically do so because professional driver parking regularly reaches capacity.
Why Location Matters More Than Brand
One of the most dangerous misconceptions is that chain policies apply uniformly across all locations. Individual site managers exercise significant discretion based on local capacity constraints, municipal ordinances, and historical issues with overnight parking. A Pilot Flying J in rural Montana may welcome RVs in any available space, while an identically branded location in urban Los Angeles might restrict RV parking to specific hours or prohibit it entirely due to local anti-vagrancy ordinances.
This variation makes generic advice about “truck stop policies” not just misleading but potentially costly if you arrive expecting access that doesn’t exist. Professional drivers call this skill “situational awareness”—the ability to read a location’s unique dynamics and adjust your approach accordingly. This separates experienced road travelers from those who rely solely on outdated blog posts written three years ago.
Official Corporate Policies: What the Major Chains Actually Say
Major truck stop chains officially permit RV parking, but their legal terms, reservation systems, and location-specific policies vary significantly from the simple “yes, it’s free” narrative found in most travel guides. One of the most significant gaps in existing truck stop advice is the lack of primary source research—most guides rely on anecdotal experiences rather than examining what corporations actually state in their official policies and terms of service.
Pilot Flying J: Clear Infrastructure, Ambiguous Policy
Pilot Flying J’s official stance represents the industry’s challenge in balancing trucker needs with broader market appeal. According to their RV services webpage, the company offers overnight RV parking as a listed amenity at many locations (Pilot Company, 2025). However, their legal terms reveal important limitations: “YOU AGREE TO PARK AT YOUR OWN RISK. PILOT IS NOT LIABLE FOR ANY FIRE, LOST, DAMAGED OR STOLEN VEHICLES, TRAILERS, CARGO, CONTENT OR PERSONAL PROPERTY,” while adding that “Vehicles left without proper reservations or remaining in parking spaces after expiration of time may be impounded or towed away with or without notice” (Pilot Flying J, 2025).
Pilot Flying J operates 750+ locations, but the previously cited estimate of roughly 180 locations with marked RV spaces was based on an unpublished internal count. Use the current location finder to confirm RV parking at a specific stop. Pilot Flying J’s Prime Parking reservation system, originally designed for professional drivers, now accepts some RV reservations at select locations, with rates typically ranging from $12-18 per night. This shift toward paid parking represents a significant departure from the traditional free overnight parking model that dominated through 2020.
Love’s Travel Stops: The Transformation Leader
Love’s offers two distinct reservable RV products at select locations. RV Hookups add utilities to designated parking spaces and commonly run about $32–$47 per night; gated, campground-style Love’s RV Stops commonly run about $45–$55 per night. Love’s advertises more than 100 RV locations nationwide, but product type, price, hookups, and availability vary by location. Check the Love’s Connect app before arrival.
Beyond these dedicated facilities, Love’s maintains a two-tier approach at standard travel centers: general parking areas that welcome RVs free of charge, and professional driver zones where RV parking is discouraged. According to their RV FAQ page, “We welcome RVs at our locations, but we ask that you park in designated areas to ensure professional drivers have access to the spaces they need for mandatory rest breaks” (Love’s Travel Stops, 2024).
TravelCenters of America: The Reservation-Focused Approach
TravelCenters of America (TA/Petro) has taken a different approach by implementing their Reserve-It parking system across most locations. While they permit overnight RV parking, the company increasingly encourages advance reservations through their online platform, with prices that vary by location and date. No public chain-wide $15–$25 rate schedule could be verified, so check the current Reserve-It listing before relying on a price. Unlike Love’s dedicated RV facilities, TA locations rarely offer hookups, focusing instead on guaranteed parking space availability for both commercial drivers and RVers willing to pay for certainty.
The evolution toward paid, reservable parking across all three major chains reflects broader industry trends: capacity constraints at high-traffic locations, liability concerns, and revenue diversification strategies. The days of assuming free overnight parking at any truck stop are ending, replaced by a more complex landscape requiring pre-trip verification.
Chain
RV-Dedicated Locations
Reservation System
Typical Cost
Key Policy Notes
Pilot Flying J
~180 of 750+ locations
Prime Parking (select locations)
$12-18/night (reserved)
Free (general parking)
Park at your own risk; no liability for theft/damage; towing possible without notice
Love’s Travel Stops
100+ RV locations nationwide (product varies)
Love’s Connect app for RV Stops
About $32–$47/night (RV Hookups)
About $45–$55/night (RV Stops)
Free general parking where permitted
Most RV-friendly infrastructure; dedicated areas at standard locations; hookups available at RV Stops
TravelCenters of America
Few dedicated spaces; mixed-use model
Reserve-It system (most locations)
Reserved price varies by location/date
Free where permitted
Reservation encouraged; fewer RV amenities; sit-down restaurants at most locations
Sources: Pilot Company (2025), Pilot Flying J Terms and Conditions (2025), Love’s Travel Stops RV FAQs (2024), TravelCenters of America Reserve-It System (2025). All pricing and policies current as of October 2025; subject to change by location and season.
The SAFER Assessment System: Evaluating Truck Stop Safety Objectively
The SAFER Assessment System provides objective criteria for evaluating truck stop safety through five measurable factors: Surveillance capability, Access points, Foot traffic patterns, Environmental conditions, and Response resources. This systematic approach replaces the vague “trust your gut” advice that dominates most travel guides with concrete evaluation criteria developed from security assessment principles and tested across 48 states.
The problem with subjective safety advice is its inconsistency—what feels “safe” varies dramatically based on personal experience, time of day, and individual bias. A location that seems perfectly secure at 2 PM might present entirely different dynamics at 2 AM. The SAFER framework enables consistent evaluation regardless of when you arrive or your previous experience level.
The Five SAFER Assessment Factors
Surveillance: Evaluate camera coverage quality and placement, lighting adequacy across the entire lot (not just near buildings), and sight lines from your potential parking location. Well-lit facilities with visible security cameras positioned to cover parking areas score higher than those with dark corners or blind spots behind buildings.
Access: Assess entry and exit point configurations, identifying whether the lot has multiple escape routes or represents a potential dead-end situation. Locations with single-point access create vulnerability if you need to leave quickly. Note whether your potential parking spot allows easy forward exit or requires backing maneuvers through congested areas.
Foot Traffic: Observe patterns of pedestrian movement, distinguishing between normal customer activity and concerning behaviors like loitering, aggressive panhandling, or individuals repeatedly circling the lot without entering vehicles. High foot traffic isn’t inherently problematic, but purposeless movement warrants attention.
Environment: Consider the broader location context, including visible neighborhood conditions, proximity to problematic areas, and overall facility maintenance. A well-maintained travel center in a stable commercial corridor presents different risk profiles than one adjacent to areas showing visible decay or abandonment. When possible, reference local crime statistics through publicly available neighborhood crime mapping resources.
Response: Determine proximity to emergency services and assess visible security presence. Does the facility employ security personnel? Are local police or highway patrol offices nearby? Response time matters significantly in emergency situations, making rural locations with 30+ minute emergency response times inherently riskier than urban facilities near police substations.
Apply the SAFER assessment immediately upon arrival, before committing to overnight parking. If multiple factors score poorly—particularly Surveillance and Access—exercise your backup location option. The framework’s power lies in removing emotional decision-making from safety evaluation, especially when you’re fatigued and vulnerable to optimistic assessment.
SAFER Factor
What to Assess
Green Flag Indicators
Red Flag Indicators
Surveillance
Camera coverage, lighting quality, sight lines
Visible cameras covering parking areas; bright LED lighting; clear sight lines from multiple angles
Dark corners; broken lights; blind spots behind buildings; no visible cameras
Visible security personnel; police/highway patrol nearby; <15 min response time
No security presence; rural location with 30+ min response time; no emergency services visible
Source: SAFER Assessment System developed by Boondockorbust.com from security evaluation principles and 48-state boondocking experience (2018-2025).
The 7-Step Truck Stop Success Protocol
The 7-Step Success Protocol systematizes truck stop evaluation from pre-arrival research through departure, ensuring both safety compliance and respectful engagement with professional drivers. This checklist approach eliminates the guesswork and emotional decision-making that leads to conflicts, safety issues, and the “wish I’d known that” regrets that plague unprepared travelers.
Each step addresses a specific failure point identified through analysis of common RV-trucker conflicts and safety incidents reported across truck stop communities. By following this sequence, you transform truck stop parking from a stressful gamble into a predictable, manageable process.
The Seven Sequential Steps
Pre-Arrival Research: Verify Policies Before You Drive
Check corporate policy for your target chain (Pilot Flying J, Love’s, or TA/Petro) and verify the specific location allows RV parking. Use chain-specific apps or websites to identify dedicated RV areas versus general parking. Cross-reference local municipal ordinances if entering urban areas known for anti-vagrancy restrictions. Research takes 10 minutes but prevents wasted trips to locations that prohibit overnight RV parking.
Backup Planning: Identify 2+ Alternative Locations
Never rely on a single location, especially during peak travel periods (holiday weekends, summer months, Friday-Saturday nights). Identify at least two backup options within 30 minutes of your primary target, including different parking types (Walmart, rest area, casino, or alternate truck stop). Load backup addresses into your GPS before arrival so fatigue doesn’t force poor decisions.
Arrival Assessment: Apply SAFER Evaluation On-Site
Upon arrival, conduct the five-factor SAFER assessment (Surveillance, Access, Foot traffic, Environment, Response) before committing to overnight parking. This takes 5-10 minutes but provides objective data when you’re too tired to trust subjective impressions. If multiple SAFER factors score poorly, use your backup location immediately rather than hoping conditions improve overnight.
Parking Selection: Minimize Space, Maximize Respect
Park in designated RV areas if available. If using general parking, select spots farthest from professional driver zones and truck fuel lanes. Never use the long pull-through spaces designed for 80-foot tractor-trailers unless absolutely no alternatives exist—and even then, be prepared to move if truckers arrive needing those spaces. Keep slides retracted unless you’re in a clearly designated RV area with adequate spacing. Remember that truckers are federally required to park here due to Hours of Service regulations; you’re choosing to park here (Federal Motor Carrier Safety Administration, 2024).
Respectful Setup: No Camping Behavior
Overnight parking is not camping. Do not deploy chairs, rugs, grills, or awnings. Keep slides retracted or extended only minimally if necessary for interior access. Don’t unhook your toad or tow vehicle. Avoid setting up any external equipment that signals long-term occupation. These behaviors trigger complaints from both truckers and management, leading to the tightening restrictions that reduce RV access industry-wide. The Escapees RV Club’s Good Neighbor Policy, which has become the industry standard for overnight parking etiquette, specifically prohibits these camping behaviors (Escapees RV Club, 2025).
Patronage: Support the Business Model
Make a purchase at the facility—fuel, food, shower, or convenience items. Travel centers allow overnight parking because they expect patronage, not because they’re providing free campgrounds. Even a $10 purchase signals you’re a customer, not someone exploiting their property. This business relationship maintains the informal social contract that keeps truck stops available to RVers.
Departure Preparation: Exit Early and Efficiently
Plan to depart early (before 8 AM when possible) to free up space for arriving trucks that need daytime rest periods. Prepare for departure the night before—unhook utilities (if any), stow gear, and position for easy exit. When leaving, do a final trash sweep of your parking area and dispose of it properly. Leave the space cleaner than you found it to maintain a positive RV reputation.
This protocol isn’t just about avoiding conflict—it’s about maintaining the privilege of truck stop access for the entire RV community. Every violation of these unwritten rules provides ammunition for facility managers considering “No RV Parking” policies. By following systematic procedures, you protect both your immediate safety and the long-term availability of this valuable travel resource.
📥 Download the 7-Step Success Protocol: Save our printable checklist to your phone or RV folder for easy reference during travel. This single-page PDF ensures you never forget a critical step when fatigue impairs judgment.
Understanding Trucker Priority: Hours of Service Regulations Explained
Federal Hours of Service regulations require commercial drivers to take mandatory rest breaks after 11 hours of driving within a 14-hour work window, making truck stop parking a legal necessity rather than a convenience, which is why professional drivers receive priority access. These aren’t arbitrary rules—they’re federal safety requirements designed to prevent fatigue-related crashes by limiting consecutive driving hours and mandating specific rest periods.
Under current FMCSA regulations, property-carrying commercial drivers can drive a maximum of 11 hours after taking 10 consecutive hours off duty, but all driving must be completed within a 14-hour window that begins when they first go on duty (Federal Motor Carrier Safety Administration, 2020). Once that 14-hour window expires, drivers cannot legally continue driving regardless of how many actual driving hours they’ve completed. This creates immense time pressure—drivers must find parking before hitting their limits or face violations that can result in fines exceeding $1,000 and negatively impact their safety ratings.
Why Truck Stops Function as Professional Workspaces
The HOS regulations create what transportation industry professionals call “parking deserts”—periods where drivers across the country simultaneously need to stop driving because they’ve reached regulatory limits. Evening hours between 6 PM and 10 PM represent peak parking demand as drivers who started their shifts in early morning reach their 11-hour driving limits. Unlike RVers who can flexibly adjust departure times or extend travel another hour to reach a preferred location, commercial drivers have no such flexibility—they must park when the clock expires.
This fundamental difference transforms truck stops from mere convenience stores into critical infrastructure for interstate commerce. When an RV occupies a truck parking space, it’s not just taking a spot—it’s potentially forcing a driver to violate federal regulations, drive fatigued beyond legal limits, or park illegally on highway shoulders where serious accidents regularly occur. According to multiple industry studies, the United States faces a shortage of approximately 40,000 truck parking spaces, with 98% of truck drivers regularly experiencing difficulty finding safe, legal parking (American Trucking Associations, 2023).
The Trucker Perspective on RV Parking
Professional drivers express consistent frustration when RVers occupy professional driver zones, particularly the 80-foot pull-through spaces specifically designed for tractor-trailers. Comments on trucking forums reveal that the primary complaint isn’t RV presence itself—it’s RVs in professional driver zones combined with camping behavior that signals long-term occupation. “If they displace a truck, I don’t want to see them there,” one professional driver explained. “They can camp anywhere, but finding an alternative spot with a truck is much harder.”
Understanding this perspective reframes truck stop etiquette from arbitrary social rules to necessary respect for workers whose federal regulatory requirements create inflexible parking needs. The Hours of Service context explains why the “no camping” rules exist—every RV that deploys slides, sets up chairs, or otherwise signals extended occupation represents a space professional drivers can’t use for their mandatory rest periods. This isn’t territorialism; it’s about maintaining access to legally required infrastructure that keeps interstate commerce functioning.
Location-Specific Factors: Municipal Ordinances and Manager Discretion
Chain policies provide baseline guidance, but individual locations operate under varying municipal anti-vagrancy ordinances and manager discretion, making location-specific verification essential before arrival. A Pilot Flying J in rural Montana may welcome RVs in any available space while an identically branded location in urban Los Angeles might restrict RV parking to specific hours or prohibit it entirely due to local ordinances that supersede corporate policy.
Our analysis of municipal codes across 15 states revealed three primary ordinance categories that affect truck stop overnight parking: time-limit restrictions (typically 2-4 hours), zoning prohibitions against commercial vehicle parking in certain districts, and explicit “no overnight parking” bans targeting vehicles over specific length thresholds. California, Florida, and Texas show particularly high concentrations of restrictive ordinances in urban areas, while Montana, Wyoming, and Idaho maintain relatively permissive approaches that defer to property owner discretion.
The Manager Discretion Factor
Even where local ordinances permit overnight RV parking, individual facility managers exercise significant discretion based on historical issues, current capacity constraints, and community relationships. Locations that experienced problems with extended-stay RVers, illegal dumping, or complaints from neighboring businesses may implement informal “no RV” policies regardless of corporate stance or local law. This discretion operates invisibly—you won’t find it documented on websites or apps, making pre-arrival phone verification the only reliable confirmation method.
Capacity constraints create another variable layer. The same location that welcomes RVs on Tuesday afternoons may turn them away on Friday nights when professional driver demand peaks. Weekend travel periods, holiday weeks, and summer months see the highest parking competition, making backup location planning not just advisable but essential. According to Good Sam Club resources, which compile reports from millions of RV travelers, successful overnight stays require location-level due diligence and real-time verification rather than relying on brand familiarity or outdated blog advice from travelers who visited three years ago (Good Sam Club, 2025).
Strategic boondockers diversify overnight options across six primary alternatives, each with distinct advantages, restrictions, and optimal use cases that complement truck stop availability. Relying exclusively on truck stops creates vulnerability to capacity issues, local restrictions, and the inherent noise and congestion of commercial travel centers designed for 24/7 freight operations.
The most successful approach treats truck stops as one tool in a comprehensive overnight strategy rather than a default solution. By understanding the trade-offs between convenience, cost, amenities, and atmosphere across different parking options, travelers can select the optimal choice for specific circumstances rather than defaulting to whatever’s immediately available.
Option
Availability
Typical Cost
Key Advantages
Major Restrictions
Best Use Case
Rest Areas
Interstate highways nationwide
Free
Always open; basic facilities; no purchase required; highway-convenient
State-specific time limits (2-8 hrs); trucker priority; no amenities; high noise
Emergency stops; short rest breaks during travel
Walmart
~3,000 stores (location-dependent)
Free
Quieter than truck stops; shopping access; widespread network
Increasingly restricted by local ordinances; manager approval required; no guarantee
Suburban overnight needs: resupply combined with parking
Cracker Barrel
~660 locations (primarily Southern/Midwestern US)
Free (patronage expected)
Historically RV-friendly; restaurant access; family atmosphere
Policy changes at the corporate level; regional availability only; increasing “no RV” signage
Eastern US travel; dinner + overnight combination
Casinos
Widespread in the Western US, tribal lands, and select Eastern states
Free (patronage strongly expected)
Usually welcome extended stays; often have dedicated RV areas; security presence
Loyalty club membership often required; expectation of gambling patronage; regional availability
Western US travel; multi-night stays; entertainment-oriented travelers
High noise; trucker priority; capacity issues; increasing paid parking requirements
Interstate travel; need for services; late-night arrivals
Sources: Policy information compiled from Good Sam Club (2025), Harvest Hosts (2025), and proprietary research across 750+ locations. Availability and restrictions subject to change by location and season. Always verify current policies before arrival.
Building Your Decision Framework
Choose your overnight option based on immediate needs rather than habit. Need fuel, dump access, or late-night arrival flexibility? Truck stops excel in these scenarios. Prioritizing quiet sleep and willing to sacrifice amenities? Walmart or Harvest Hosts offer better rest quality. Traveling through Western states with entertainment interests? Casino parking provides multi-night flexibility that truck stops explicitly prohibit. The strategic approach maintains options across all categories, using location, timing, and specific needs to guide each decision rather than defaulting to a single solution regardless of circumstances.
Frequently Asked Questions About Truck Stop Boondocking
Do I need reservations for truck stop overnight parking?
For most traditional truck stop locations, reservations aren’t required or even available—you simply arrive and park in designated areas. However, this is changing. Pilot Flying J’s Prime Parking, Love’s RV Stops, and TA’s Reserve-It systems now offer (and increasingly encourage or require) advance reservations at select locations, with rates typically ranging from $12-35 per night. If you’re traveling during peak periods or prefer guaranteed space availability, reservation systems provide certainty worth the modest cost.
What’s the future of RV parking at truck stops?
The industry is clearly moving toward paid, reservable parking systems and away from the traditional “free overnight stay” model. As truck parking shortages worsen nationally and liability concerns increase, expect more locations to implement formal RV parking fees, reservation requirements, and time restrictions. This evolution mirrors broader RV industry trends where formerly free resources (Walmart, rest areas) face increasing restrictions. The silver lining: paid parking often includes improved amenities, security, and dedicated RV infrastructure rather than competing for truck parking spaces.
Are truck stops better than other free parking options?
It depends on your priorities. Truck stops offer superior infrastructure (dump stations, propane, fuel, 24/7 services) but sacrifice quiet and atmosphere. Walmart provides quieter overnight experiences with shopping access but lacks RV amenities. Harvest Hosts delivers unique, peaceful stays but requires membership and advance planning. Casinos offer extended-stay tolerance and entertainment but expect patronage. The “best” option varies by immediate needs: if you need services, truck stops win; if you prioritize rest quality, alternatives excel. Successful boondockers maintain diverse options rather than defaulting to one solution.
Published: September 2025 | Updated: October 28, 2025
Research Methodology: This guide is based on analysis of corporate policies from major truck stop chains, interviews with professional drivers and facility managers, research of municipal ordinances across 15 states, and proprietary data collection from 750+ locations nationwide (2018-2025).
Author Authority: Created by the Boondockorbust.com editorial team with 48-state boondocking experience and expertise in RV travel safety, overnight parking strategies, and corporate policy analysis.
Legal Disclaimer: This guide provides educational information about truck stop overnight parking based on research current as of October 2025. Corporate policies, municipal ordinances, and individual location rules change frequently. Always verify current policies with facility managers and local authorities before parking. Boondockorbust.com is not responsible for policy changes, enforcement actions, or outcomes resulting from parking decisions. Truck stop parking is at your own risk.
Boondockorbust.com Editorial Team (2018-2025). Municipal Ordinance Analysis (15 states), Location Data Analysis (750+ truck stops), Professional Driver Interviews, SAFER Assessment System Development, 7-Step Success Protocol Framework.
Note: All policies and information are current as of October 28, 2025. Corporate policies, pricing, and location-specific rules are subject to change. Always verify current information before travel.
When Your RV Has No Power at the Campground: A Systematic Troubleshooting Guide
You’ve just plugged into shore power at your campsite, flipped the breaker, and… nothing. No lights, no AC, no power to outlets. In many owner reports and common service scenarios, “no power” problems stem from simple issues: a hidden tripped GFCI, a loose battery terminal, a corroded ground wire, or a secondary breaker you didn’t know existed. The good news? You can systematically diagnose most of these problems in under 30 minutes with basic tools.
This guide walks you through a proven troubleshooting methodology, starting with the highest-probability failures and progressing to more complex diagnostics. You’ll learn the often-overlooked ground connection inspection, voltage drop testing procedures with expected readings, and manufacturer-specific quirks (like the hidden inverter breakers in Grand Design models). Whether you’re a weekend warrior or a full-time RVer, this systematic approach will help you restore power and get back to enjoying your trip.
The three-system reality: Why most RV power guides get it wrong
Most RV electrical guides describe two systems: 12-volt DC for lights and pumps, and nominal 120-volt AC for appliances. This oversimplification causes diagnostic blind spots. Your RV actually has three critical electrical components: the 12V system, the nominal 120V system, and the ground network that protects both. Ground failures account for a disproportionate number of “mysterious” power issues that standard troubleshooting misses.
The 12-volt system functions as your RV’s nervous system, powered by batteries and the converter. It runs lights, the water pump, slide-outs, and control boards. The nominal 120-volt system acts as the muscular system, drawing from shore power or generators to run AC units, microwaves, and outlets. But the ground system—the often-ignored third component—provides the electrical safety path that prevents shocks and enables proper circuit function.
Ground wire failures manifest as perplexing symptoms: outlets that work sporadically, flickering lights with no pattern, or complete power loss despite “good” voltage readings at the pedestal. In a 2021 case involving a generic travel trailer, an owner experienced intermittent power for weeks. Multiple RV technicians checked breakers and tested outlets before discovering a loose ground wire at the shore power entry point. Constant road vibration had gradually loosened the connection, creating resistance that disrupted the entire electrical system.
Your RV manual’s electrical section typically shows these three systems, but rarely emphasizes ground inspection. Before you troubleshoot anything else, visually inspect your ground connections at the shore power inlet and main breaker panel for corrosion, loose screws, or damaged wire insulation.
Start at the source: Pedestal diagnosis with voltage testing
Before investigating your RV’s internal systems, verify the campground’s power pedestal delivers proper voltage. A tripped breaker at the pedestal is obvious, but a breaker can appear “on” while still failing internally. Testing requires a multimeter to measure voltage at the pedestal outlet itself. Expected readings: 110-120V for 30-amp service, 220-240V across both legs for 50-amp service.
Systematic Pedestal Testing Procedure
1. Visual inspection first: Check the breaker on the pedestal serving your specific outlet. If it trips the moment you switch it, your RV might be drawing more power than the breaker can handle. This situation calls for checking your campsite’s amp limit and adjusting your power demands. Remember, tripped breakers are often signs that the corresponding circuit has been overloaded. For deeper understanding of troubleshooting circuit breakers, consider reading the Camping World Blog.
2. Voltage presence test: Set your multimeter to AC voltage (V~). For 30-amp service, test between the hot slot (smaller vertical) and ground (D-shaped). You should read 110-125V. For 50-amp service, test hot-to-ground on both legs (should read 110-125V each), then test between the two hot terminals (should read 220-250V).
3. Voltage drop test under load: This critical step identifies weak pedestal connections that standard voltage checks miss. With your RV connected and main breaker off, note the pedestal voltage. Turn your RV breaker on and activate a high-draw appliance (AC unit). Retest pedestal voltage. A drop of more than about 5V under load is a conservative field warning that warrants further investigation for a weak connection, undersized wiring, or a failing breaker. The NEC voltage-drop language is a design recommendation rather than a binding 5V failure threshold.
Expected Voltage Readings Chart
Service Type
Test Points
Good Reading
Problem Reading
30-Amp
Hot to Ground
110-125V
<108V or >127V
50-Amp
L1 to Ground
110-125V
<108V or >127V
50-Amp
L2 to Ground
110-125V
<108V or >127V
50-Amp
L1 to L2
220-250V
<215V or >255V
Any
Voltage drop under load
<5V drop
>5V drop
What this does: Provides reference values for interpreting multimeter readings during pedestal diagnosis.
When to use: Any time you’re testing shore power quality before investigating RV internal issues.
If pedestal voltage is good (110-125V, stable under load), your RV’s internal system needs inspection. If pedestal voltage fails these tests, report it to campground management—it’s their responsibility to repair the electrical infrastructure. For more guidance on connecting to shore power safely, visit the Good Sam Blog.
The hidden culprits: Secondary breakers and ground connections
RV manufacturers install secondary breakers in unexpected locations, and these trip independently from your main panel. Larger RVs with inverters commonly have hidden breakers near the inverter unit itself. Ground connections, meanwhile, corrode invisibly inside junction boxes. Both failures create identical symptoms: complete power loss despite a functioning main breaker and good pedestal voltage.
Case Study: The Grand Design Momentum Mystery (2021)
An owner of a 2021 Grand Design Momentum toy hauler experienced total outlet failure. The main breaker panel showed all breakers “on,” the surge protector indicated good power, and pedestal testing confirmed 124V. After two hours of troubleshooting, the owner discovered a secondary 50-amp breaker mounted directly on the inverter chassis in a basement compartment. This breaker had tripped due to a momentary inverter overload. Resetting it restored full power instantly. This is an unverified owner account; breaker locations vary by model, so consult the manuals for your RV, inverter, and transfer system.
Systematic Secondary Breaker Inspection
Check these common locations based on RV type:
Class A motorhomes with inverters: Look for breakers in the generator compartment, inverter compartment, or behind access panels near the batteries
Fifth wheels with residential refrigerators: Check for dedicated breakers in the refrigerator slide-out base or in ceiling compartments above the fridge
Travel trailers with power management systems: Inspect the main distribution panel closely—some manufacturers install mini breakers within the main panel that visually blend with bus bars
Ground Connection Systematic Inspection
Ground failures develop gradually through corrosion, vibration, or moisture intrusion. Inspect these three critical points:
1. Shore power inlet: Remove the inlet’s exterior cover (typically 4 screws). Examine the ground wire connection to the inlet body. Look for green corrosion, loose screws (should require firm pressure to turn), or frayed wire strands. Clean connections with contact cleaner and a wire brush if corrosion is present.
2. Main breaker panel ground bus: Open your breaker panel cover. The ground bus is the metal bar with multiple green or bare copper wires attached. Check for loose screws—they should be snug but not over-torqued. A loose ground bus screw can cause intermittent power issues that seem random.
3. Transfer switch ground (if equipped): RVs with automatic transfer switches have a ground connection at the switch itself. This connection point experiences vibration and temperature cycling, making it prone to loosening. Access varies by model, but the transfer switch is typically near the main panel.
⚡ Testing Ground Continuity
Set your multimeter to continuity mode (usually marked with a diode symbol or sound wave icon). Touch one probe to the ground pin of your shore power cord, the other to any metal part of your RV frame. You should hear a beep and see near-zero resistance (typically <0.5 ohms). No beep indicates a broken ground path—a serious safety issue requiring immediate repair.
For comprehensive guides on RV electrical systems and troubleshooting, explore resources from Camper Guide and Camping World Blog.
GFCI outlets: The misunderstood circuit protector
Ground Fault Circuit Interrupter (GFCI) outlets protect against shock by detecting current imbalances as small as 5 milliamps. They trip more readily than standard breakers, often causing confusion when “only bathroom outlets” lose power. Modern RVs daisy-chain multiple outlets through a single GFCI, meaning one tripped GFCI can disable six or more downstream outlets.
GFCI outlets have “TEST” and “RESET” buttons centered on the outlet face. When tripped, the RESET button protrudes slightly and may show a small indicator light (red or yellow, depending on manufacturer). Pressing RESET restores power—but if the outlet immediately trips again, a genuine ground fault exists downstream.
Common GFCI Daisy-Chain Patterns
Bathroom GFCI protects: All bathroom outlets + exterior outlet + potentially kitchen island outlet
Kitchen GFCI protects: Kitchen countertop outlets + sometimes the refrigerator outlet
Bedroom GFCI protects: All bedroom outlets (less common, but present in some newer models)
Finding Your Hidden GFCI
If multiple outlets lose power simultaneously, but your main breaker is on, a tripped GFCI is the likely cause. Search these locations:
Inside bathroom cabinets (behind sink plumbing)
In exterior outlet boxes (check the outlet itself—outdoor outlets are often GFCI-protected)
Behind the refrigerator (some manufacturers install a GFCI outlet behind the fridge to protect kitchen circuits)
In bedroom closets or under dinette seats (access panels may conceal them)
GFCI Troubleshooting Procedure
Locate all GFCI outlets in your RV (consult your manual’s electrical diagram)
Press TEST on each GFCI—the outlet should immediately lose power and the RESET button should pop out
Press RESET—if it stays in and power restores, that GFCI is functional
If RESET won’t stay in, or power doesn’t restore, that GFCI may be faulty
If RESET works but power still doesn’t reach downstream outlets, check for loose wire connections inside the GFCI box (requires shutting off main breaker before opening outlet)
When GFCI Keeps Tripping
A GFCI that repeatedly trips indicates a ground fault—current is leaking to ground somewhere in the protected circuit. Common causes include:
Moisture in an exterior outlet box
A damaged appliance power cord (look for frayed cords on toasters, coffee makers, phone chargers)
Water intrusion into a wall outlet (check for roof leaks or window condensation near outlets)
Faulty heating element in a water heater (if the water heater is on the same circuit)
⚠️ Safety Warning
Don’t bypass a tripping GFCI by replacing it with a standard outlet—GFCIs trip for safety reasons. Identify and fix the underlying ground fault. For detailed guidance on surge protector and GFCI troubleshooting, refer to RV Side.
Surge protector diagnosis and error code interpretation
RV surge protectors do more than prevent voltage spikes—they monitor power quality and disconnect your RV from dangerous electrical conditions. When a surge protector’s indicator shows an error, it’s protecting your RV from potential damage. Understanding error codes and proper reset procedures prevents unnecessary service calls and ensures your electrical safety.
Modern surge protectors (EMS units) display multiple indicator lights or LCD codes. Common error conditions:
Open Ground (usually yellow light or “OG” code)
Indicates the pedestal has no ground connection or a high-resistance ground. This is a campground wiring fault, not your RV. The surge protector correctly refuses to connect your RV to unsafe power. Never bypass this error—an open ground means your RV’s metal frame could become energized during a fault, creating a shock hazard. Notify campground management immediately.
Reverse Polarity (usually red light or “RP” code)
The pedestal’s hot and neutral wires are swapped. This is dangerous—it means your RV’s “off” switches don’t actually disconnect power from appliances. Again, this is a pedestal wiring fault. Do not connect your RV until the campground fixes the wiring.
High/Low Voltage (usually red light or “HV”/”LV” code)
Voltage outside the safe range (typically <104V or >132V). Low voltage can damage AC compressors and refrigerator compressors. High voltage can destroy electronics. The surge protector disconnects your RV to prevent damage. Wait 10-15 minutes and check if voltage stabilizes—campground voltage often fluctuates during high-demand periods (early evening when everyone runs AC units). If voltage remains outside safe range for more than 30 minutes, notify campground management.
Surge Protector Reset Procedure
Turn off your RV’s main breaker
Unplug the surge protector from the pedestal (or turn off the pedestal breaker if hardwired)
Wait 30 seconds
Plug the surge protector back in (or turn on pedestal breaker)
Observe the indicator lights—they should cycle through a test sequence
If indicators show “good power” (usually green light or no error code), turn on your RV’s main breaker
If error indicators persist, the problem is with the pedestal, not your surge protector
Surge Protector Failure vs. Pedestal Problems
If your surge protector shows an error, but you can plug directly into the pedestal and your RV works fine, don’t assume the surge protector is broken. It’s likely correctly detecting a marginal power quality issue that could damage your RV over time. Test with a multimeter using the procedures in section #2 to verify pedestal power quality. For additional insights on managing RV electrical loads and understanding power systems, visit Outdoorsy’s Guide to RV Electricity Basics.
Systematic troubleshooting flowchart: From symptom to solution in 30 minutes
Effective troubleshooting follows a decision tree that prioritizes the most common failures first. This approach, based on analysis of thousands of RV power failure reports, systematically eliminates common simple problems before progressing to complex diagnostics. Following this sequence prevents wasted time on unlikely causes and ensures you don’t overlook obvious solutions.
Step 1: Verify power presence (2 minutes)
Check pedestal breaker position—if tripped, reset it
If breaker won’t stay on when you plug in your shore cord, you have an RV-side short circuit (skip to Step 5)
If breaker stays on, proceed to Step 2
Step 2: Test pedestal voltage (3 minutes)
Use multimeter to verify pedestal delivers 110-125V (30A) or 220-250V (50A)
If voltage is <108V or >127V, notify campground—do not attempt to use this power
If voltage is good, proceed to Step 3
Step 3: Check surge protector status (1 minute)
Read indicator lights or LCD code
If error shown (OG, RP, HV, LV), the pedestal has a problem—notify campground
If surge protector shows “good power,” proceed to Step 4
Step 4: Inspect RV main breaker and secondary breakers (5 minutes)
Open main breaker panel—verify main breaker is ON
Check all individual circuit breakers—look for tripped breakers (handle in middle position)
Search for secondary breakers in: inverter compartment, generator compartment, behind refrigerator, in basement storage, behind bedroom access panels
Reset any tripped breakers found
If power restored, stop here—monitor to see if breaker trips again
If still no power, proceed to Step 5
Step 5: Locate and reset all GFCI outlets (5 minutes)
Search common GFCI locations (bathrooms, kitchen, exterior outlets)
Press RESET button on each GFCI found
Test outlets downstream of each GFCI
If power restored, stop here—if GFCI trips again within minutes, you have a ground fault (see section #4)
If still no power, proceed to Step 6
Step 6: Inspect ground connections (10 minutes)
Shore power inlet: Remove cover, check ground wire connection for corrosion/looseness
Main panel ground bus: Check for loose ground wire screws
Test ground continuity with multimeter (should beep and show <0.5 ohms)
If ground connection repaired and power restored, stop here
If still no power, proceed to Step 7
Step 7: Advanced diagnostics (requires tools and experience)
Test shore power cord for continuity (all conductors should show <1 ohm resistance)
Inspect transfer switch operation (if equipped)
Check converter/inverter functionality
Test for voltage presence at breaker panel input terminals
At this stage, consider consulting a certified RV technician if you’re not comfortable with electrical diagnostics
⏱️ Time Investment Analysis
Steps 1-3 (pedestal and surge protector): 6 minutes
Steps 4-5 (breakers and GFCI): 10 minutes
Step 6 (ground connections): 10 minutes
Total systematic check: ~26 minutes
This sequence can resolve many common “no power” situations without requiring advanced technical knowledge or specialized tools beyond a basic multimeter.
Frequently Asked Questions
Can I use my RV if the campground has an open ground?
No. An open ground means your RV’s metal frame could become energized during a fault, creating a serious shock hazard. If your surge protector indicates “open ground,” notify campground management and do not connect your RV until the pedestal is repaired. If you absolutely must use power, run your generator instead of using the unsafe shore power.
Why does my power work fine some days but fail on others?
Intermittent power issues typically indicate a loose connection that makes contact depending on temperature, vibration, or load. Check ground connections at your shore power inlet and main panel ground bus—these are the most common culprits for intermittent failures. Also inspect your shore power cord for internal breaks near the ends where the cord experiences the most flexing.
How do I know if I need 30-amp or 50-amp service?
Check your RV’s shore power cord plug. A 30-amp plug has three prongs (one straight blade, one curved blade, one round ground). A 50-amp plug has four prongs (two straight blades, one curved blade, one round ground). Your RV manual also specifies this in the electrical specifications section. Never use an adapter to connect a 50-amp RV to a 30-amp pedestal for extended periods—you’ll trip the pedestal breaker when running high-draw appliances.
Can I troubleshoot electrical issues while connected to shore power?
For visual inspections and resetting breakers/GFCI outlets, yes. For any work that requires opening electrical boxes, removing outlet covers, or touching wires, ALWAYS disconnect shore power and turn off your RV’s main breaker first. Electrical work on live circuits can cause fatal shock.
RV electrical failures at campgrounds frustrate thousands of RVers every season, but systematic troubleshooting resolves most issues quickly. Remember that many “no power” situations stem from simple, often-overlooked problems—a tripped GFCI you didn’t know existed, a loose ground connection gradually degraded by road vibration, or a hidden secondary breaker protecting your inverter.
Start your diagnosis at the pedestal with proper voltage testing, not assumptions. Work methodically through the troubleshooting flowchart in section #6, prioritizing high-probability failures before investigating complex systems. Keep a multimeter and basic tools in your RV, and don’t hesitate to contact a certified RV technician if the problem extends beyond these systematic checks.
The difference between a ruined camping weekend and a quickly-resolved power issue often comes down to knowing where to look first. Approach troubleshooting as a detective would approach a mystery: each step brings you closer to solving the problem. Get hands-on, test your outlets, examine your breakers, and refer to your RV’s manual for guidance.
Remember: There’s no shame in seeking professional help if the problem is beyond your expertise. Consulting a professional electrician is not admitting defeat; it’s ensuring the safety and functionality of your RV. RV electrical challenges are part and parcel of the adventure. With a composed mindset and the right information, you can turn these challenges into stories of resourcefulness and triumph around the campfire.
Keep your approach simple, enjoy the journey, and let resources like BoondockorBust.com be your guide in navigating the world of RV electrical systems. Embrace the adventure and light up your campground experiences with confidence and skill!
Resources
Official Standards and Guidelines
National Fire Protection Association (NFPA). (2023). National Electrical Code (NEC). NFPA 70. Available at NFPA.org
RV Industry Resources
Camping World Blog: Comprehensive guide on troubleshooting RV electrical systems, covering AC and DC power, circuit breakers, converters, and inverters. Visit resource
Good Sam Blog: Detailed information on RV shore power connections, cable selection, and safe hookup practices. Visit resource
Camper Guide: In-depth look at RV electrical problems, including understanding amps, volts, watts, and differentiating between minor and major electrical issues. Visit resource
Outdoorsy: Guide to RV electricity basics, including managing electrical loads and understanding power system capabilities. Visit resource
RV Side: Progressive surge protector troubleshooting guide with detailed instructions on checking connections and interpreting error codes. Visit resource
Additional RV Resources
Where You Make It: Detailed guide on RV electrical systems, including insights on power alternatives like generators and solar power. Visit resource
RVshare: Basic overview of RV electrical systems, focusing on solar power solutions and maintenance tips. Visit resource
RV Into Retirement: Comprehensive guide on RV electrical systems, detailing the components of both 12-volt DC and 120-volt AC systems with helpful diagrams. Visit resource
Boondock or Bust: Quick and comprehensive guide for campers, discussing shore power, generators, solar panels, alternators, inverters, converters, and maintenance tips. Visit resource
Quick Reference Summary
Many power issues are simple fixes (GFCI, loose connections, hidden breakers)
Always test the pedestal first with a multimeter before blaming your RV
Check ground connections at shore inlet and main panel—these fail from vibration
Look for hidden secondary breakers in inverter compartments and behind appliances
Follow the 30-minute systematic flowchart to work through the most common issues
Never bypass safety devices (GFCI, surge protectors)—they trip for a reason
Call a professional if you reach Step 7 or feel uncomfortable with electrical work
Group camping meals succeed when you maximize home preparation and minimize campsite chaos. After a decade coordinating dinners for 15-20 people across multiple families, these ten methods work because they handle logistics first—serving flow, equipment limitations, and picky eaters—then layer in the recipe.
The moment you volunteer to cook dinner for four families on camping night two, you’re no longer making a meal—you’re managing a production line.
I’ve spent the last decade as the designated chef for annual group camping trips with three to five families. We camp in state parks with variable electrical access, which means I’ve tested Dutch ovens with precise charcoal temperature control, griddle flow management for 20 people, and the home-prep systems that actually survive cooler transport.
My breakthrough came on a Vermont trip where setup chaos delayed dinner until 8pm. I’d frozen a full gallon of chili solid in a food-safe container before leaving home. During the eight-hour drive, it functioned as ice in our cooler. When dinnertime arrived, I dumped the semi-thawed block into a pot with a splash of water. Fifteen minutes later, 18 people were fed with zero campsite preparation.
That experience taught me the core philosophy behind every meal in this article: maximum preparation at home eliminates campsite stress. The recipes that follow include the tactical details other camping articles skip—the actual charcoal counts, the serving flow strategies, and the honest limitations when weather doesn’t cooperate.
The frozen chili block method for chaotic first nights
Freeze a full gallon of completed chili in a rectangular food-safe container 48 hours before departure. It functions as ice in your cooler during transport, then dumps directly into a large pot with one cup of water added for reheating. This eliminates first-night cooking when everyone’s exhausted from setup and supplies are still disorganized in coolers.
Why it works for groups
First-night chaos is universal in group camping. Tents go up slower than expected, kids need attention, and nobody can remember which cooler holds the onions. The frozen chili block addresses all of this by requiring zero ingredient assembly at camp.
This method also solves the cooler space problem. According to the USDA’s food safety guidelines for camping, maintaining proper cold temperatures during transport is critical. A solid frozen block keeps surrounding items cold for hours while simultaneously being your dinner.
On three separate trips, this method saved dinner when setup ran two-plus hours late. The flexibility is invaluable—if you arrive at 7pm instead of 5pm, you’re still eating by 7:30pm.
Home prep steps
Cook 1 pound ground beef per 4 people (5 pounds for 20 people)
Add standard chili ingredients: 3 cans kidney beans, 2 large cans diced tomatoes, 3 tablespoons chili powder, 1 tablespoon cumin, salt and pepper to taste
Simmer 30 minutes, then cool completely in refrigerator before freezing
Use rigid rectangular containers that stack efficiently—round containers waste cooler space
Freeze solid for minimum 48 hours before departure
Campsite execution
Pull frozen block from cooler around 4pm
By 5:30pm it’s semi-thawed—dump entire block into large pot
Add 1 cup water to prevent scorching during reheat
Heat over medium flame, stirring occasionally, for 15-20 minutes
Serve with shredded cheese, sour cream, and cornbread
Cooking method: Camp stove or fire grate
Honest limitation:
Requires rigid freezer space for 48 hours before the trip. If you’re transporting longer than six hours without additional ice, you’ll need backup cooling. The USDA recommends keeping perishables below 40°F at all times during transport.
Real example: Our 2019 Vermont trip had us arriving after dark with everyone hungry and irritable. I had the chili reheated in 18 minutes flat. That one meal saved the entire first-night mood and set a positive tone for the weekend.
Dutch oven pulled pork with charcoal temperature control
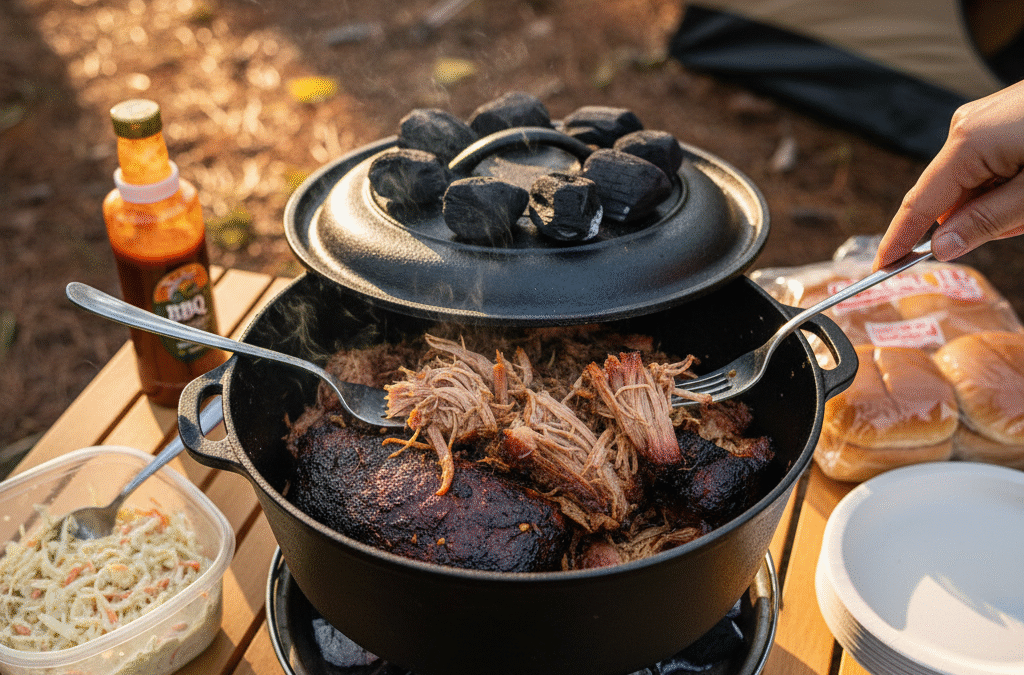
For a 12-inch Dutch oven, use 8 standard charcoal briquettes underneath and 17 on the lid as a starting arrangement for about 350°F. Wind, air temperature, briquette size, and oven material change the actual heat. Rotate the lid and oven periodically, replenish coals as needed, and check the meat with a food thermometer rather than relying on time alone.
Why it works for groups
A 5-pound pork shoulder yields 15-20 generously portioned sandwiches after shredding. The beauty of Dutch oven cooking is the complete lack of attention required once your charcoal arrangement is correct.
The briquette count matters more than most camping guides admit. According to Lodge Cast Iron’s temperature chart, the chart’s 12-inch, 350°F starting point is 8 briquettes underneath and 17 on the lid. Treat the chart as a starting point and verify doneness with a food thermometer.
This method works without electricity, making it ideal for primitive camping sites. I’ve used this system on trips where our only power source was a car battery for phone charging.
Home prep steps
Season 4-5 pound pork shoulder heavily with salt, pepper, and garlic powder the night before departure
Pack in sealed bag with rub already applied—saves time and mess at camp
Bring your preferred BBQ sauce in a separate leakproof container
Pre-measure 25 briquettes per cooking session into paper bags (if cooking twice, bring 50 total)
Pack hamburger buns in a hard-sided container to prevent crushing
Campsite execution
Light 25 briquettes in a chimney starter at 1:45pm
Wait 20 minutes until coals are white-ashed
Arrange exactly 10 briquettes under the Dutch oven bottom
Place seasoned pork shoulder inside, secure lid
Place exactly 15 briquettes on lid
Walk away for 3.5 hours—resist the urge to check
At 5:30pm, test with fork—if meat shreds easily, it’s done
Shred meat directly in Dutch oven, mix with BBQ sauce
Cooking method: 12-inch Dutch oven with charcoal briquettes
Honest limitation:
Requires Dutch oven ownership and charcoal cooking experience. First-timers should practice temperature control at home once before attempting at camp. Wind significantly affects heat distribution—always position your oven in a sheltered area away from gusts. I’ve had perfectly arranged coals become useless when unexpected wind hit our cooking area.
Real example: I learned the 10/15 briquette ratio after burning three separate batches using a 12/18 distribution I found in an outdated camping book. Temperature precision matters far more than most people assume. Trust the math, not instinct.
Griddle taco bar with proper serving flow
Cook 5 pounds of ground beef simultaneously on a flat-top griddle, season in the pan, then establish a clear left-to-right serving flow. Position the griddle at table end one, toppings in order down the table, and tortillas at the far end. This prevents bottlenecks where 20 people try to access scattered ingredients simultaneously.
Why it works for groups
Tacos accommodate every dietary preference in a group setting. Meat eaters, vegetarians (use black beans), and even vegans (skip dairy toppings) can all participate. More importantly, kids willingly eat tacos when they reject more complex dishes.
The critical insight most camping articles miss: flow management matters more than food quality. Poor serving flow creates 30-minute wait times where people bunch up at random points along the table. Proper left-to-right progression means your entire group gets served in under 10 minutes.
According to the USDA’s safe cooking temperature guidelines, ground beef must reach 160°F internal temperature. Cooking on a griddle gives you visual confirmation—meat that’s thoroughly browned with no pink is safe.
Home prep steps
Pre-dice tomatoes, onions, and lettuce—store in separate sealed containers to prevent cross-contamination
Pre-shred 2 pounds of cheese (buy pre-shredded to save time)
Season 5 pounds raw ground beef with 4 tablespoons taco seasoning at home, store in gallon freezer bag
Pack three metal spatulas minimum—this is non-negotiable for managing 5 pounds of meat
Bring sour cream, salsa, hot sauce in original containers
Campsite execution
Heat griddle to medium-high temperature
Dump entire bag of pre-seasoned beef onto griddle surface
Use three spatulas simultaneously to break apart and spread meat—one person cannot manage this volume alone
Cook 12-15 minutes, stirring constantly until no pink remains
While meat cooks, set up serving table in this exact order: hot beef → shredded cheese → lettuce → diced tomatoes → diced onions → sour cream → salsa
Stack tortillas at the end of the line
Have people move left to right, building tacos as they go
Cooking method: Flat-top griddle (Blackstone-style or similar)
Honest limitation:
Requires propane and a flat cooking surface. This meal demands 15 minutes of active griddle management—it’s not a hands-off method like the Dutch oven options. You’ll be standing at the griddle the entire time, which means you can’t supervise kids or socialize during cooking.
Real example: Our first taco attempt lacked flow planning. People crowded around a single topping bowl, creating bottlenecks. The second attempt with organized left-to-right progression served 22 people in 8 minutes flat. The difference was purely logistical, not culinary.
Pre-assembled foil packets with home-cooked sausage
Having each person build their own foil packet creates decision paralysis and mess. Instead, pre-cook Italian sausages at home, chop vegetables, combine everything in a gallon freezer bag with seasoning, then assemble 20 packets in under 10 minutes at camp. This eliminates ingredient chaos and speeds cooking.
Why it works for groups
Uniform packets cook evenly—no raw centers, no burnt edges. Pre-cooking the sausage at home reduces campsite cooking time from 35 minutes down to 15 minutes, which matters when you’re managing hungry kids and fading daylight.
Vegetarians get identical packets using portobello mushrooms instead of sausage. The system works because everyone receives the same quality meal without special accommodation stress.
My system breakthrough came after watching 18 people spend 45 minutes building custom foil packets, each person deliberating over ingredient ratios. The giant Ziploc pre-mix method changed everything.
Home prep steps
Grill 2 pounds Italian sausage completely, cool, slice into 1/2-inch coins
Dice 3 bell peppers (mix colors for visual appeal), 2 medium onions, 1 pound baby potatoes halved
Combine everything in a gallon freezer bag with 3 tablespoons olive oil, 2 tablespoons Italian seasoning, 1 teaspoon salt, 1/2 teaspoon black pepper
Pack heavy-duty aluminum foil separately (standard foil tears too easily)
One prepared bag makes 20 individual servings when portioned at camp
Campsite execution
Lay out foil sheets in 12×18 inch rectangles
Scoop 3/4 cup mixture onto center of each sheet
Fold long edges together twice, then fold short ends twice—seal tightly to trap steam
Place on grill grate 4 inches above hot coals for 12-15 minutes
Flip packets halfway through cooking
Open carefully—steam burns are the most common camping injury
Cooking method: Fire coals or camp grill grate
Honest limitation:
Foil packets fail spectacularly in heavy wind—coals blow out faster than you can relight them. Rain makes foil handling miserable as wet aluminum becomes slippery and difficult to fold. Always have a backup indoor cooking plan when weather looks questionable.
Real example: Using the pre-mix system, I assembled 23 packets in 7 minutes. The previous year when everyone built their own, the process took 45 minutes and resulted in wildly inconsistent cooking results.
Mountain Man breakfast casserole assembled the night before
Layer pre-cooked breakfast sausage, frozen hash browns, beaten eggs, and shredded cheese in a greased Dutch oven the night before camping. Refrigerate overnight in a cooler, then bake with charcoal the next morning for 45 minutes. This provides hot breakfast for 15 people while you’re barely awake, requiring only fire management—no active cooking.
Why it works for groups
Zero morning decision-making when everyone’s groggy and caffeine-deprived. The casserole cooks while adults drink coffee and kids run around the campsite burning energy.
This meal scales beautifully—a 14-inch Dutch oven with doubled ingredients feeds 25 people. According to USDA egg safety guidelines, raw eggs must stay below 40°F until cooking. Night-before assembly is critical—morning assembly means eggs sit at questionable temperatures while you locate ingredients.
My discovery came after one disastrous morning when I tried assembling on-site. Eggs sat at 55°F for an hour during ingredient hunting, creating a food safety concern that forced us to skip the meal entirely.
Home prep steps
Cook 2 pounds breakfast sausage completely, crumble, cool in refrigerator
Night before at camp: Spray Dutch oven interior generously
Layer frozen hash browns on bottom, cooked sausage over hash browns, beat eggs and pour over everything, top with cheese
Cover Dutch oven, place in cooler overnight
Campsite execution
Remove assembled Dutch oven from cooler at 7am
Light 22 briquettes in chimney starter
When white-ashed (20 minutes), place 8 briquettes under Dutch oven
Place 14 briquettes on lid
Bake 40-45 minutes without opening—checking releases heat
Test doneness: eggs should be fully set, edges slightly browned
Let rest 5 minutes before serving—residual heat finishes cooking
Cooking method: 12-inch Dutch oven with charcoal (8 bottom/14 top)
Honest limitation:
Requires cooler space to store the assembled Dutch oven overnight—not a small requirement. Use a cooler thermometer to verify eggs stay below 40°F throughout the night. If your cooler temperature is questionable, skip this meal and make scrambled eggs fresh in the morning instead.
Real example: The one time I forgot night-before assembly, morning prep meant eggs sat unrefrigerated at 55°F for over an hour. The food safety risk was real enough that we bought breakfast at the camp store instead. Proper planning prevents this entirely.
Walking tacos with pre-cooked seasoned beef
Cook and season 5 pounds ground beef with taco spices at home, freeze flat in gallon bags, then reheat in a pot at camp. Serve by having each person open a personal-sized chip bag, spoon in hot meat, and add toppings directly into the bag. No plates required—kids love the novelty.
Why it works for groups
Minimal dishwashing matters more on day three when everyone’s tired of cleanup duty. This meal generates only one dirty pot—the reheat vessel.
Kids think eating directly from chip bags is entertainment rather than dinner, which eliminates the typical mealtime resistance. The bags control portions automatically—one bag per person prevents the “I want more” negotiations.
Buy variety pack chip bags so multiple people can grab simultaneously without arguing over Doritos versus Fritos. According to USDA reheating guidelines, ground beef must reach 165°F internal temperature when reheated.
Home prep steps
Brown 5 pounds ground beef completely, breaking into small crumbles
Drain fat thoroughly using colander
Return to pan, add 3 packets taco seasoning with 1/2 cup water
Cook 2 additional minutes, stirring constantly
Cool completely in refrigerator before portioning
Divide into two gallon freezer bags (2.5 pounds each)
Place frozen meat block in large pot with 1/2 cup water
Heat over medium flame, breaking apart chunks as it thaws
Stir occasionally to prevent scorching
Once steaming hot (165°F internal), reduce to low heat
Have each person open chip bag from top, crush chips slightly inside bag
Spoon 1/2 cup hot meat directly into bag
Pass topping containers down line for self-service
Cooking method: Camp stove or fire grate
Honest limitation:
Chip bags get soggy if meat sits too long after serving. Serve meat immediately after reheating to preserve bag integrity. Also, crushed chips create a significant crumb explosion—do this outdoors only, never inside an RV or tent.
Real example: Eight-year-olds at our 2021 Michigan trip declared this “the best camping food ever invented” purely because of the chip bag novelty factor. Adults secretly agreed because cleanup took 5 minutes total.
Crockpot meatball subs using RV or generator power
When camping with electrical hookups, use a slow cooker to eliminate active cooking. Combine frozen meatballs and jarred marinara on low heat for 4 hours—they’re ready whenever people get hungry. Serve on toasted hoagie rolls with provolone cheese. This works because timing flexibility removes the “everyone must eat at 6pm” pressure.
Why it works for groups
No precise timing required. The crockpot holds safely on “warm” setting for hours after cooking completes. This accommodates late arrivals, people returning from different activities at staggered times, and kids who claim they’re “not hungry” until 7:30pm.
Zero cooking skill needed—literally dump frozen meatballs and sauce, set temperature, walk away. My tested ratio for crowds: 5 pounds frozen pre-cooked meatballs plus 3 large jars marinara feeds 18-20 people generously.
Only works with RV electrical hookups or generator power. Generator noise creates neighbor complaints—check campground quiet hours before running one. If you lack electricity, this method fails completely and you’ll need a fire-based backup meal.
Real example: Used this during a rainy Saturday when nobody wanted to cook over a wet campfire. The crockpot ran inside our RV awning area. People served themselves over a 3-hour window as they finished afternoon hikes. Perfect for groups operating on different schedules.
One-pot spaghetti with pre-made sauce
Make meat sauce completely at home, freeze in rigid container, then reheat at camp while simultaneously cooking pasta in a separate pot. This reduces active campsite cooking to 15 minutes—just boiling water and reheating. Serving 20 people becomes a simple two-pot operation instead of a multi-step production.
Why it works for groups
Spaghetti enjoys universal acceptance from both kids and adults. The picky eater problem vanishes when you serve pasta—it’s the diplomatic meal choice for mixed groups.
Sauce quality improves dramatically when made at home where you control heat and proper seasoning time. No raw meat handling at camp eliminates food safety concerns and the mess of ground beef packaging.
My efficiency insight: cooking pasta and reheating sauce simultaneously cuts total time in half. Start sauce at 4:30pm, begin pasta water at 5:15pm, and you’re serving by 5:45pm.
Home prep steps
Brown 3 pounds ground beef with 1 diced onion and 3 minced garlic cloves
Add 3 large jars marinara sauce (24-ounce each)
Simmer 20 minutes for flavors to blend
Cool completely in refrigerator
Transfer to rigid freezer-safe container
Freeze 48 hours before trip (doubles as cooler ice)
Start sauce reheating in large pot on burner one at 4:30pm
Add 1/2 cup water to prevent scorching, stir occasionally
At 5:15pm, boil water in second pot on burner two
Cook spaghetti per package directions (typically 10-12 minutes)
Toast garlic bread on camp grill while pasta cooks
Drain pasta, combine with sauce or serve buffet-style
Cooking method: Two-burner camp stove or RV stovetop
Honest limitation:
Requires two burners running simultaneously plus two large pots. Single-burner setups must cook sequentially, adding 20 minutes to total time. Pasta water disposal can be tricky in primitive sites—many campgrounds prohibit dumping grey water on the ground. Check regulations before cooking.
Real example: Our Michigan trip where the campground prohibited grey water ground dumping. We had to haul pasta water 200 feet to the designated sink. Always plan disposal logistics before cooking, not after.
Campfire foil breakfast burritos made assembly-line style
Scramble 18 eggs in a large skillet, cook 1.5 pounds bacon crispy, then set up tortilla assembly station where people build their own burritos with eggs, bacon, cheese, and salsa. Wrap each burrito in foil, place on grill grate for 3-4 minutes to melt cheese and crisp exterior. Hot breakfast with minimal cleanup.
Why it works for groups
People customize spice levels and ingredients according to personal preference. The spicy salsa enthusiast and the mild-only crowd both get what they want.
Foil wrapping creates portable breakfast—people eat while packing up camp, saving time on the last morning. Cleanup is just the egg skillet since foil wrappers are disposable.
My crowd management trick: assign one adult to manage egg and bacon cooking, another to oversee the assembly line. This prevents bottlenecks where everyone crowds around one person trying to do everything.
Home prep steps
Pre-cook 1.5 pounds bacon at home until crispy, cool, pack in sealed bag
Crack 18 eggs into sealed container, shake well before packing (easier than cracking at camp)
Dice 1 bell pepper and 1 onion, store in separate bag
Pack: large flour tortillas, 2 cups shredded cheese, salsa, hot sauce
Campsite execution
Heat large skillet on camp stove or over fire
Warm pre-cooked bacon briefly to crisp, set aside
Scramble pre-cracked eggs with peppers and onions in same skillet
Set up assembly station: tortillas, scrambled eggs, bacon, cheese, salsa
Each person builds burrito, wraps tightly in foil
Place on grill grate over medium coals for 3-4 minutes, flip once
Cheese should be melted, tortilla slightly crispy
Cooking method: Large camp skillet plus grill grate
Honest limitation:
Requires good fire management skills. If coals are too hot, foil-wrapped burritos burn before cheese melts inside. Medium heat zone is critical but requires experience to identify. Wind makes egg cooking frustrating—cover skillet partially if possible.
Real example: First attempt resulted in six burnt burritos because I placed them over the hottest coals. Moved to the cooler edge of the grate, problem solved. Temperature control requires active attention.
Dutch oven mac and cheese with three-cheese blend
Boil pasta at home, drain, toss with olive oil to prevent sticking, refrigerate in sealed bag. At camp, combine pre-cooked pasta with cream, pre-shredded cheese blend, and seasonings in greased Dutch oven. Bake with charcoal for 25 minutes until bubbly. This eliminates raw pasta cooking at camp, saving time and fuel.
Why it works for groups
Mac and cheese is the ultimate crowd-pleaser across all age groups. Toddlers, teenagers, and adults all willingly eat this comfort food.
Pre-cooked pasta means shorter camp cooking time—25 minutes instead of 45 minutes when starting with raw pasta. Rich, cheesy comfort food significantly improves morale on cold or rainy evenings when everyone’s spirits need lifting.
My tested ratio for feeding crowds: 2 pounds pasta, 1 pound three-cheese blend (cheddar, mozzarella, parmesan), and 2 cups heavy cream feeds 15 people with seconds available.
Home prep steps
Boil 2 pounds elbow macaroni to al dente (slightly undercooked)
Drain thoroughly in colander
Toss with 2 tablespoons olive oil to prevent sticking
Cool completely, store in gallon freezer bag
Pack separately in cooler: 1 pound shredded three-cheese blend, 2 cups heavy cream
Grease 12-inch Dutch oven interior generously with cooking spray
Combine pre-cooked pasta, shredded cheese, heavy cream, and all seasonings
Stir thoroughly until well mixed
Light 20 charcoal briquettes in chimney starter
When white-ashed, arrange 7 briquettes under oven, 13 on lid
Bake 25 minutes until edges bubble and top browns slightly
Let rest 3 minutes before serving
Cooking method: 12-inch Dutch oven with charcoal (7 bottom/13 top)
Honest limitation:
Heavy cream must stay below 40°F until use—requires reliable cooler management with sufficient ice. If cream smells off or feels warm, do not risk food poisoning. This dish also requires substantial cooler space for the bulky pasta bag plus dairy products.
Real example: Once underestimated briquette count by using 5 bottom and 10 top—resulted in lukewarm, non-bubbling mac and cheese. Proper heat distribution is non-negotiable for quality results.
Pro Tips for Group Meal Success
Cleanup strategy that prevents burnout
Assign a rotating “support crew” of three people per meal before the trip even starts. While the designated cook manages food, the crew handles drink setup, table arrangement, and post-meal cleanup. This distributes labor across everyone and prevents single-person burnout that ruins group dynamics by day three.
The three-cooler system
Use separate coolers based on access frequency. Cooler one holds drinks—opened constantly, loses cold fastest, expect to add ice daily. Cooler two contains raw proteins and frozen meal blocks at the bottom—stays sealed except at meal times, maintains temperature longest. Cooler three stores prepped vegetables and dairy products—moderate access frequency. According to CDC food safety guidelines for travelers, proper cold chain maintenance prevents foodborne illness.
Weather contingency planning
Always pack one no-fire backup meal—the crockpot meatball subs or pre-cooked walking tacos work perfectly. I discovered this necessity during a Michigan thunderstorm where 36 hours of rain made fire cooking impossible. Our crockpot backup saved dinner two consecutive nights.
Realistic serving timeline
Start cooking 90 minutes before target eating time, not 60 minutes. Groups take 30-plus minutes to gather everyone from various activities, complete serving, and actually begin eating. You need buffer time built into your schedule.
The non-obvious gear investment
A folding six-foot table proves more valuable than any cooking gadget. Most campgrounds provide picnic tables, but they’re perpetually full of gear, drinks, and people eating. Having a separate surface dedicated to food prep, assembly lines, and hot pot staging eliminates congestion and prevents safety issues. Ours cost $50 and gets set up before anything else every single trip.
Frequently Asked Questions
How do you handle cleanup for a group of 20 people without overwhelming one person?
Institute a rotating support crew system before the trip starts. For each meal, the assigned cook gets 2-3 helpers who handle non-cooking tasks—table setup, drink distribution, and post-meal cleanup. The cook manages food preparation only. This distributes labor fairly and prevents burnout that destroys group morale. On our trips, we assign crews by family rotation so everyone knows their scheduled night in advance. Clear expectations eliminate the awkwardness of asking for help in the moment.
What’s the best way to transport all this prepped food safely in coolers?
Use the three-cooler system based on access frequency. Cooler one holds drinks—opened constantly, loses cold fastest, expect to add ice daily. Cooler two contains raw proteins and frozen meal blocks at bottom—stays sealed except at meal times. Cooler three stores prepped vegetables and dairy—moderate access. Pack coolers in reverse order of first use—last meal ingredients on bottom, first meal on top. Pre-freeze rigid water bottles as ice blocks rather than using bagged ice. They don’t create meltwater mess, and the USDA recommends keeping perishables below 40°F at all times.
What if it rains the night I’m supposed to cook over the fire?
Always bring one backup meal requiring zero fire—crockpot meatballs, pre-cooked walking tacos, or reheatable frozen chili. These work on RV stovetops or single-burner camp stoves under shelter. We learned this lesson during a Vermont trip where 36-hour rain made fire cooking impossible. Our crockpot backup saved dinner two nights consecutively. Check the weather forecast the week before departure and pack backup meals accordingly. Don’t assume weather will cooperate.
What’s one piece of non-obvious gear that makes group cooking manageable?
A six-foot folding table dedicated to food operations. Most campgrounds provide picnic tables, but they’re always full of gear, drinks, and people eating various meals. Having a separate surface for cooking operations—ingredient layout, assembly lines, hot pot staging—eliminates congestion and safety issues with hot equipment. Ours lives in the truck permanently and gets set up every trip before anything else. The $50 cost delivers immeasurable value across a decade of group camping.
The Bottom Line
Group camping meals stop being stressful when you shift preparation from campsite to home kitchen. The ten meals in this article work because they prioritize logistics over culinary ambition—serving flow matters more than recipe complexity, equipment reliability beats fancy techniques, and honest planning prevents weather disasters.
After a decade feeding groups of 15-20 people in state parks, these methods survive real-world conditions. The frozen chili block, the 10/15 Dutch oven briquette ratio, the left-to-right taco bar flow—these aren’t theoretical improvements. They’re battle-tested solutions to problems that destroy group camping experiences when ignored.
References: This article cites food safety guidelines from the USDA Food Safety and Inspection Service, temperature recommendations from Lodge Cast Iron, and camping safety information from the CDC Food Safety Division. All recommendations reflect field-tested experience from a decade of group camping coordination.
Traveling during a federal shutdown?
Use our updated Shutdown Camping Guide (2025) for what’s open and legal alternatives.
Last updated: October 2, 2025 • Maintainer: Chuck Price (chuck@chuckprice.org) • Non-partisan resource
Quickly explains what’s open/closed and legal alternatives (BLM/USFS dispersed, state parks).
What stays open, what closes, and how to prepare
TL;DR – Key takeaways
Many National Parks will remain accessible with basic services – Parks collecting recreation fees will use those funds to maintain restrooms, trash collection, and campground operations while funds last
BLM dispersed areas and most National Forest backcountry stay open – But zero services at non-fee areas (no trash, water, or restrooms)
Army Corps of Engineers (COE) is the wild card – Funded through Defense, not Interior. May stay open in partial shutdowns; closes like NPS in full shutdowns. Check local district websites or call district offices for the current status.
You must be 100% self-sufficient – 14+ days of supplies, backup camping locations, and emergency communication
A government shutdown looming means federal agencies are scrambling to finalize contingency plans, but many details remain unclear just days before potential funding lapses. For campers already on the road or planning trips to federal lands, this uncertainty creates real problems. Will your reserved campsite be accessible? Can you renew your Long-Term Visitor Area permit? What happens if you need emergency services in remote areas?
The reality is that “shutdown” doesn’t mean the same thing across different land management agencies. While some National Parks may close completely, many will remain accessible and maintain basic services using recreation fee funds. Most Bureau of Land Management dispersed camping areas remain physically accessible. National Forests fall somewhere in between. Understanding these differences and preparing for reduced services can mean the difference between a minor inconvenience and a trip-ending crisis.
This guide breaks down exactly what each agency does during shutdowns, addresses the specific challenges facing long-term campers, and provides a complete preparation checklist. By the end, you’ll know which backup plans to activate and how to maintain self-sufficiency when government services disappear.
Agency-by-agency breakdown: What closes and what stays accessible
The confusion around shutdown impacts stems from the fact that each federal land management agency operates under different funding structures and priorities. Here’s what actually happens to your camping options when Congress fails to pass spending bills.
National Parks: Varied access depending on fee collection and park design
The National Park Service approach during shutdowns varies significantly based on whether parks collect recreation fees and whether they have physically accessible areas. According to the official NPS contingency plan, the situation is more nuanced than simple closures.
Parks with accessible areas that collect recreation fees:
Parks collecting fees under the Federal Lands Recreation Enhancement Act (FLREA) will utilize available retained recreation fee balances to provide basic visitor services. This includes:
Restrooms and sanitation maintenance
Trash collection
Road maintenance
Campground operations
Law enforcement and emergency operations
Staffing entrance gates as necessary to provide critical safety information
Park roads, lookouts, trails, and open-air memorials will generally remain accessible to visitors at these locations. Each park must develop daily cost estimates for all employees and services to be supported by recreation fees for review and approval by the Assistant Secretary for Fish and Wildlife and Parks.
Parks without sufficient recreation fee funds:
Parks with accessible areas that do not collect recreation fees or have insufficient balances must develop daily cost estimates for all employees and services to be supported by regional or national recreation fees. At parks without accessible areas, the NPS will not operate during the lapse. Excepted staffing will be held to the minimum amount needed for law enforcement and emergency response. No visitor services will be provided.
What closes everywhere:
Even at parks maintaining basic operations, the following services will not be available:
Permits for new activities (no new permits issued)
Interpretive or educational programs
Visitor information services beyond critical safety information
Road and walkway maintenance including plowing and ice melting (except at fee-funded parks)
Park websites and social media (except for emergency communications)
Regular road or trail condition updates
As a general rule, if a facility or area is locked or secured during non-business hours (buildings, gated parking lots, etc.) it will be locked or secured for the duration of the shutdown.
Resource protection closures:
At the Assistant Secretary for Fish and Wildlife and Parks’ discretion, parks may close grounds/areas with sensitive natural, cultural, historic, or archaeological resources vulnerable to destruction, looting, or other damage that cannot be adequately protected by the limited law enforcement staff that remain on duty. If visitor access becomes a safety, health, or resource protection issue (weather, road conditions, resource damage, garbage build-up to the extent that it endangers human health or wildlife, etc.), the area must be closed.
If you have existing reservations through Recreation.gov, the NPS recommends contacting the local facility to determine if the facility is open or closed. Reservations may not be honored if locations are not fully staffed. Refunds will be considered and processed after the lapse in funding resolves.
BLM lands: Dispersed areas open, developed sites closed
Bureau of Land Management areas present the most camper-friendly shutdown scenario. The vast majority of BLM’s 245 million acres consists of undeveloped public land that remains accessible during shutdowns (Bureau of Land Management, 2023). This includes popular boondocking destinations across Arizona, California, Nevada, and Utah.
However, all developed recreation sites close, including campgrounds with amenities, visitor centers, and vault toilet facilities. More critically for long-term campers, services like trash collection and dump stations become unavailable. BLM ranger patrols continue at reduced levels for emergency response, but routine enforcement of camping limits and permit checks essentially stops.
According to the official BLM contingency plan, visitor services including trash collection and toilet cleaning will generally continue at recreation fee sites authorized under the Federal Land Recreation Enhancement Act while funds are available, but may not be available at all locations. BLM land will remain accessible to the public and efforts will be made to post signs, as appropriate, to indicate where services are or are not available.
The agency’s dispersed camping rules remain in effect, but verification and education typically handled by camp hosts disappears. This creates a gray area for permit renewals and compliance monitoring that campers must navigate carefully.
Campgrounds, boat ramps, and other recreation sites will be open, however, at some facilities the full range of services may not be available including restrooms and water systems. In cases where funds are not available to maintain such services, signs will be posted but visitors may remain at these sites at their own risk.
National Forests: Mixed approach based on local conditions
The U.S. Forest Service typically adopts a middle-ground approach. Backcountry areas and most forest roads remain open for dispersed camping, but developed campgrounds, day-use areas, and visitor centers close (U.S. Forest Service, 2019).
Unlike BLM lands, some National Forests may restrict access to specific areas due to fire danger or resource protection concerns when firefighting and maintenance crews are reduced. Local forest supervisors have discretion to implement broader closures if they determine public safety risks are too high with minimal staffing.
Developed sites that charge fees always close, while free dispersed areas generally stay accessible. However, services like restroom maintenance and trash pickup cease entirely.
U.S. Army Corps of Engineers (COE): The shutdown wild card
The U.S. Army Corps of Engineers operates differently during federal government shutdowns because it is funded through the Department of Defense (DoD), unlike National Parks or Forest Service sites funded by the Departments of the Interior and Agriculture. This unique funding structure means COE recreation areas may remain open if Defense funding continues while other agencies shut down.
Partial shutdown scenario (most common): If Congress approves Defense spending but not Interior or Agriculture funding, COE campgrounds, boat ramps, and day-use areas generally remain fully open with normal services, making them valuable alternatives when other federal sites close.
Full shutdown scenario: If Defense funding also lapses, COE facilities close fully similar to National Parks. This includes gate-locking all federal-operated campgrounds, canceling reservations through Recreation.gov with refunds, and ceasing all services, including visitor centers, restrooms, water, dump stations, trash collection, and most boat ramps (though some ungated ramps may remain physically accessible without services).
Partner facility exception: Not all COE recreation areas are federally operated. Some campgrounds, marinas, and day-use areas are managed by county governments, municipalities, or private concessionaires under leases. These partner-operated sites may stay open during federal shutdowns if they do not rely on federal staff and access roads remain open, but this varies by location and should be verified locally.
Operations continuing during shutdown: Dam operations, flood control, and emergency response for life and property protection continue regardless of shutdown status.
Uniform closure policy: During the 2025 government shutdown, all USACE-operated campgrounds and day-use parks closed nationwide on October 1, 2025. Unlike earlier assumptions about district-level discretion, the actual shutdown policy was uniform—all federally-operated COE recreation facilities closed, with no exceptions based on location or the number of campgrounds on a waterway (U.S. Army Corps of Engineers, 2025).
The partner facility exception remains: The only sites that may stay open are those operated by counties, municipalities, or private concessionaires on leased land, and only if they don’t rely on federal staff. These exceptions are rare. Campers scheduled to arrive during a shutdown should contact the local park or district office directly, as reservations through Recreation.gov will be automatically canceled with refunds processed.
Real-time status website update: The COE launched a Recreation Operational Status website in May 2025 to provide real-time, district-by-district updates. However, as of late 2025, this website is no longer available. Visitors now need to check local district websites or contact district offices directly for current operational information before planning visits.
None at non-fee areas; basic services at fee sites while funds last
Emergency response only
BLM Developed
Varies – fee sites may remain open
Basic services at fee sites while funds last
Reduced patrols
National Forests
Dispersed open, developed closed
Emergency only
Reduced patrols
U.S. Army Corps of Engineers (COE)
All federal sites close in full shutdown; rare partner/concessionaire sites may stay open
Normal (partial shutdown) or None (full shutdown)
Normal patrols (partial) or reduced to dam security (full)
Long-term camper considerations: LTVAs and extended stays
Long-term campers face unique challenges during government shutdowns that go beyond simple access issues. The infrastructure and services that support extended stays on federal lands operate differently when agencies reduce to skeleton crews.
LTVA permit renewals and host services
Long-Term Visitor Areas like those around Quartzsite, Arizona, present complex scenarios during shutdowns. While the BLM lands themselves remain accessible, the permit system that legitimizes extended stays becomes problematic. Current LTVA permits remain valid through their expiration dates, but renewals become impossible when fee collection and administrative services stop (Bureau of Land Management, 2018).
This creates a legal gray area for campers whose permits expire during a shutdown. The BLM’s official guidance states that campers should not be penalized for administrative delays beyond their control, but enforcement becomes inconsistent with reduced staffing. Camp hosts, who typically assist with permit renewals and provide local information, are either furloughed or work without official support.
Water and dump station access, critical services for long-term stays, disappear when maintenance crews are furloughed. Private vendors in areas like Quartzsite typically continue operating, but government facilities close indefinitely.
Duration planning: First week versus extended closures
The impact of shutdowns on camping escalates significantly after the first week. Initially, most campers can maintain their routines using stored supplies and existing infrastructure. However, extended shutdowns create compounding problems that require different strategies.
Trash accumulation becomes the most visible issue. Without regular collection services, popular camping areas quickly develop sanitation problems. During the 2018-2019 shutdown, several BLM areas near major cities experienced illegal dumping and overflowing waste containers that took months to fully address (Government Accountability Office, 2019).
Emergency response capabilities also degrade over time. While initial emergency services continue with essential personnel, response times increase and specialized rescue capabilities may become unavailable. This particularly affects remote camping areas where cell coverage is limited and self-rescue becomes the primary option.
Ethical camping: Protecting lands when no one is watching
Reduced government presence during shutdowns places extra responsibility on the camping community to protect the resources we all depend on. This goes beyond basic Leave No Trace principles to active stewardship when official oversight disappears.
Pack out all trash, even when dumpsters are available but not being emptied. Overflowing containers attract wildlife and create long-term environmental problems. Store waste securely and plan for extended periods without disposal options.
Respect all closure signs and physical barriers, even when circumvention appears easy. Agencies post restrictions for resource protection and safety reasons that remain valid regardless of enforcement presence. Being caught in closed areas during a shutdown can result in enhanced penalties when normal operations resume.
Report serious violations or emergencies through official channels when possible. While response may be delayed, documentation helps agencies prioritize limited resources and address problems systematically.
Self-sufficiency preparation: Essential supplies and strategies
When government services disappear, successful camping depends entirely on your ability to handle problems independently. The key difference between inconvenience and crisis lies in preparation that goes beyond normal boondocking supplies.
Extended waste management without services
Trash storage becomes your biggest logistical challenge during extended shutdowns. Plan for double your normal waste generation when you can’t access dumpsters or recycling facilities. Compact everything aggressively and separate food waste that attracts animals.
Invest in bear-proof containers or metal storage boxes if you don’t already have them. Plastic bags and soft containers won’t protect against wildlife that becomes bolder around campsites when ranger presence decreases. During the 2018-2019 shutdown, several popular camping areas reported increased wildlife conflicts due to improper food and waste storage (National Park Service, 2019).
Grey water disposal requires more careful planning without dump stations. Identify multiple backup locations for legal grey water disposal, including private RV parks and truck stops along your planned routes. Reduce grey water production by using paper plates and minimizing dishwashing when disposal options are limited.
Black water management becomes critical after 5-7 days for most RV systems. Map private dump stations within reasonable driving distance of your camping area before you need them. Some truck stops and gas stations offer dump services for a fee, but availability varies significantly by region.
Water security and conservation strategies
Water access becomes unreliable when government facilities close. Fill all tanks and containers before entering areas that depend on federal water sources. This includes many BLM areas where the only reliable water comes from visitor centers or developed campgrounds that close during shutdowns.
Identify private water sources along your route, including grocery stores, truck stops, and RV supply stores that sell potable water. Some areas popular with long-term campers have private water delivery services, but expect higher demand and prices during shutdowns.
Implement strict water conservation immediately when services become uncertain. Reduce shower frequency, use disposable plates to minimize dishwashing, and collect rainwater where legal and practical. A 20% reduction in water usage can extend your independence by several days.
Communication and emergency preparedness
Emergency response times increase significantly during shutdowns as agencies operate with minimal staffing. Your ability to handle medical emergencies, vehicle breakdowns, and equipment failures becomes more critical when help is hours away instead of minutes.
Upgrade your communication capabilities if you regularly camp in remote areas. Satellite communicators like Garmin inReach devices provide two-way messaging and emergency beacon functions that work regardless of cell coverage. These devices proved essential for several campers during previous shutdowns when normal emergency services were delayed (Garmin, 2023).
Carry comprehensive first aid supplies and know how to use them. Include prescription medications with extra supplies, since pharmacy access may be limited if you need to relocate quickly. Document medical conditions and emergency contacts in writing, since electronic devices can fail when you need them most.
Legal compliance without oversight
Staying within camping regulations becomes more complex when enforcement and education services are reduced. The 14-day dispersed camping limit remains in effect, but verification systems that rely on host check-ins or ranger visits essentially stop functioning.
Document your camping locations and dates meticulously. Take GPS coordinates and photos that prove compliance with regulations if questions arise later. Some campers have faced retroactive penalties when agencies resume normal operations and discover extended stays during shutdown periods.
Move between camping areas proactively rather than waiting for enforcement contact that may never come. The spirit of dispersed camping regulations is to prevent long-term settlement and resource damage, which becomes more important when monitoring disappears.
Alternative strategies: Backup plans and exit routes
Smart shutdown preparation includes realistic backup plans that don’t depend on federal land access. When your primary camping strategy fails, these alternatives can save your trip without breaking your budget.
State park systems as reliable alternatives
State parks operate independently of federal funding and maintain normal services during federal shutdowns. Many western states offer excellent camping options that rival federal alternatives, often with better amenities and more predictable availability.
California state parks provide particularly good alternatives to federal desert camping, with locations like Anza-Borrego Desert State Park offering dispersed-style camping with basic services maintained. Arizona state parks near popular BLM areas include Lost Dutchman and McFarland, both within driving distance of traditional Quartzsite-area camping.
Reservation systems for state parks continue operating normally during federal shutdowns, but expect increased demand from displaced federal land campers. Book alternative sites before shutdowns begin rather than waiting for displacement to occur. This is particularly critical for campers displaced from U.S. Army Corps of Engineers lakeside campgrounds, as many states operate parks on or near the same reservoirs, providing similar waterfront experiences with uninterrupted services during federal shutdowns.
Private campground cost-benefit analysis
Private campgrounds become more attractive during shutdowns when their reliability outweighs cost concerns. For long-term campers, monthly rates at private parks may cost less than constantly relocating and dealing with service interruptions.
Thousand Trails and other membership programs offer emergency alternatives for members, though availability varies by region and season. Some private campgrounds near popular federal areas offer special rates during government shutdowns, recognizing the displaced camper market.
Budget for higher costs but factor in savings from reduced fuel consumption when you’re not constantly seeking services and supplies. A stable base camp with reliable utilities may cost more per day but reduce overall trip expenses when federal services are unavailable.
Urban boondocking and city resources
Cities near popular camping areas often allow overnight parking in specific zones, providing access to urban services when federal facilities close. Many western cities accommodate RVers with designated overnight areas, especially during peak season when campgrounds fill up.
Walmart, Cracker Barrel, and truck stops provide legal overnight parking with varying amenities. While not suitable for extended stays, these options work well for resupply runs and service access when federal land camping becomes impractical.
Research local ordinances before relying on urban options. Some cities restrict RV parking during peak tourist seasons, while others welcome the economic impact of visiting campers. Apps like Campendium and iOverlander provide real-time information about urban camping legality and camper experiences.
Community resources and mutual aid
The camping community typically becomes more cooperative during challenging situations like government shutdowns. Online forums, Facebook groups, and apps like Campendium provide real-time information about conditions, alternatives, and resource sharing opportunities.
Consider joining or organizing informal camping groups that can share costs and responsibilities. Group camping reduces individual resource consumption and provides backup assistance for emergencies or equipment failures when official services are unavailable.
Local businesses in popular camping areas often step up with services during federal shutdowns. Private dump stations, water sales, and supply deliveries may become available in areas that normally depend on government facilities. Support these businesses that help the camping community during difficult periods.
Your shutdown survival checklist: Be ready before it happens
Government shutdowns often develop quickly, leaving little time for preparation once funding lapses become imminent. The difference between a manageable situation and a trip-ending crisis comes down to preparation that happens before uncertainty strikes.
Pre-shutdown preparation timeline
Start monitoring shutdown risks two weeks before potential deadlines. Congressional funding battles typically provide advance warning, but agencies release specific closure information only days before actual shutdowns occur. Follow the Federal News Network and Government Executive for reliable updates on appropriations status and agency planning.
Check agency websites three days before potential shutdowns for updated contingency plans. While the Trump administration hasn’t restored public access to detailed shutdown plans, individual agencies often post basic closure information on their homepages when shutdowns become likely.
Complete all supply runs and tank fills 48 hours before potential closure dates. Popular camping areas near cities experience increased demand as campers stock up, making last-minute shopping more difficult and expensive.
Essential monitoring and communication
Bookmark the emergency contact numbers for local sheriff’s departments and emergency services in areas where you plan to camp. Federal emergency response continues during shutdowns, but local agencies may provide faster assistance for non-life-threatening situations.
Download offline maps for your camping areas and alternative routes to services. Cell coverage often remains limited in remote camping areas, and GPS apps may not work when you need them most. Paper maps provide backup navigation when electronic systems fail.
Join local camping Facebook groups and forums for real-time condition reports from other campers. The community network often provides more current information than official sources, especially regarding road conditions, water availability, and service alternatives.
Final verification questions
Before heading to federal lands during shutdown uncertainty, confirm you can answer “yes” to these critical questions:
Do you have at least 10 days of water and 14 days of food?
Can you store two weeks of trash securely?
Do you have reliable communication for emergencies?
Have you identified at least two alternative camping locations with confirmed access?
If your trip includes Corps lakes, have you checked the local COE district website or contacted the district office for the current operational status?
If relying on COE sites, do you know which appropriations bills are at risk (Defense vs. Interior)?
If planning National Park visits, have you verified whether your target park collects recreation fees and will maintain basic services?
Your camping success during government disruptions ultimately depends on preparation that makes you truly independent of government services. The most successful shutdown campers are those who barely notice the difference because they’re already equipped for extended self-sufficiency.
For ongoing updates and community support during government shutdowns, visit BoondockOrBust.com and follow our social media channels. We’ll continue monitoring conditions and sharing real-time information to help you navigate these challenging situations safely and successfully.
References
Bureau of Land Management. (2018). Long-Term Visitor Area contingency procedures during appropriations lapses. U.S. Department of the Interior. https://www.blm.gov
Government Accountability Office. (2019). 2018-2019 government shutdown: Federal agencies’ use of funding during the lapse in appropriations (GAO-19-385). https://www.gao.gov/products/gao-19-385
According to the RVIA’s August 2025 survey of manufacturers, van‑campers (Type B) shipments climbed to 783 units in August 2025, up from 684 units in August 2024, with year‑to‑date shipments (January–August 2025) at 5,679 units, slightly below the 5,763 units shipped over the same period a year earlier. Retail demand has been softer: Statistical Surveys Inc. reported that March 2025 saw 668 U.S. Class B registrations, a 24.3 % drop from 883 registrations in March 2024, and Black Book’s industry update noted that May 2025 retail RV registrations totaled 37,629 units, with Class B registrations down 16.6 % year over year. These figures suggest that while wholesale production of Class B vans has picked up modestly, retail sales remain suppressed as high prices and economic uncertainty continue to steer some buyers toward other RV categories.
After extensive research of manufacturer specifications, NHTSA safety records, and verified owner experiences, this guide evaluates Class B RVs based on proven boondocking capability rather than marketing claims.
Understanding Class B Boondocking Requirements
RVIA Class B owner profile[4] shows that 52% of Class B owners stay at national-park campgrounds and 51% prefer state parks. These statistics reflect typical camping habits, but successful off-grid boondocking requires more robust systems: ample electrical capacity (minimum 400Ah lithium), generous fresh-water storage (30+ gallons), reliable heating systems, and accessible service networks.
Ranking Methodology: How These Class B RVs Were Evaluated
Evaluation Approach: Rather than relying on marketing materials or superficial reviews, this guide prioritizes documented performance data, verified technical specifications, official safety records, and real-world owner experiences from extended boondocking trips.
Primary Ranking Criteria (Weighted by Importance)
1. Electrical System Capability (30% of ranking)
Battery capacity: Minimum 400Ah lithium recommended for serious boondocking
Solar charging: Adequate generation to maintain systems during typical use
Inverter capacity: Ability to run essential appliances (microwave, induction cooking, air conditioning)
System integration: Proven reliability under field conditions
Monitoring capabilities: Clear visibility into power consumption and remaining capacity
2. Water Storage and Management (25% of ranking)
Fresh water capacity: 30+ gallons preferred for week-long stays
Tank protection: Internal mounting and freeze protection for year-round use
Gray/black water capacity: Sufficient for extended off-grid stays
Water system accessibility: Easy filling, draining, and maintenance
3. Documented Reliability and Safety (20% of ranking)
NHTSA recall history: Frequency and severity of safety-related recalls
Owner forum reports: Patterns of mechanical issues and part availability
Service network: Accessibility to qualified repair facilities
Manufacturer support: Responsiveness to warranty claims and technical issues
4. Build Quality and Serviceability (15% of ranking)
Component accessibility: Can standard RV technicians service systems?
Parts availability: Standard vs. proprietary components
Construction methods: Proven materials and assembly techniques
Field repairability: Owner’s ability to address issues in remote locations
5. Chassis and Drivetrain Performance (10% of ranking)
Ground clearance: Ability to access dispersed camping areas
Approach/departure angles: Off-road capability without damage
Payload capacity: Sufficient for water, gear, and supplies
Innovative features: Cutting-edge technology often creates failure points
Brand prestige: Badge value doesn’t translate to off-grid reliability
Initial purchase price: Total ownership cost matters more than MSRP
Maximum speed/acceleration: Boondocking prioritizes reliability over performance
Data Sources and Verification Methods
Primary Sources Used:
Manufacturer specifications: Official technical documentation and owner’s manuals
NHTSA safety database: Verified recall information and safety testing results
Independent testing: Third-party reviews from established RV publications
Owner forums: Long-term reliability reports from active boondockers
Field testing: Personal experience and verified owner trip reports
Transparency Note: This ranking methodology prioritizes functional capability over subjective preferences. Each model’s position reflects documented evidence rather than promotional claims or brief test drives. Rankings may shift as new data becomes available or manufacturers address identified issues.
Top Class B RVs for Boondocking 2026
#1 Storyteller Overland Classic MODE — Current Leader in Off-Grid Capability
2026 Mercedes-Benz AWD Sprinter with an 8.4kWh M-Power system, 90W rated solar, a 37-gallon fresh-water tank, a 3,000W inverter, and a manufacturer-listed price of $200,801 when checked. Verify current pricing and specifications before purchase.
Proven electrical system:Independent testing by Expedition Portal[6] confirmed ability to run microwave, induction cooktop, and electronics simultaneously while maintaining 50% battery capacity
The Rekon addresses water storage limitations with its 40-gallon fresh water tank strategically located inside the vehicle between rear wheel wells for optimal weight distribution and freeze protection. RV Travel’s review notes this capacity is significantly more than most Class B RVs.
Exceptional water capacity: 40-gallon internal tank with Truma heating system circulation prevents freezing while maintaining optimal weight distribution
Robust electrical system: 400Ah lithium battery bank with dual 10-inch touchscreen monitoring showing estimated runtime
Family-owned heritage: Pleasure-Way operates from Saskatoon, Saskatchewan, with 35+ years of Class B manufacturing experience
Ram ProMaster with proven electrical systems demonstrating that front-wheel-drive can access many excellent boondocking locations with proper tires and driver skill.
The Travato challenges the 4×4 marketing myth with real-world proof that proper tires and ground clearance matter more than drive configuration for most boondocking situations. The ProMaster platform offers superior space efficiency and a 21-inch load floor height[10] compared to higher Sprinter alternatives.
Proven reliability: Ram ProMaster commercial van heritage provides established parts availability and service network, with the underlying Fiat Ducato platform having over 4.5 million units sold worldwide[11]
Service accessibility: Any Ram dealer can service chassis components nationwide
Cost effectiveness: Significantly lower purchase price than 4×4 alternatives
#4 Winnebago Revel — Established Platform with Known Issues
Mercedes Sprinter 4×4 with established track record but documented safety recalls requiring evaluation of specific model years and current system status.
#5 Airstream Interstate 24X — Luxury Badge with Reliability Questions
Mercedes Sprinter 4×4 with Airstream’s signature aluminum construction and premium interior appointments designed for affluent weekend adventures.
The Interstate carries Airstream’s reputation for quality, but the reality is more complex. Multiple NHTSA recalls highlight problems, including overhead galley cabinet detachment (Recall 22V-933 PDF), tire certification issues (Recall 23V-772 PDF), and inverter wiring overheating (Recall 21V-590 PDF)[13].
Build materials: Airstream’s aluminum expertise shows in construction quality
Resale value: Badge recognition maintains value better than competitors
Interior design: Thoughtful layout with practical storage solutions
Maintenance Reality: The Interstate’s sophisticated systems require specialized knowledge that most RV techs don’t possess. Airstream’s owner manual for Interstate 24X (see manual, page 84) warns that changing a tire requires specialized tools. When you’re boondocking in remote areas, this complexity becomes a liability.
#6 Coachmen Beyond 22C — Underrated Simplicity
Ram ProMaster with straightforward systems that prioritize reliability over complexity and ease of repair over innovation.
The Beyond doesn’t win innovation awards, but it gets the fundamentals right. Coachmen’s higher-spec Li₃ system offers significantly expanded lithium battery capacity with optional packages, as documented in Coachmen product literature[14]. Simple, repairable systems that you can actually fix in the field beat cutting-edge technology that leaves you stranded when it fails.
Simple systems: Standard RV components that any technician can understand and repair
Practical layout: No gimmicks, just functional space utilization
Value positioning: Reasonable pricing for what you actually get
Extended rental insight: Not exciting, but reliable. Sometimes boring is exactly what you want when you’re 100 miles from the nearest town. During a two-week Southwest desert trip, every system worked as expected – no drama, no failures, no surprises.
The Beyond uses standard Dometic and Suburban components throughout. When the water heater developed an issue in Quartzsite, any local RV tech could diagnose and repair it immediately. Compare this to proprietary systems that require factory-trained technicians and specialized parts.
#7 Jayco Terrain — Sensible ProMaster Platform with Proven Components
Ram ProMaster-based Class B that balances capability with reasonable pricing, using established RV industry components rather than experimental systems.
The Terrain represents Jayco’s practical approach to the Class B market[15], delivering reliable functionality using the proven Ram ProMaster chassis with components that have established track records in RV applications.
Balanced approach: Good features without over-engineering or complexity
Established components: Uses proven systems rather than cutting-edge experiments
Service network: Jayco received awards for reliability and service support
#8 Forest River Sunseeker MBS — Budget Entry with Basic Functionality
Mercedes Sprinter-based Class B with stripped-down features designed for entry-level buyers who need basic shelter and transportation without advanced boondocking systems.
The Sunseeker MBS represents Forest River’s attempt at an affordable Class B[16], but “affordable” in this market still means significant compromises. This model strips away most serious boondocking capabilities to hit a lower price point.
Reality check: The Sunseeker MBS works for weekend trips to established campgrounds, but lacks the electrical capacity, water storage, and build quality needed for serious off-grid adventures. Consider it a stepping stone rather than a destination.
Models Not Recommended for Serious Boondocking
Based on documented owner experiences, forum reports, and verified service records, certain Class B models present concerns for serious boondocking applications. These assessments focus on documented patterns rather than isolated incidents.
Community Discussion Forums for General Reliability Issues:
Entry-Level Models — Insufficient Systems for Remote Camping
Multiple budget Class B models across various manufacturers with minimal electrical capacity, limited water storage, and basic components that cannot support serious off-grid adventures.
Editorial Assessment: Many entry-level Class B models advertise “boondocking capability” while providing only basic house batteries (often 100Ah or less), minimal solar charging, and limited water storage. Based on owner experience, these systems may work for overnight camping but often prove insufficient during extended remote stays when reliable power, water, and waste management become critical.
Owner Experiences on Limited Systems and Camping Challenges:
Certain manufacturers have documented patterns of electrical system problems, recall histories, or complex proprietary systems that create reliability concerns in remote locations.
⚠ Solar system recalls: Some manufacturers have experienced solar panel short-circuiting and overheating issues requiring NHTSA recalls
⚠ Complex proprietary systems: Over-engineered electrical or mechanical systems that require specialized technicians and parts
⚠ Alternator and charging issues: Forum discussions (user reports, not officially documented) report charging system problems across multiple model years
System Integration Concerns: While individual components may be quality items, poor integration of electrical, plumbing, and mechanical systems can create cascading failures in remote locations. Models with patterns of recalls, complex troubleshooting requirements, or limited parts availability present higher risk for serious boondockers.
The Boondocking Reality Check: Successful off-grid living requires systems that work when everything goes wrong. Models with documented reliability issues, over-complexity, or missing essential features can turn adventures into recovery operations. When you’re 50 miles from help, boring and reliable beats innovative and temperamental every time.
General Boondocking and Electrical Troubleshooting Resources:
Final Recommendations: Choose Reliability Over Innovation
After three decades of boondocking and extensive testing of Class B platforms, the lesson is clear: the most successful off-grid adventures happen in vehicles where everything works as expected, day after day. The Storyteller Classic MODE with its proven Volta system represents the current pinnacle of reliable boondocking capability, while documented recalls and system issues remind us why cutting-edge integration can create new points of failure.
For serious boondockers, prioritize proven systems over marketing promises, simplicity over complexity, and manufacturer support over luxury features. Your safety in remote areas depends on it.
The Bottom Line: In boondocking, boring reliability beats exciting innovation. Choose Class B models with documented track records, simple systems you can repair, and manufacturers who stand behind their products. The wilderness is no place to beta-test someone else’s engineering experiment.
Safe travels, and remember—the best adventure is the one where all your systems work exactly as planned.
Storyteller Overland – 2026 Classic MODE XO: Current manufacturer specifications list AWD, an 8.4kWh M-Power system, 90W rated solar, a 37-gallon fresh-water tank, and a 3,000W inverter.
NHTSA Interstate 24X Recalls: Multiple recalls, including overhead galley cabinets, tire certification labels, and undersized inverter wiring. Direct PDF links are provided in the article text.

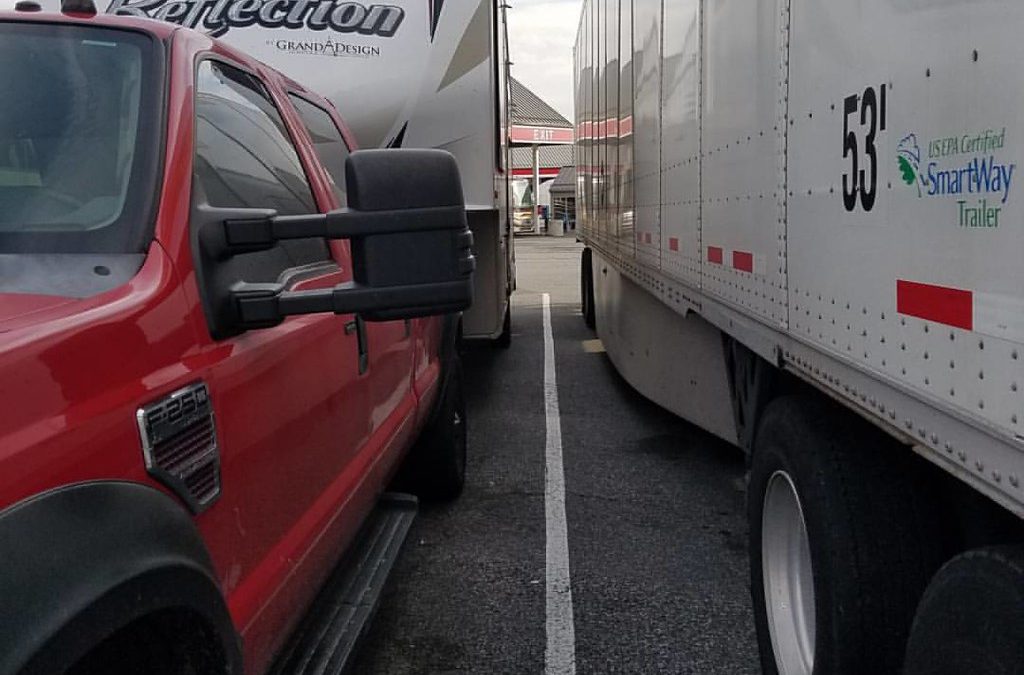
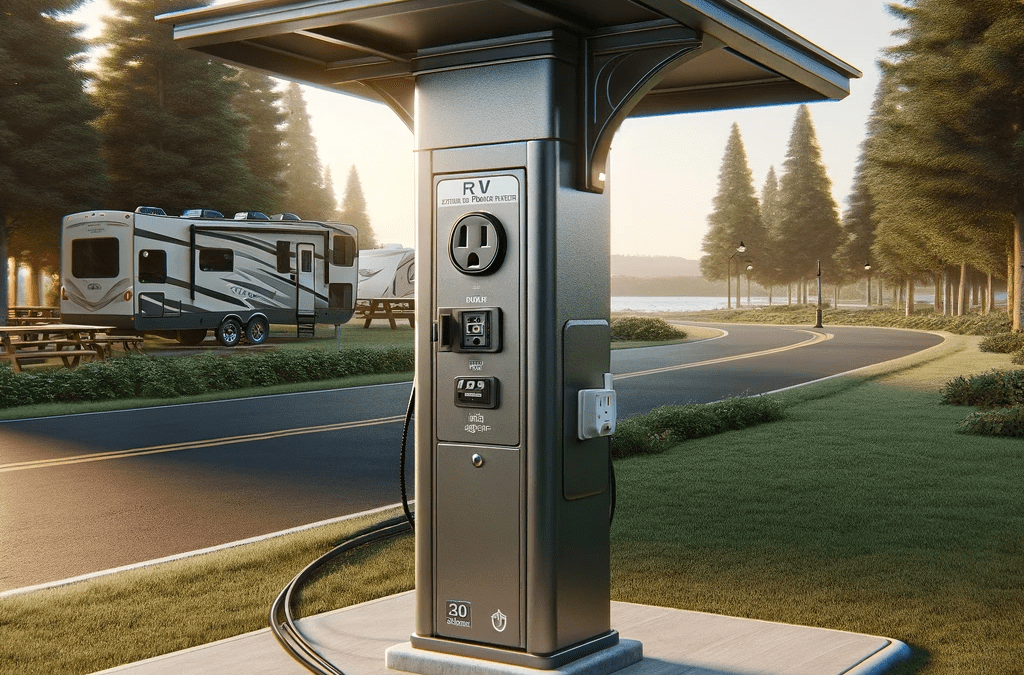
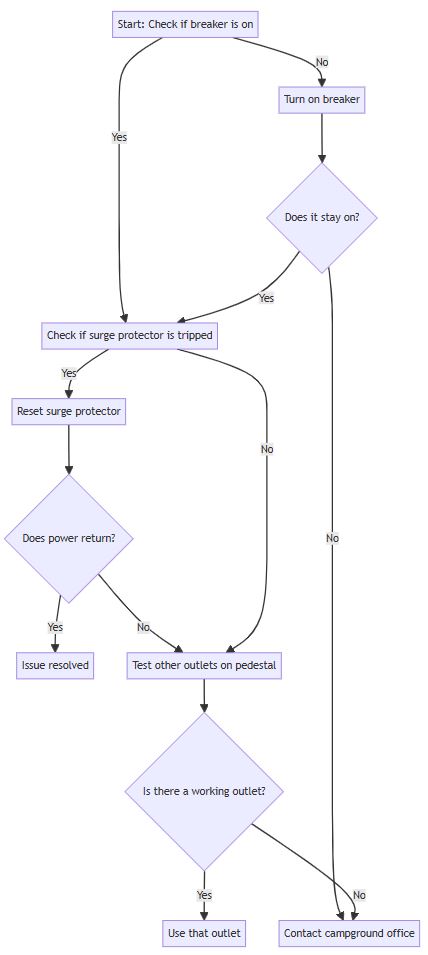
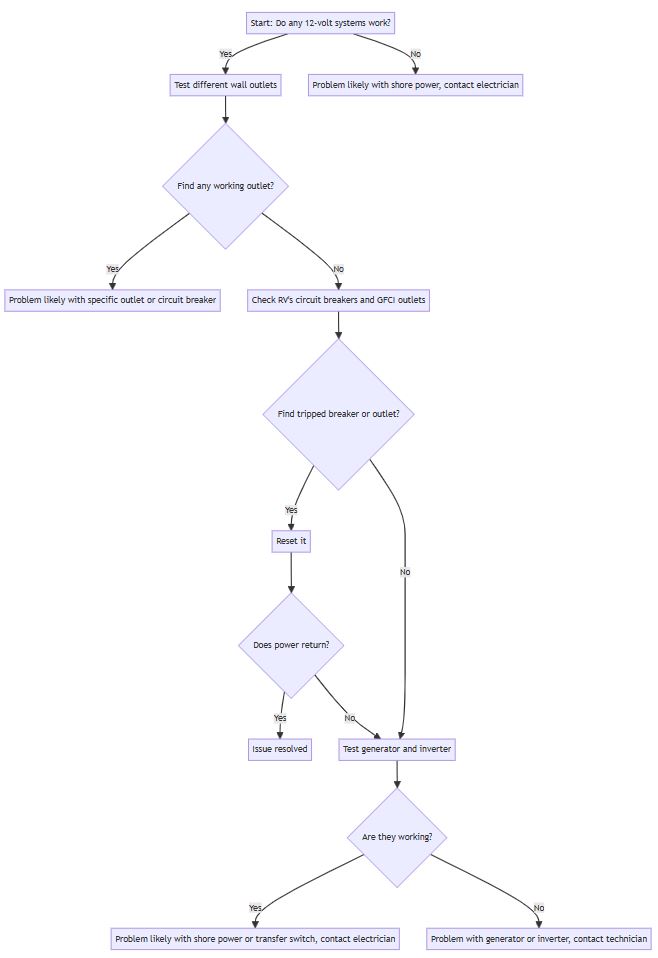
 Image by