To feed 15 to 20 campers, cook and freeze most of the protein at home. Carry it in a cooler held at 40°F or below, per FDA guidance on eating outdoors. At camp, reheat it to 165°F, the leftovers minimum on the foodsafety.gov temperature chart.
Key points
- Must-know: Keep cold food at 40°F or below and reheat cooked food to 165°F, per the FDA and foodsafety.gov.
- Trip killers: Throw out food left out more than 2 hours, or more than 1 hour above 90°F, per the FDA.
- Best for: Groups of about 15 to 20 at a campground with a two-burner stove, a fire ring and a 12-inch Dutch oven.
- Confirm before you go: Stage 1 fire orders can bar charcoal outside agency fire rings. For example, a Stage 1 order for the Minidoka Ranger District of the Sawtooth National Forest did so from July 1 to Oct. 31, 2026. Check the current order for your campground.
How home prep feeds 15 to 20 campers
Cook and freeze most group-meal protein at home, then reheat it at camp. Browning 5 pounds of meat for 20 people at a campsite means raw-meat handling, more fuel and more dishes. A home kitchen moves that work next to a sink and a refrigerator. This plan fits a campground with a cooler, a two-burner stove and a fire ring. It does not fit backpacking, or hot-weather trips that last longer than the ice.
Two federal limits shape the plan. Cold food stays at 40°F or below. Food left out more than 2 hours, or 1 hour above 90°F, gets thrown out. Both limits come from the U.S. Food and Drug Administration (FDA) outdoor food handling page.
Plan the menu first, then the cooking days and the cooler space. For the rest of the trip, use this step-by-step trip planning guide.
Scale each recipe with simple arithmetic
Each recipe below states its own serving count. That count is the recipe’s design, not a sourced per-person standard. To scale a recipe, follow these steps:
- Divide your headcount by the recipe’s servings.
- Multiply every ingredient by that number.
- Round up to a full package where it makes sense.
Example: a 20-serving recipe for 15 people is 15 / 20 = 0.75. Five pounds of beef becomes 5 x 0.75 = 3.75 pounds. For crowds of 25 or more, University of Minnesota Extension advises using recipes written for that size or repeating a family-size recipe in batches.
If some of the reheating happens inside the rig, these notes on cooking in a small RV kitchen cover burner and counter limits.
Pack the cooler so frozen meals keep everything cold
A frozen block of home-cooked chili or sauce works as cooler ice and as dinner. The USDA Food Safety and Inspection Service (FSIS) camping guidance says to fill coolers with cold or frozen foods. The FSIS leftovers page says frozen leftovers can be reheated without thawing, though it takes longer. Keep the block in the cooler until it goes in the pot. Never set it on a table to thaw. The foodsafety.gov four steps to food safety rule out thawing food on the counter.
FSIS states that “leftover food is safe only if the cooler still has ice in it.” Most bacteria grow fast between 40°F and 140°F, according to the same FSIS camping page.
Cooler packing checklist
- Use block ice. FSIS says block ice keeps food cold longer than cubes.
- Fill the cooler with cold or frozen food and several inches of ice.
- Pack in reverse order of use, so the first meal sits on top.
- Use watertight containers for food that sits in meltwater.
- Put drinks in a separate cooler, since it gets opened often.
- Double-wrap raw meat. Give it its own cooler, or pack it below ready-to-eat food if you have one cooler.
- Keep every cooler shaded or covered, with the lid closed.
Keep the food cooler at 40°F or below, the cold-holding limit from the FDA guide to eating outdoors. Check it with an appliance thermometer each morning and evening. When a frozen block goes in the pot, reheat it to 165°F. Sauces and chili go to a rolling boil, per the FSIS leftovers page.
Safe temperatures for every protein in these meals
Ground beef and sausage are done at 160°F, not when the pink disappears. The FSIS hiking and camping page says color does not show doneness. It also notes that illnesses have occurred even when ground beef patties were cooked until no pink showed. The minimums below cover only the proteins in these ten recipes. Fully cooked meat that you reheat goes to 165°F, per the foodsafety.gov safe minimum internal temperature chart, last reviewed Nov. 21, 2024.
Use a food thermometer in every recipe with meat or eggs.
These temperatures are minimums from FSIS and foodsafety.gov. A food thermometer is how you confirm them.
Table sources: foodsafety.gov chart, FSIS Shell Eggs from Farm to Table and the FSIS leftovers page.
| Food | Minimum internal temperature | Rest time | Used in these meals |
|---|---|---|---|
| Ground beef, ground pork and pork sausage | 160°F | None | Egg bake, walking tacos, chili, spaghetti sauce, foil packets |
| Pork shoulder (a roast cut) | 145°F | 3 minutes | Pulled pork |
| Egg dishes | 160°F | None | Egg bake (scrambled eggs cook until white and yolk are firm) |
| Casseroles | 165°F | None | Egg bake, mac and cheese |
| Poultry, including chicken sausage | 165°F | None | Any chicken-sausage swap |
| Reheated cooked leftovers | 165°F | None | Every precooked protein, including meatballs and pulled pork |
| Reheated sauces, soups and gravies | Rolling boil | None | Chili, spaghetti sauce, marinara |
Breakfast for a crowd
An egg casserole assembled the night before must cook within 24 hours. The FSIS shell egg guidance says dishes with raw eggs are cooked right away, or refrigerated and cooked within 24 hours. That rule holds only if your cooler stays at 40°F or below overnight. If it does not, crack the eggs at camp. FSIS also says, “Refrigerated eggs should not be left out more than 2 hours.” Cold eggs left out can sweat, which lets bacteria move into the egg, per the same FSIS page.
Use the cold-holding limit of 40°F from the FDA outdoor food handling guide as the overnight test. An appliance thermometer in the cooler gives you the reading.
Meal 1: Overnight sausage, hash brown and egg bake
Serves 12 as designed. Bakes in one 12-inch Dutch oven.
- 2 lb bulk pork breakfast sausage
- 30 oz frozen shredded hash browns
- 12 large eggs
- 1 cup milk
- 2 cups shredded cheddar
- 1 tsp salt and 1/2 tsp black pepper
- At home, cook the sausage to 160°F, checked with a food thermometer. Cool it fast in a shallow container, as the FSIS leftovers guidance advises, then chill it.
- The night before, grease a foil pan that fits inside the Dutch oven. Layer the hash browns, sausage and cheese in the pan.
- Whisk the eggs, milk, salt and pepper. Pour the mixture over the layers. Cover the pan tightly and set it in the cooler at 40°F or below.
- In the morning, set the pan inside the Dutch oven. Cook it within 24 hours of assembly.
- Bake with more coals on the lid than below, as Lodge advises for Dutch oven baking. Starting coal counts appear in the coals section below.
- The bake is done when the center reads 165°F on a food thermometer. That meets both the 160°F egg-dish minimum and the 165°F casserole minimum on the foodsafety.gov chart.
Scaling: for 20 to 24 people, make two bakes in two ovens. 12 x 2 = 24 servings.
Meal 2: Assembly-line breakfast burritos
Makes 20 burritos as designed.
- 30 large eggs, kept in the carton in the cooler
- 2 lb bacon
- 20 large flour tortillas
- 3 cups shredded cheese
- 2 cups salsa
- 2 tbsp butter or oil for the pan
- Heavy-duty foil
- At home, cook the bacon crisp. Chill it, then pack it in a sealed bag in the cooler.
- At camp, crack the eggs and scramble them in batches. Cook until the whites and yolks are firm, per FSIS shell egg guidance.
- Return any uncracked eggs to the cooler right away.
- Reheat the bacon in a skillet until it sizzles. Reheated cooked meat goes to 165°F, per the table above.
- Set up a line in one direction: tortillas, eggs, bacon, cheese, salsa. Each person fills, rolls and wraps a burrito in foil.
- Warm the wrapped burritos on the grate over low coals, turning them once.
Arithmetic check: 30 eggs / 20 burritos = 1.5 eggs each. 2 lb of bacon is 32 oz, and 32 / 20 = 1.6 oz raw weight per burrito.
Lunch and dinner mains
Seven mains reheat from the cooler or finish over coals with little raw-meat handling at camp. Each protein is cooked at home to its safe minimum and cooled in shallow containers, as the FSIS leftovers page advises. At camp, reheat every precooked protein to 165°F. Sauces and chili go to a rolling boil, per the same FSIS page. Ground meats reach 160°F at home, per the foodsafety.gov minimum temperature chart.
For smaller groups, browse these more easy RV camping recipes.
| Meal | Meal slot | Home prep | Camp method | Base servings |
|---|---|---|---|---|
| 1. Sausage, hash brown and egg bake | Breakfast | Cook sausage, assemble night before | Dutch oven, coals | 12 |
| 2. Breakfast burritos | Breakfast | Cook bacon | Stove, then grate | 20 |
| 3. Walking tacos | Lunch | Cook and freeze beef | Stove | 20 |
| 4. Meatball subs | Lunch | Thaw meatballs in refrigerator | Stove | 20 |
| 5. Freezer-block chili | Dinner | Cook and freeze chili | Stove | 20 |
| 6. Spaghetti meat sauce | Dinner | Cook and freeze sauce | Stove, two burners | 20 |
| 7. Sausage, potato and pepper foil packets | Dinner | Cook sausage, par-boil potatoes | Grate over coals | 20 |
| 8. Pulled pork sandwiches | Dinner | Cook, shred and freeze pork | Stove or Dutch oven, bottom heat | 20 |
| 9. Dutch oven mac and cheese | Dinner or side | Par-cook pasta | Dutch oven, coals | 16 |
| 10. Dutch oven peach cobbler | Dessert | None | Dutch oven, coals | 16 to 20 |
Meal 3: Walking tacos with home-cooked beef
Makes 20 bags as designed.
- 5 lb ground beef
- 3 tbsp chili powder, 1 tbsp ground cumin, 2 tsp garlic powder and 2 tsp salt
- 20 single-serve bags of corn chips
- 3 cups shredded cheddar
- 1 head lettuce, shredded
- 4 tomatoes, diced
- 2 cups salsa
- 16 oz sour cream
- At home, cook the beef to 160°F, checked with a food thermometer. Drain it and stir in the spices.
- Cool the beef fast in shallow containers. Freeze it flat in two gallon freezer bags.
- Pack the frozen bags in the food cooler.
- At camp, reheat the beef in a covered pot with a splash of water. Stir until it reaches 165°F.
- Set up a serving line in one direction: hot pot, cheese, lettuce, tomatoes, salsa, sour cream. Return the cheese and sour cream to the cooler within 2 hours, or 1 hour above 90°F.
- Each person crushes the chips, opens the bag and adds toppings.
Arithmetic check: 5 lb is 80 oz, and 80 / 20 = 4 oz raw weight per bag.
Meal 4: Meatball subs
Makes 20 subs as designed.
- 5 lb fully cooked frozen meatballs
- Three 24-oz jars marinara sauce
- 20 hoagie rolls
- 20 slices provolone
- Before the trip, thaw the meatballs in the refrigerator at home. The foodsafety.gov four steps name the refrigerator as the safest place to thaw food.
- Pack the thawed meatballs in sealed bags in the cooler at 40°F or below.
- At camp, heat the meatballs and marinara in a covered pot on the stove. Stir until the sauce reaches a rolling boil and the meatballs reach 165°F.
- Hold the pot hot at 140°F or above, the hot-holding limit in FDA outdoor food guidance. Check it with a thermometer.
- Split the rolls. Add meatballs and sauce, then a slice of provolone.
A slow cooker can serve as a hot-holding pot, but only after the food is already hot. Confirm 140°F or above with a thermometer. Arithmetic check: 5 lb is 80 oz, and 80 / 20 = 4 oz of meatballs per sub.
Meal 5: Freezer-block chili
Serves 20 as designed.
- 5 lb ground beef
- 2 large onions, diced
- 4 garlic cloves, minced
- Three 15-oz cans kidney beans, drained
- One 28-oz can crushed tomatoes
- One 15-oz can tomato sauce
- 1/4 cup chili powder, 2 tbsp ground cumin and 2 tsp salt
- At home, brown the beef with the onion and garlic until the beef reaches 160°F. Drain the fat.
- Add the beans, tomatoes, tomato sauce and spices. Simmer until thick.
- Cool the chili fast in shallow containers.
- Freeze it in a rigid rectangular container with a lid that fits your cooler. Two smaller containers also work.
- Pack the frozen block in the food cooler, where it works as a cold source.
- At camp, move the block straight from the cooler to a pot. Add 1/2 cup water and cover.
- Heat over low, stirring as it softens, until the chili reaches a rolling boil. Never thaw the block on a table.
Arithmetic check: 5 lb is 80 oz, and 80 / 20 = 4 oz raw beef per serving.
Meal 6: Make-ahead spaghetti meat sauce
Makes 20 servings as designed.
- 3 lb ground beef
- 1 large onion, diced
- 4 garlic cloves, minced
- Three 24-oz jars marinara sauce
- 3 lb dry spaghetti
- Salt for the pasta water
- 1 cup grated Parmesan
- At home, cook the beef with the onion and garlic until the beef reaches 160°F. Drain it and stir in the marinara.
- Cool the sauce fast in shallow containers. Freeze it in rigid containers.
- At camp, heat the sauce from frozen in a covered pot until it reaches a rolling boil.
- Cook the spaghetti in batches in a large pot of salted, boiling water. Drain it.
- With two burners, run the sauce and the pasta at the same time. With one burner, cook the pasta first, drain and cover it, then bring the sauce to a rolling boil. Serve the pasta within 2 hours of draining, or 1 hour above 90°F, per the FDA.
- Toss or ladle the sauce over the pasta. Top with Parmesan.
Arithmetic check: 3 lb of dry pasta is 48 oz, and 48 / 20 = 2.4 oz dry pasta per serving.
Meal 7: Sausage, potato and pepper foil packets
Makes 20 packets as designed.
- 3 lb Italian pork sausage links
- 4 lb baby potatoes, halved
- 4 bell peppers, cut in strips
- 2 onions, sliced
- 1/4 cup olive oil
- 2 tsp salt, 2 tsp Italian seasoning and 1 tsp black pepper
- 20 sheets heavy-duty foil
- At home, cook the sausage to 160°F, checked with a food thermometer. Chill it, then slice it.
- Par-boil the potatoes until just tender. Chill them.
- Pack the sausage, potatoes, peppers and onions in separate sealed bags in the cooler.
- At camp, toss the vegetables with the oil and seasoning. Divide them across the 20 foil sheets.
- Top each pile with sausage. Fold the foil and seal the edges tight.
- Heat the packets on the grate over coals until the sausage reaches 165°F. Open several packets to check with a thermometer.
Vegetarian swap: fill separate packets with mushrooms and extra potatoes. Assemble them first with clean utensils and a clean cutting board. Arithmetic check: 3 lb of sausage is 48 oz, and 48 / 20 = 2.4 oz per packet.
Meal 8: Pulled pork sandwiches, cooked at home
Makes 20 sandwiches as designed.
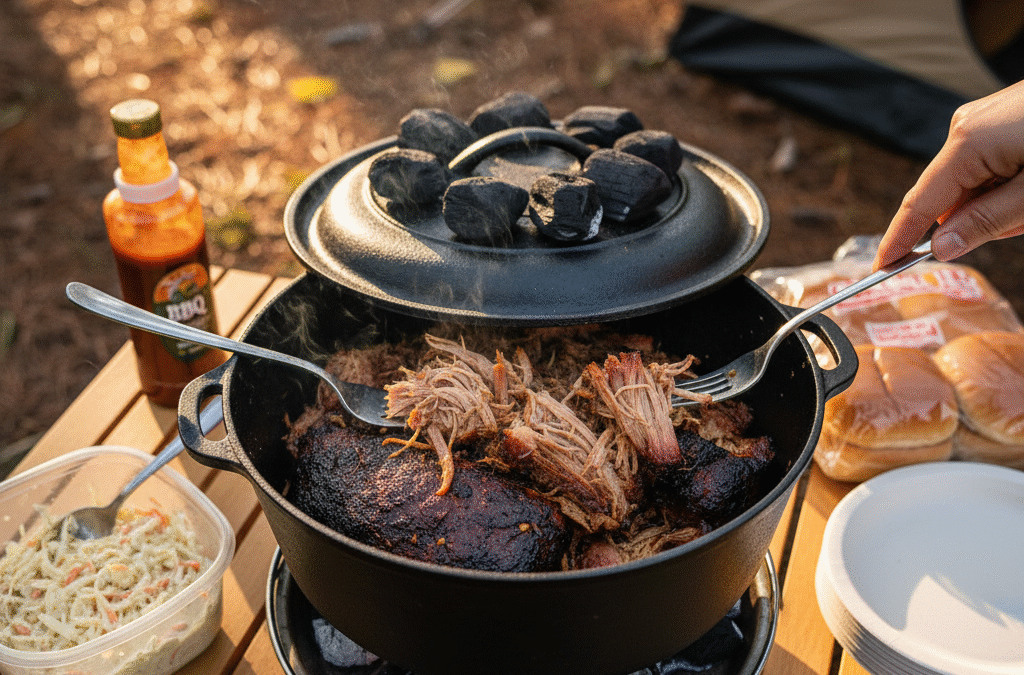
- 8 lb boneless pork shoulder
- 2 tbsp brown sugar, 1 tbsp paprika, 2 tsp salt and 1 tsp garlic powder
- 3 cups barbecue sauce
- 20 sandwich buns
- At home, rub the pork with the sugar and spices.
- Cook it in an oven or slow cooker past the 145°F minimum, with a 3-minute rest, until it shreds easily.
- Shred the pork. Cool it fast in shallow pans.
- Freeze it flat in gallon freezer bags.
- At camp, reheat the pork with the sauce in a pot or Dutch oven until it reaches 165°F. Over coals, use bottom heat only, which Lodge recommends for stewing.
- Pile the pork on the buns.
Scaling: for 15 people, 15 / 20 = 0.75, so 8 x 0.75 = 6 lb of pork shoulder.
Meal 9: Dutch oven mac and cheese
Makes 16 servings as designed. Bakes in one 12-inch Dutch oven.
- 2 lb elbow pasta
- 1.5 lb shredded cheddar
- 3 cups milk or cream, kept cold
- 4 tbsp butter
- 1 tsp salt, 1/2 tsp black pepper and 1 tsp dry mustard
- At home, cook the pasta just short of done. Drain it, cool it fast in a shallow container and chill it.
- At camp, grease the Dutch oven. Add the pasta, cheese, cold milk, butter and seasoning. Stir.
- Bake with more coals on the lid than below, per Lodge. Stir once partway through.
- The dish is done when the center reads 165°F, the casserole minimum on the foodsafety.gov chart.
Scaling for 20: 20 / 16 = 1.25. That gives 2 x 1.25 = 2.5 lb pasta, 1.5 x 1.25 = 1.875 lb cheese and 3 x 1.25 = 3.75 cups milk. Split the batch across two ovens if one is too full.
Dessert from the Dutch oven
A canned-fruit cobbler bakes in a 12-inch Dutch oven with most coals on the lid. Lodge’s camp Dutch oven coal guide says baking needs more heat from the lid than from below. This dessert works only where the current fire order allows charcoal. Check that before you pack briquettes. Starting coal counts are in the next section.
Meal 10: Dutch oven peach cobbler
Makes 16 to 20 servings as designed. Bakes in one 12-inch Dutch oven.
- Two 29-oz cans sliced peaches, with juice
- One 15.25-oz box yellow cake mix
- 1 stick (1/2 cup) butter, cut in thin pats
- 1 tsp ground cinnamon
- Heavy-duty foil or parchment to line the oven
- Line the Dutch oven with foil or parchment.
- Pour in the peaches and their juice.
- Sprinkle the dry cake mix evenly over the fruit. Do not stir.
- Lay the butter pats across the top. Dust with cinnamon.
- Cover and bake with most of the coals on the lid. Rotate the oven and lid every 10 to 15 minutes, per the Lodge guide.
- The cobbler is done when the top is golden and the fruit bubbles at the edges.
Arithmetic check: two 29-oz cans hold 58 oz of fruit. That is 58 / 20 = 2.9 oz per serving for 20, or 58 / 16 = about 3.6 oz for 16.
Dutch oven coals, fire orders and stove safety
For about 325°F, a 12-inch Dutch oven starts with 24 briquettes: 16 on the lid and 8 underneath. That count comes from the Missouri Department of Conservation’s Dutch oven guide. Its rule is to double the oven’s diameter in inches, then put about two-thirds of the briquettes on top and one-third below. To change the heat by 25°F, the guide says to add or remove two briquettes, so about 350°F takes 26. If a recipe will not fit in your Dutch oven with room under the lid, split it across two ovens or pans. Treat the count as a starting point, not a fixed setting. Above 3,000 feet, Lodge says to expect longer cook times.
Lodge coal guidance for camp Dutch ovens:
- Light briquettes 15 to 20 minutes before use.
- For baking, put more coals on the lid than below.
- For roasting, use equal coals on top and bottom.
- For stewing, boiling and frying, use bottom heat only.
- Every 10 to 15 minutes, turn the oven a quarter turn and the lid a quarter turn the other way.
- To change the heat, add or remove coals on top and bottom in proportion.
Follow basic charcoal safety. Never add lighter fluid to hot coals. Keep water ready. Do not set up over dry grass or leaves. Put coals out completely with plenty of water.
Check the fire order first
Stage 1 fire restrictions can bar charcoal outside agency fire rings while still allowing gas stoves. Here is one dated example. The U.S. Forest Service Stage 1 order for the Minidoka Ranger District of the Sawtooth National Forest ran from July 1 to Oct. 31, 2026. It barred wood, charcoal or briquette fires anywhere except in a permanent metal or concrete fire pit or grate that the Forest Service installed at its developed recreation sites. Outside those sites, it allowed stoves and grills with a shut-off valve fueled only by liquid petroleum or liquid petroleum gas, where flammable material was cleared within 3 feet.
That order has ended. Check the current order with the agency that manages your campground before your trip.
Where fires are allowed, use established fire rings or fire pans and put fires out completely, per the National Park Service (NPS) Leave No Trace principles.
Rain plan without carbon monoxide
When rain moves cooking under cover, keep every fuel-burning cooker outside. The Centers for Disease Control and Prevention (CDC) carbon monoxide guidance says never to burn charcoal indoors. The CDC also states, “Never use a portable gas camp stove indoors.” An RV or a tent is an enclosed space. Keep a generator more than 20 feet from windows, doors and vents, per the CDC.
For detectors, extinguishers and other rig precautions, see this guide to RV fire safety and prevention.
Handwashing, dishes and leftovers without running water
Without running water, wash hands with water from a jug, soap and paper towels. The FDA outdoor eating guide lists a water jug, soap and paper towels, or moist towelettes. The CDC hand sanitizer page says soap and water work better than sanitizer. Sanitizer is a fallback that needs at least 60% alcohol. It also works less well on visibly dirty or greasy hands.
Scrub with soap and water for at least 20 seconds, per the FSIS camping food safety guide. When water is short, FSIS says sanitizer or wipes can clean utensils and surfaces. Bring potable water for cleanup. Learn how to carry and store water for washing up.
Dishes
- Do not put cooked food on a plate or utensil that held raw meat until it is washed in hot, soapy water, per the FDA.
- Carry dishwater at least 200 feet from streams and lakes, per the NPS Leave No Trace principles.
- Use a small amount of biodegradable soap. Strain the water and scatter it.
- Pack out food scraps from the strainer.
- Store food and trash securely, and never feed wildlife, per the NPS.
- Follow your campground’s rules where they differ.
Check where to dispose of food waste and trash before you leave home.
Leftovers
Put leftovers in shallow containers and into the cooler within 2 hours, or 1 hour above 90°F, per the FSIS leftovers guidance. FSIS says refrigerated leftovers keep 3 to 4 days. In a cooler, that holds only while it stays at 40°F or below. Leftovers are safe only while the cooler still has ice, per the FSIS camping guide. If the ice is gone, throw them out.
For the full end-of-trip routine, use this campsite setup and cleanup checklist.
Frequently asked questions
What are the easiest meals to cook while camping for a big group?
The simplest group meals use protein cooked and frozen at home, then reheated at camp. Walking tacos, freezer-block chili, meatball subs and pulled pork all follow that pattern. Reheat each precooked protein to 165°F, checked with a food thermometer, per the FSIS leftovers page. Bring sauces and chili to a rolling boil.
How do you meal prep for camping?
Cook each protein at home to its safe minimum temperature. Cool it fast in shallow containers, as FSIS leftovers guidance advises, then freeze it flat in bags or rigid containers. Pack the cooler in reverse order of use, so the first meal sits on top. Label each bag with the meal name and serving count.
How do you pack a cooler for camping?
Use block ice, since FSIS camping guidance says it lasts longer than cubes. Fill the cooler with cold or frozen food and put drinks in a separate cooler. Double-wrap raw meat and pack it below ready-to-eat food. Keep the food cooler shaded and at 40°F or below, per FDA outdoor guidance.
How long can food sit out at a campsite?
Perishable food can sit out for no more than 2 hours. Above 90°F, the limit drops to 1 hour. Both limits come from FDA guidance for eating outdoors. After that, throw the food out. Put leftovers back in the cooler before the limit runs out, and serve hot food at 140°F or above.
How do you wash dishes while camping?
Wash anything that held raw meat in hot, soapy water before it touches cooked food, per FDA outdoor guidance. Carry dishwater at least 200 feet from streams and lakes, per the NPS Leave No Trace principles. Use a small amount of biodegradable soap, strain the water and scatter it. Pack out food scraps and follow campground rules.
How many charcoal briquettes does a 12-inch Dutch oven need?
For about 325°F, start with 16 briquettes on the lid and 8 underneath, per the Missouri Department of Conservation. Add two briquettes for each extra 25°F. The count is a starting point. Lodge advises rotating the oven and lid every 10 to 15 minutes. Fire orders change. Check the current order before departure. This answer was checked Nov. 15, 2026.
Before you leave home
- Pick the meals and scale each recipe to your headcount with the arithmetic above.
- Cook, cool and freeze the proteins and sauces at home.
- Pack a food thermometer and an appliance thermometer for the cooler.
- Pack the coolers in reverse order of use, with drinks in their own cooler.
- Call or check the website of the agency that manages your campground for the current fire order. If charcoal is barred, swap the Dutch oven meals for stove meals before you shop.
Sources
- Centers for Disease Control and Prevention. Carbon monoxide basics page. Updated Oct. 26, 2026. Accessed Nov. 15, 2026.
- Centers for Disease Control and Prevention. Hand sanitizer guidance page. Updated Jan. 18, 2024. Accessed Nov. 15, 2026.
- foodsafety.gov. Four steps to food safety. Updated Sept. 18, 2023. Accessed Nov. 15, 2026.
- foodsafety.gov. Safe minimum internal temperature chart. Last reviewed Nov. 21, 2024. Accessed Nov. 15, 2026.
- Lodge Cast Iron. Camp Dutch oven coal guidance. Posted July 29, 2021. Accessed Nov. 15, 2026.
- National Park Service. Leave No Trace seven principles. Updated June 16, 2022. Accessed Nov. 15, 2026.
- Missouri Department of Conservation. Dutch Oven Cooking 101, by Jim Low. Missouri Conservationist, June 2009. Accessed Nov. 15, 2026.
- U.S. Department of Agriculture, Food Safety and Inspection Service. Food safety while hiking and camping. Updated June 4, 2024. Accessed Nov. 15, 2026.
- U.S. Department of Agriculture, Food Safety and Inspection Service. Leftovers and food safety. Updated July 31, 2020. Accessed Nov. 15, 2026.
- U.S. Department of Agriculture, Food Safety and Inspection Service. Shell Eggs from Farm to Table. Updated Nov. 20, 2024. Accessed Nov. 15, 2026.
- U.S. Food and Drug Administration. Handling Food Safely While Eating Outdoors. Content current as of March 5, 2024. Accessed Nov. 15, 2026.
- U.S. Forest Service, Sawtooth National Forest. News release on Stage 1 fire restrictions. Released June 30, 2026. Accessed Nov. 15, 2026.
- University of Minnesota Extension. Planning the quantity for a food occasion. Reviewed 2021. Accessed Nov. 15, 2026.
Land access, permits, road conditions, and site availability change. Verify all information with the relevant land management agency before your trip.
About the author
Chuck Price has 35+ years of RV camping experience and travels in a 2018 Hymer Aktiv Class B.


