Good Sam vs Harvest Hosts vs RV Overnights: 2026 Cost Comparison
Good Sam vs Harvest Hosts vs RV Overnights: 2026 Cost Comparison
The math behind Good Sam, Harvest Hosts, and RV Overnights. No fluff. Just current pricing, break-even logic, route fit, and where each option actually saves money.
Estimated read time: 11 minutes | Updated: May 23, 2026 | Data verified: May 23, 2026
Quick Reference
Use this as the fast answer before the math.
- Best for repeat paid campgrounds: Good Sam Standard
- Best for unique one-night stops: Harvest Hosts Classic
- Cheapest host-style membership: RV Overnights
- Hardest to value cleanly: Good Sam Elite, because the public Overnight Stays network size is still not clearly disclosed
- Best money-saving default for some travelers: no membership at all
What this does not cover: roadside assistance, fuel rewards, credit card rewards, insurance, or campground loyalty programs outside these memberships.
Executive Summary
Good Sam Standard is still the cleanest value play for paid campground stays.
Good Sam Standard works when you regularly stay at participating campgrounds and can use the 10 percent discount enough times to recover the $39 annual fee.
Good Sam Elite is harder to justify on membership math alone. It costs $149, includes Standard benefits, and adds perks such as Overnight Stays, but the public host-network value is not as transparent as the campground discount.
Harvest Hosts still wins on experience and public network depth. It is not automatically the cheapest choice once host purchases and one-night stays enter the math.
RV Overnights remains the lowest-cost host-style program in this comparison, but its smaller network makes route fit the deciding factor.
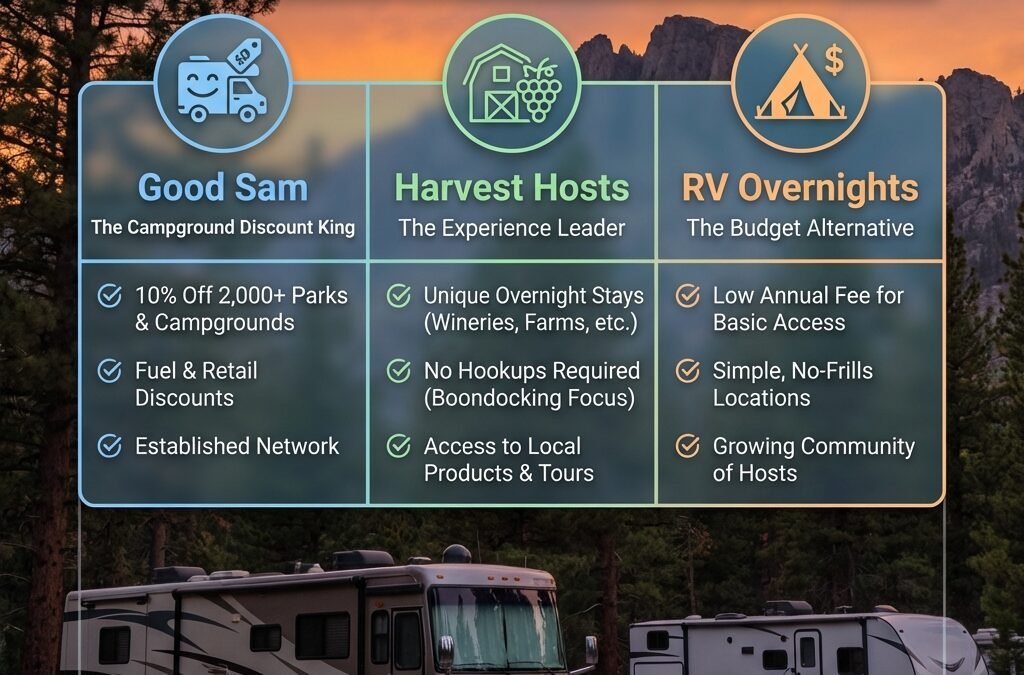
2026 Membership Snapshot
Prices change, so treat this table as a decision snapshot.
Pricing note: Prices below were checked on May 23, 2026. Verify current pricing, renewal terms, taxes, and promotions at each program site before purchasing.
| Program | Public Price on May 23, 2026 | What It Does Best | Transparency Notes |
|---|---|---|---|
| Good Sam Standard | $39/year | 10% discount at participating Good Sam campgrounds | Easy to model. Official page also lists renewal and benefit restrictions. Check Good Sam pricing. |
| Good Sam Elite | $149/year | Standard benefits plus Overnight Stays and other Elite perks | The membership page lists Overnight Stays as an Elite benefit, but does not clearly publish a public host count. Review Elite benefits. |
| Harvest Hosts Classic | $99/year base price; $69.30 displayed sale price at update time | Unique one-night host experiences | Strongest experience-driven option. Host spending varies by traveler and host type. Check Harvest Hosts plans. |
| Harvest Hosts All Access | $179/year base price; $125.30 displayed sale price at update time | Largest combined Harvest Hosts ecosystem | The public page showed more than 9,000 locations, with slightly different totals in different page areas. |
| RV Overnights | $49.99/year regular price | Budget-friendly host-style overnight stops | Public pages list roughly 1,450 to 1,500+ host locations, depending on the page. Members should expect to support hosts with purchases. Check RV Overnights pricing. |
Not eligible for a clean comparison: one-off coupons, legacy prices, credit card point value, campground-specific exclusions, and temporary checkout offers that disappear without notice.
The core mistake is buying the wrong membership for the wrong job. Good Sam, Harvest Hosts, and RV Overnights are not interchangeable. They overlap more than they used to, but they still solve different problems.
If you want to reduce regular paid campground costs, Good Sam Standard is usually the cleanest answer. If you want memorable one-night stops at wineries, farms, breweries, and similar places, Harvest Hosts still owns that lane. If you want the lowest-cost host-style membership, RV Overnights is the budget play. If you want everything bundled under Good Sam, Elite costs enough that the value case needs more scrutiny.
For more context on the broader camping decision, start with the Boondock or Bust boondocking guide, then use this page to decide whether a paid membership should be part of your actual travel system.

The Simple Math: Break-Even by Use Case
Before comparing perks, force each membership through a math filter.
Assumptions Used in the Examples Below
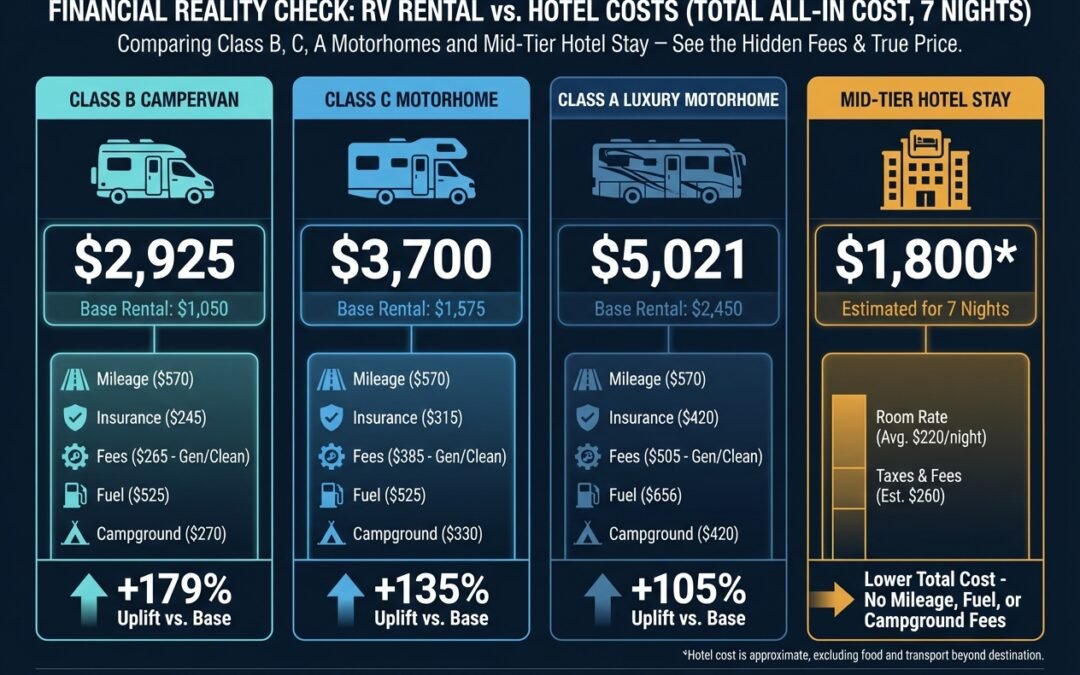
- Good Sam Standard uses a $60/night participating campground example.
- Host-program comparisons use an $80/night commercial campground as the benchmark alternative.
- Harvest Hosts examples assume a $30 host purchase for the base calculation, but actual spending varies.
- RV Overnights examples use the platform’s public expectation that members should plan to spend at least $30 per host location.
- All break-even examples are illustrative. Adjust them for your actual nightly rates, routes, and buying habits.
| Membership | Annual Fee Used | Useful Math | Practical Takeaway |
|---|---|---|---|
| Good Sam Standard | $39 | 10% off a $60 site saves $6 per night. $39 divided by $6 = 6.5 nights. At $40/night, the payback is about 10 stays. At $100/night, it is about 4 stays. | If you use participating campgrounds 7 or more nights at around $60/night, this can be an easy win. |
| Good Sam Elite | $149 | Elite costs $110 more than Standard. It also includes Standard’s 10% campground discount, so campground savings may offset part of the premium before Overnight Stays are considered. | Do not buy Elite just for the label. Buy it only if you will use the added perks enough to justify the $110 premium over Standard. |
| Harvest Hosts Classic | $99 base price | If your alternative is an $80 campground and you spend $30 supporting the host, implied savings is about $50 per stop. $99 divided by $50 = about 2 stays. If your average host spend is $50, payback rises to about 3.3 stays. | Works best when you value the stop itself, not just the cheapest possible overnight. |
| Harvest Hosts All Access | $179 base price | Using the same $50 implied savings, $179 divided by $50 = 3.58 stays, so call it about 3.5 to 4 stays before it pays off. | Better for heavier users who want the broadest combined network. |
| RV Overnights | $49.99 | If your alternative is an $80 campground and you spend the platform’s stated $30 minimum at the host, implied savings is about $50 per stop. $49.99 divided by $50 = about 1 stay. | Fastest payback on paper, but only if the smaller network fits your routes. |
Override: If your real alternative is free public-land camping or a low-cost state park, the savings case gets weaker for every paid membership.
What Each Membership Is Actually Good At
Each program works best when matched to the right job.
Job #1: Lower the cost of multi-night paid campground stays
Best choice: Good Sam Standard
This is the cleanest fit. It is inexpensive, easy to understand, and built around a straightforward campground discount. If that is the job, you do not need a more complex host-style membership.
Job #2: Find interesting one-night stops on a road trip
Best choice: Harvest Hosts Classic or RV Overnights
Choose Harvest Hosts if you want the broader unique-host ecosystem. Choose RV Overnights if you want the cheaper host-style membership and can live with a smaller public network.
Job #3: Get the broadest host-based inventory
Best choice: Harvest Hosts All Access
This is the wide-net option. It is not the cheapest, but it is the most comprehensive host-style package in this comparison.
Job #4: Minimize all accommodation costs
Best choice: often no membership at all
If you already rely on cheaper public camping, state parks, or selective pay-as-you-go booking, forcing yourself into a membership can increase cost and reduce flexibility.
Not covered here: whether a specific host is worth a detour. That depends on your route, arrival time, rig size, and what you actually want to do that night.
The Good Sam Elite Problem
Good Sam Elite is now a real spending decision.
The issue is not that Elite lacks perks. The official Good Sam page lists Elite at $149/year and says it includes all Standard benefits plus Overnight Stays and other perks. The problem is transparency. The 10 percent campground discount is easy to model. Overnight Stays is harder because the public membership page does not clearly show a total host-network count.
That matters because the practical premium is $110 over Standard. If you already use Good Sam campgrounds, Elite still gives you the Standard discount. But that discount alone does not explain why you should pay the extra $110. The added perks need to do real work.
Reality check: Do not compare Elite against no membership. Compare Elite against Standard first. The real question is whether the extra $110 buys benefits you will use.
Who should skip it: travelers who only want a campground discount, rarely use Good Sam campgrounds, or need clear host-network density before buying.
The Harvest Hosts Trade-off
Harvest Hosts wins when the stop is part of the trip.
Harvest Hosts is still the strongest choice if the goal is not just sleep, but a good stop. Its public plans page shows a much larger host ecosystem than RV Overnights, and the All Access package rolls several location types into one broader membership.
The trade-off is cost behavior. Harvest Hosts does not work like a campground fee. You may not pay a site fee at the host, but you are expected to support the business. If you spend $30, the math can look strong. If you spend $50 or more at wineries, breweries, farms, or attractions, your true savings fall.
That is not a knock against Harvest Hosts. It is the point of the program. It is best for travelers who want a more interesting overnight, not for travelers trying to spend the absolute least possible.
Who should skip it: travelers who want hookups, multi-night destination camping, no-purchase parking, or the cheapest possible overnight every time.
The RV Overnights Trade-off
RV Overnights is easier to model than Good Sam Elite.
The pricing is clearer, the regular membership is lower, and the platform publicly tells members to expect a minimum $30 spend per host location. That makes the true-cost conversation more honest.
The catch is density. RV Overnights public pages showed about 1,450 to 1,500+ host locations at the time of this update. That can be plenty if the locations match your route. It can be useless if they do not.
For a deeper look at member feedback, complaints, and platform fit, read the RV Overnights reviews and complaints analysis.
Best use case: budget-conscious travelers who want host-style stops, can plan ahead, and do not need the broadest national coverage.
Who should skip it: travelers who need maximum route density, reliable same-day options everywhere, or campground-style amenities.
Midpoint Reality Check
The cheapest membership is not always the cheapest trip.
A $49.99 membership can still be a waste if it sends you off route. A $179 membership can still make sense if you use it often and enjoy the stops. The right question is not which logo looks best. The right question is which product reduces your real trip cost or improves your trip enough to justify the fee.
When Stacking Memberships Makes Sense
Stacking can work when memberships do different jobs.
Stack That Makes Sense
Good Sam Standard + RV Overnights
This pairing works because one membership handles paid campground savings and the other handles lower-cost host-style transit stops. At regular pricing, the combined cost is $88.99 per year, which is still less than Good Sam Elite alone at $149.
Stack That Only Makes Sense for Heavy Users
Good Sam Standard + Harvest Hosts
This works if you actively want both destination campground discounts and the Harvest Hosts experience. It does not work if you are collecting overlapping memberships out of fear of missing out.
When not to stack: If your annual trip frequency is low, your routes do not overlap the networks, or you cannot explain how each membership will be used, a single membership or no membership is usually cheaper.
If the choice is specifically between RV Overnights and Harvest Hosts, use this separate RV Overnights vs Harvest Hosts decision guide before buying both.
The Decision Framework
Use this five-step filter before buying anything.
- Define the job. Are you trying to save money on campgrounds, find one-night stops, or buy experiences?
- Run the break-even math. If you cannot realistically hit the usage threshold, stop there.
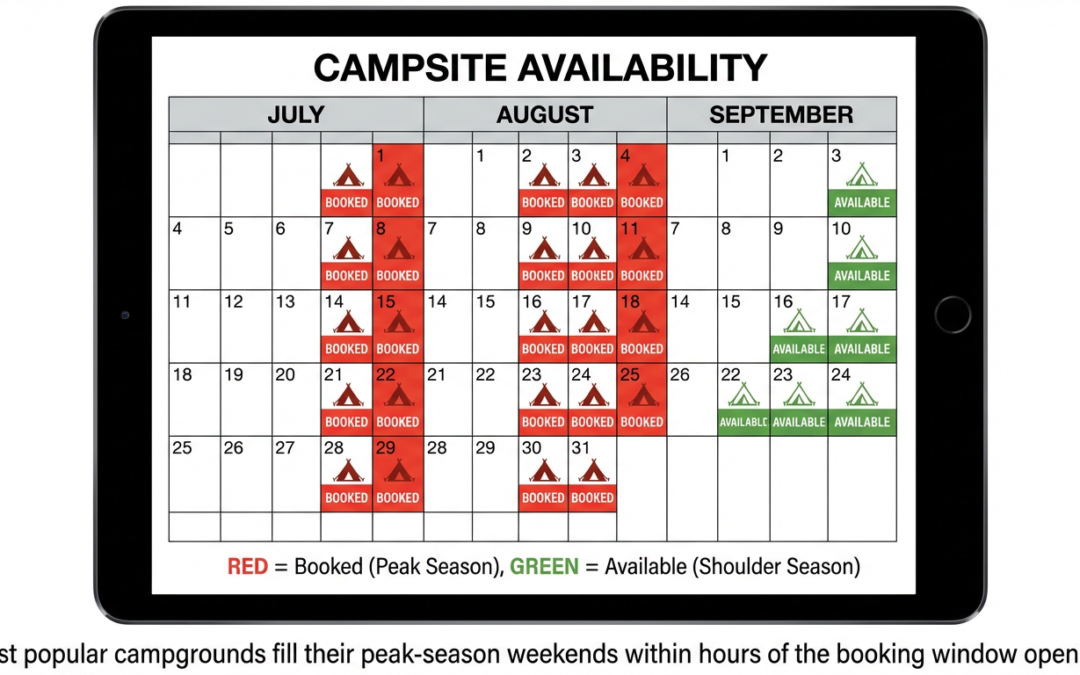
- Check route fit. Big national numbers mean little if the locations do not match your routes.
- Price the restrictions. One-night limits, booking friction, cancellation rules, host support expectations, and detours all have a cost.
- Compare against no membership. Always compare the paid option against doing nothing. For some trips, free RV parking options or low-cost public camping still win.
Decision rule: If you cannot explain exactly how a membership saves money or improves trip quality, you probably should not buy it.
Override: If a membership creates route detours, unwanted purchases, or booking stress, the paper savings do not matter.
Frequently Asked Questions
These are the practical questions that drive the purchase decision.
Is Good Sam membership worth it in 2026?
Good Sam Standard can be worth it if you regularly stay at participating Good Sam campgrounds. Using a $60 campground example, the 10 percent discount saves $6 per night, so the $39 annual fee breaks even at about 6.5 nights. At lower nightly rates, you need more stays.
Is Harvest Hosts worth the annual fee?
Harvest Hosts can be worth it if you value unique overnight stops and would otherwise pay commercial campground rates. It is weaker as a pure savings play if you usually camp on public land, use low-cost state parks, or spend heavily at host businesses.
What is the difference between Good Sam Standard and Elite?
Good Sam Standard is the lower-cost campground discount membership. Good Sam Elite includes Standard benefits and adds perks such as Overnight Stays, but the public membership page does not make the host-network value as easy to model as the 10 percent campground discount.
How much do you typically spend at Harvest Hosts?
Harvest Hosts does not use a normal campground fee model for host stays. Members are expected to support host businesses. Your true cost depends on what you buy, and that can change the break-even math quickly.
How does Good Sam Overnight Stays work?
Good Sam lists Overnight Stays as an Elite benefit. The public membership page describes it as exclusive to Elite members, but it does not clearly publish the same kind of host-count detail that Harvest Hosts and RV Overnights show on their public pages.
Which RV membership saves the most money?
There is no single winner. Good Sam Standard is usually the cleanest paid-campground discount tool. RV Overnights is the lowest-cost host-style membership in this comparison. Harvest Hosts is strongest for travelers who value the experience. No membership is still the cheapest option for some RVers.
Bottom Line
Buy the membership that matches your actual travel pattern.
For repeat paid campground stays, Good Sam Standard is still the easiest membership to justify on plain math. For experience-driven one-night stops, Harvest Hosts remains the strongest brand in this comparison. RV Overnights gives budget-conscious travelers a lower-cost host-style entry point, but only when the smaller network fits the route.
Good Sam Elite is the hardest to defend cleanly unless you know you will use the added perks. The price is real, and the public host-network transparency still lags.
Shortest answer: buy Good Sam Standard for campground savings, Harvest Hosts for experiences, RV Overnights for cheaper host-style stops, and nothing at all if your current system already works.
Related RV Membership Guides
Use these guides when you need a narrower answer.