
How to File an RV Insurance Claim Without Losing Your Mind
By Chuck & Cindy Price, Factual Analysis by Boondock or Bust
Executive Summary (TL;DR): An RV insurance claim is a formal request for compensation for a covered loss. The process is significantly more complex than a standard auto claim due to integrated living systems, specialized parts, and unique policy endorsements. While a typical auto claim for physical damage averages around $5,000 (Insurance Information Institute, 2024), RV claims often have a higher severity, with major repairs frequently exceeding $20,000 due to the vehicle’s dual nature as both transport and dwelling. Successfully navigating a claim requires a strategic approach to documentation, repair-shop vetting, and settlement negotiation to ensure fair compensation.
Why RV Claims Are Fundamentally Different from Auto Claims
The common assumption that an RV insurance claim is simply a variation of a car insurance claim is a critical misunderstanding that can lead to significant financial and logistical complications. From an insurer’s perspective, a recreational vehicle is a hybrid asset class with a risk profile that extends far beyond that of a typical passenger car. This distinction is the primary reason for the increased stringency and complexity of the claims process.
Unlike automobiles, RVs contain multiple, interconnected systems for plumbing, electricity (AC/DC), propane, and climate control. A seemingly minor collision can cause latent damage to these systems that may not be immediately apparent. For example, a rear-end collision could compromise holding tank integrity or damage sensitive electronics in the power control center. This complexity increases claim severity—the total cost of a single claim—and requires adjusters and technicians with specialized, cross-disciplinary knowledge (J.D. Power, 2024).
Furthermore, standard RV insurance policies include endorsements not found in auto policies, such as:
- Personal Effects Coverage: Covers personal belongings inside the RV, which are not covered by auto insurance.
- Emergency Expense Coverage: Provides funds for lodging and transportation if the RV becomes uninhabitable while on a trip.
- Full-Timer’s Liability: Essential for the more than one million Americans living in their RVs full-time, this provides liability protection similar to a homeowner’s policy for incidents that occur while the RV is parked (Recreation Vehicle Industry Association, 2023).
An insurance underwriter for a specialty vehicle firm noted, “We don’t just underwrite the vehicle; we underwrite the lifestyle. The loss potential from a water leak can be as damaging as a collision, and the liability exposure for a parked, occupied vehicle is entirely different. That elevated and varied risk is priced into the policy and reflected in how we must manage the claim.” This multi-faceted risk profile is why claimants must approach the process with a higher degree of diligence than they would for their car.
The Five Critical Phases of a Claim: A Strategic Framework
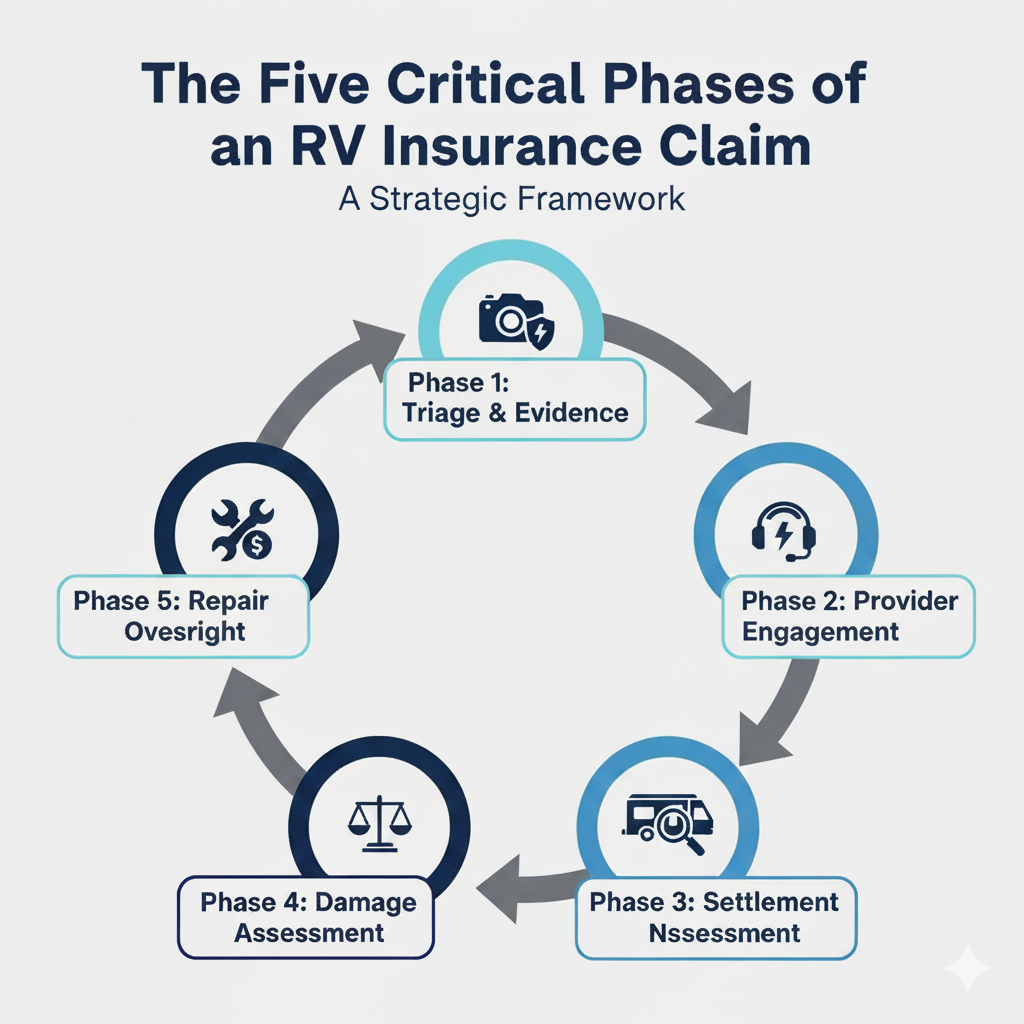
Viewing the claims process as a passive waiting game is a common mistake. A more effective approach is to manage it as a strategic project with five distinct phases. Each phase has a specific objective aimed at protecting the claimant’s interests and ensuring a fair, accurate settlement.
Phase 1: Triage & Evidence Collection (The First 48 Hours)
The primary objective of this phase is to create an undisputable record of the incident and the resulting damage. This goes beyond taking a few photos; it involves building a “digital evidence locker” that preemptively counters potential disputes over prior condition or cause of loss. Insurers may attempt to attribute damage to pre-existing wear and tear, but a robust evidence file makes such arguments difficult to sustain.
Your evidence collection should adhere to a quasi-forensic standard. Digital photographs and videos are considered “original” documents in legal and insurance proceedings, provided they are authentic and unaltered (Federal Rules of Evidence, 2024). Best practices include:
- Over-documentation: Take far more photos and videos than seem necessary, from wide, medium, and close-up angles. Capture damage from multiple perspectives.
- Contextual Shots: Photograph the surrounding scene, including any contributing factors (e.g., a fallen tree limb, a damaged campsite utility post).
- Time-stamping: Ensure your camera’s date and time are correct. The metadata in a digital file serves as a reliable time-stamp.
- Narrated Video: A continuous walk-around video in which you explain what you are seeing provides powerful context that static images cannot.
Phase 2: Provider Engagement & Adjuster Assignment
Once the scene is documented, the next step is to provide your insurer with a First Notice of Loss (FNOL). During this initial call, be factual and concise. Provide the date, time, location, and a general description of the incident. Avoid speculating on fault or the extent of the damage. The key objective is to formally initiate the claim and get a claim number.
It is crucial to understand the role of the adjuster assigned to your case, as they are not your personal advocate. An adjuster is a representative of the insurance company tasked with investigating and settling the claim according to the terms of the policy. While they have a duty to act in good faith, their primary responsibility is to the insurer. There are several types of adjusters you may encounter (International Risk Management Institute, 2025):
- Staff/Desk Adjuster: An employee of the insurance company who often handles claims remotely using photos and estimates.
- Field Adjuster: An employee who conducts in-person inspections of the damage.
- Independent Adjuster (IA): A third-party contractor hired by the insurer, often in areas with high claim volume or where the insurer has no local staff. Their duties and obligations are the same as a staff adjuster’s.
Understanding this dynamic challenges the common belief that the adjuster works for you. Their role is to be an impartial arbiter of the facts against the policy language. Your role is to provide them with the comprehensive evidence needed to justify the full value of your claim.
Phase 3: Damage Assessment & Repair Vetting
This phase is where many claims lose momentum and value. An insurer may provide a list of “preferred providers,” but you are typically not required to use them. The objective here is to select a repair facility based on expertise, not convenience. A critical error is choosing a standard auto body shop for complex RV repairs. Such facilities often lack the certified technicians and specialized equipment required to correctly diagnose and repair integrated RV systems.
The vetting process should prioritize qualifications. Look for a facility with technicians who are certified through the RV Technical Institute (RVTI), a program administered by the RV Industry Association (RVTI, 2025). This certification ensures the technician is trained in the specific standards and systems unique to recreational vehicles. A detailed, itemized estimate from a certified facility serves as your primary negotiation tool. It should clearly separate parts and labor costs and specify whether Original Equipment Manufacturer (OEM) or aftermarket parts will be used.
Phase 4: Settlement Negotiation
Accepting the insurer’s first settlement offer without scrutiny is a significant mistake. The initial offer is a starting point based on the adjuster’s assessment, which may be incomplete. Your objective is to achieve a settlement that fully covers the cost of a proper repair by a qualified facility. If the insurer’s offer is lower than your estimate, provide the adjuster with your detailed estimate and a logical explanation for the discrepancy. This is a data-driven business negotiation, not a confrontation.
Most state insurance regulations include a “Fair Claims Settlement Practices Act” or similar rules that require insurers to act in good faith and provide a reasonable explanation for any settlement offer (Texas Department of Insurance, 2025). If negotiations stall, your policy likely contains an “Appraisal Clause.” This provision allows you and the insurer to each hire an independent appraiser; the two appraisers then agree on a third, neutral appraiser (an umpire), and a decision from any two of the three is binding.
Phase 5: Repair Oversight & Final Payment
Once a settlement is agreed upon, the final phase involves managing the repair and payment process. Hidden damage is often discovered after work begins. When this occurs, the repair shop must stop work, document the new damage, and submit a “supplemental claim” to the insurer. Do not authorize additional work until the supplement is approved.
Upon completion, perform a thorough inspection of the repairs before making the final payment. The payment itself can be handled in several ways (Progressive, 2025):
- Direct Bill: The insurer pays the shop directly.
- Two-Party Check: The check is made out to both you and the repair shop, requiring both parties to endorse it. This is the most common method.
- Direct Payment to Claimant: If you paid for repairs out-of-pocket, the insurer may reimburse you directly.
A reputable RV repair shop manager advises, “Never sign a final work order until you have operated every system they touched—slides, jacks, water pump, appliances. A cosmetic repair is easy to see, but a functional repair is what keeps you safely on the road.”
Data-Driven Mistakes: Common Errors That Reduce Payouts
A strategic approach to claims includes knowing when not to file one. The conventional wisdom to “always file a claim because that’s what insurance is for” can be a long-term financial error. Insurers track claim frequency, and a history of small claims can lead to significant premium surcharges or even non-renewal of your policy. Actuarial data shows that claim frequency is a strong predictor of future losses, making policyholders with multiple small claims a higher risk (Forbes Advisor, 2024).
A sound financial analysis is necessary. Consider a scenario with a $1,000 deductible where the damage estimate is $1,500. The net payout from the insurer would be $500. However, a single at-fault claim can raise premiums by 30-50% for three to five years. If your annual premium is $2,000, a 40% surcharge ($800) for three years totals $2,400 in additional costs. In this case, accepting a $500 payout costs you a net $1,900. A general rule is to avoid filing claims for damage that is less than 150-200% of your deductible, though you should perform the calculation for your specific situation.
FAQ: Answering the Difficult Questions
- Can I make a diminished value claim for my RV?
- Diminished value—the loss in a vehicle’s resale value after an accident—is difficult to claim for RVs. Unlike cars, which have extensive resale data, RV values are highly variable. While some states like Georgia recognize third-party diminished value claims in specific cases, most insurers do not offer it for RVs, and it is rarely successful without litigation (Georgia Office of Commissioner of Insurance, 2025).
- Can I demand the shop use Original Equipment Manufacturer (OEM) parts?
- Most policies allow the insurer to specify the use of aftermarket or reconditioned parts of like kind and quality. You can request OEM parts, but if they cost more than the insurer’s approved alternative, you may have to pay the difference. For safety-critical components, the argument for OEM parts is stronger.
- When should I consider hiring a Public Adjuster?
- A Public Adjuster is a state-licensed professional you hire to manage your claim and negotiate with the insurer on your behalf. They work for you, not the insurance company. According to the National Association of Public Insurance Adjusters, they are most effective in large, complex claims (e.g., a fire or rollover) where the scope of damage is extensive and valuation is difficult. They typically charge a percentage of the final settlement (NAPIA, 2025).
Conclusion: Shifting from a Reactive to a Proactive Stance
Successfully managing an RV insurance claim is not a matter of luck; it is the result of a deliberate, proactive strategy. By understanding the fundamental differences in how RVs are insured and assessed, and by treating the claim as a five-phase project, owners can shift from a position of passive hope to one of active control. The most critical element of this strategy begins before an incident ever occurs.
The single most effective action an RV owner can take is to create and maintain a comprehensive, time-stamped visual record of their vehicle’s condition. A detailed set of photos and videos taken annually and after any major upgrades provides an indisputable baseline that neutralizes potential disputes over prior damage. This “pre-incident file” is your most powerful tool in ensuring you are made whole after a loss.
References
- Federal Rules of Evidence. (2024). Rule 1001. Definitions That Apply to This Article. Cornell Law School Legal Information Institute. Retrieved from https://www.law.cornell.edu/rules/fre/rule_1001
- Forbes Advisor. (2024). How Long Does An Accident Stay On Your Record? Retrieved from https://www.forbes.com/advisor/car-insurance/how-long-does-an-accident-stay-on-your-record/
- Georgia Office of Commissioner of Insurance. (2025). Auto Insurance Consumer Guide. Retrieved from https://oci.georgia.gov/consumers/auto-insurance
- Insurance Information Institute. (2024). Facts + Statistics: Auto insurance. Retrieved from https://www.iii.org/fact-statistic/facts-statistics-auto-insurance
- International Risk Management Institute. (2025). Insurance adjuster. IRMI Glossary. Retrieved from https://www.irmi.com/term/insurance-definitions/insurance-adjuster
- J.D. Power. (2024). How Much Does It Cost to Maintain an RV? Retrieved from https://www.jdpower.com/cars/shopping-guides/how-much-does-it-cost-to-maintain-an-rv
- National Association of Public Insurance Adjusters (NAPIA). (2025). What is a Public Adjuster? Retrieved from https://www.napia.com/what-is-a-pa
- Progressive. (2025). Claims FAQ. Retrieved from https://www.progressive.com/claims/faq/how-is-payment-handled-for-a-vehicle-damage-claim/
- Recreation Vehicle Industry Association. (2023). New RV Owner Demographics Are Younger, More Diverse, and Still Growing. Retrieved from https://www.rvia.org/news-insights/new-rv-owner-demographics-are-younger-more-diverse-and-still-growing
- RV Technical Institute (RVTI). (2025). Certification. Retrieved from https://www.rvti.org/certification
- Texas Department of Insurance. (2025). Unfair claim settlement practices. Retrieved from https://www.tdi.texas.gov/rules/index.html